 Please read Part One and Part Two.
Part 3: Azure Automation, Azure RunBooks, and Octopus Deploy
With just PowerShell and an Azure ARM template, we can kick off a deployment in just a few minutes. But there are still some manual steps involved – you still need to login to your Azure subscription, enter a command to create a new resource group, and enter another command to kick off a deployment. With the help of an Azure automation account and a platform called Octopus Deploy, we can automate this process even further to a point where it takes as little as three clicks to deploy your whole infrastructure!
A Quick Overview
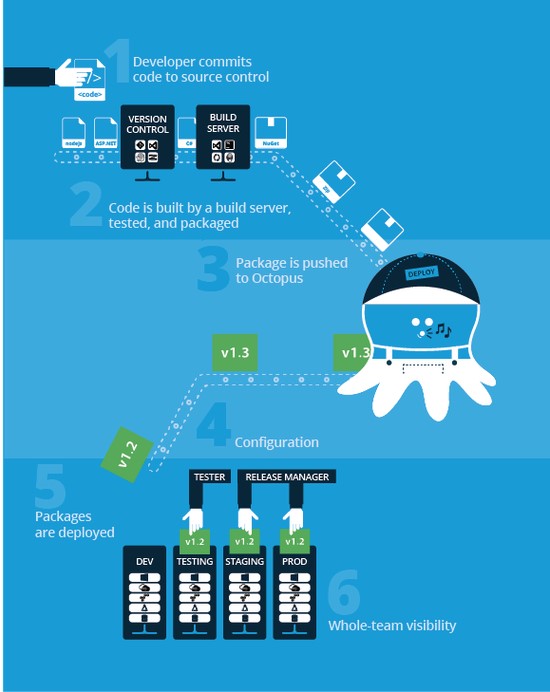
Before we go any further, let me give you a brief overview of the automation involved here and how the different pieces fit together. We’ll use the Octopus Deploy service as an abstraction layer to handle the different releases or versions of the infrastructure we are trying to create. This is really just a user-friendly interface that connects to a Runbook in an Azure Automation Account that kicks off our main deployment. You can think of a Runbook as just a PowerShell script that runs in Azure Portal to deploy the resources on a template stored within an Azure Storage Account.
This system helps us create a one-click deployment strategy that contains all the configuration for a specific release. For example, we could create single-click deployments for several different testing and production environments that utilize different deployment configurations.
You can use this script to deploy a resource group that contains an Automation Account, a Key Vault (to store admin usernames and passwords), a Storage Account to store your main and nested deployment templates, and necessary service principals for your Automation and Octopus Deploy Accounts.
In order to run the script above, you need to have the following scripts in the same directory:
- Script to create service principal for Azure Automation Account
- Script to create service principal for Octopus Deploy
Azure Automation and RunBooks
As I mentioned above, you can create an Azure Automation Account to help you streamline the deployment process within Azure Portal. There are plenty of different ways you can use an automation account, but for the sake of this post, we’ll focus on creating a Runbook to deploy our infrastructure. Check out this link for more information about Azure Automation Runbooks.
Check out this Runbook as an example of how to automate the steps in the previous section, along with a few other things. It does all of the following:
- Exposes necessary parameters related to the deployment in a parameter object (lines 6-25); we can pass parameters into this script like a resource group name or Azure subscription id
- Authenticates user with service principal for Azure Automation Account (lines 32-33)
- Creates resource group, if resource group name does not exist (lines 35-40)
- Removes any locks on a resource group, if it already existed in step 3 (lines 42-48)
- Creates storage account context and shared access tokens
- Pulls down and saves externally-hosted parameter file to local Runbook storage (lines 62-70)
- Adds shared access tokens as parameters to parameter file (lines 71-72)
- Deploys template specified in parameters object
- Reapplies any locks that were removed in step 4
Octopus Deploy
If you don’t have an Octopus Deploy account, you can utilize the 45-day free trial offering to mess around before committing to a subscription model.
There are a lot of different ways you can use Octopus Deploy, so it’s definitely worth checking out their documentation.
Follow these steps to deploy your infrastructure with Octopus Deploy:
- Login to Octopus Deploy; after logging in, you will be taken to your dashboard.
- Click the Environment tab and click “Add Environment.”
- Name your environment with a name of your choosing and click “Save” – this will function as a container that you can scope environment level variables and constants to.
- Click on the “Projects” tab and click “Add Project”
- Create a name and click “Save”. You will be taken to your project page.
- Click on the “Process” tab on the left and click “Add step” and select “run a script.”
- Enter a name for your script and check “octopus server” in the execution plan section.
- Select “source code” in the script source section.
- Enter your script in the text editor. Take note on how parameters are pulled from Octopus Deploy. We will be creating these variables in step 13.
- In the conditions section, select “Run for all applicable Lifecycle environments” and click “Save.”
- Within your project page, click on the “variables” tab on the left hand side of the page and add your environment level variables here. These variables will be the ones used by the script in step 11. Octopus Deploy also has a useful feature where you can create a library of environment variables to use for different projects. Make sure to scope your variables to the environment we created in step 3.
- After saving your variables, click on the “Settings” tab on the left hand side of your project page and configure your release settings as desired.
- Click “Create Release” on your project page and click “Save”. You will be taken to your release page.
- Finally, select and deploy to the environment we created in step 3.
Conclusion
Hopefully you can see the value of taking the time to set something like this up. Now, your deployments will be much closer to being error free, much more repeatable, and much faster. A continuous delivery pipeline, in conjunction with an automated deployment mechanism like this, can streamline the deployment of your codebase to several testing, staging, and production environments with a single push to your version control service.