


Azure API Management service has been around since 2014. AIS has been implementing solutions using Azure API Management for almost as long. I am working on a project that recently introduced new requirements that seemed like a good fit for API Management, so we looked into it. As a result, we decided to use Azure API Management and recently deployed it into production.
I want to share some of the considerations in making that decision and some of the implementation details. This won’t be a comprehensive case for all the reasons you might choose Azure API Management, but it will at the very least describe what is API management in Azure and one use case for you to help make your judgment.
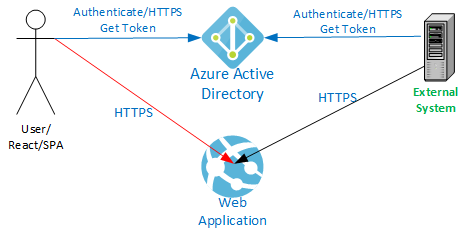
The application in question is a React-based Single Paged Application (SPA) hosted in an Azure App Service with an ASP.NET Core 3.1 Web API backend. The application uses Azure Active Directory (AAD) authentication.
The application previously exposed data to an external system via the same API built into the application called by the SPA from the client browser. The external system uses an AAD service principal with a client ID and secret for authentication. This external system polls the API approximately once per minute. It only reads data and receives JSON results.
We separated this external API into its own Azure App Service and now host it behind Azure API Management. Check out our Azure API management tutorial with screenshots to see how to implement.
Consideration for API Management
Several months ago, two other external systems that needed to receive data were proposed. They require the same information that the first external system is receiving. At least one of the new systems wants to receive XML instead of JSON. We are also sharing data with another system, via an Azure Storage account, which we want to convert to calling the same API as the others. This adds up to potentially four external systems accessing this API.
The existing API could have been used and would have required that all apps use AAD authentication. Each additional system is provided application identities and granted read-only access to the primary application. The API shared with the UI would have to be modified to support XML results. The UI changes regularly, and the original API is often altered to support it. These changes could be disruptive to the external data feed and require comprehensive testing of two different use cases in the same test stream.
Decoupling the API provided to the external systems from the API supporting the interactive UI makes sense. This doesn’t, by itself, necessitate the introduction of an API Management service. The primary reason we considered Azure API Management is the uncertainty in what the external systems are capable of. They may support only certain kinds of authentication methods or require unique changes to the data stream (like XML responses). Updating our API code to support this wide variety of use cases adds lines of code, complexity, and more testing requirements, all of which can affect reliability and deployment velocity.
By funneling traffic through an Azure API Management layer, we can support a wider variety of scenarios without touching the backend API code. If we encounter a new requirement, we might define a new API Management API based on the same backend application but apply different policies based on need. The backend remains unchanged and is tested by itself. The external facing API Management API is still tested, but that testing is focused on the specifics of the interface (authentication, response formatting, etc.), not the data retrieval portion.
Once we embarked upon the Azure API Management journey, we also realized we had a couple of additional use cases built into our application. We had geocoding and mapping implemented through client-side calls directly to third-party services. We needed to make some of these calls through a paid subscription that requires an API key that we need to protect. We were considering proxying these through our existing backend API, which would have been fine, but this would have meant more lines of code, more complexity, and more testing of the core application. These calls instead go into the Azure API Management Service and straight out to the third-party service. We get the added benefit that now this traffic is visible to us and logged in Log Analytics to monitor it. We probably wouldn’t have introduced Azure API Management just for this, but since we had decided to implement it, why not use it?
Another benefit of moving to the API Management approach involves the authentication choices offered to external systems. By moving away from AAD authentication, we eliminated the need to account for these users in our internal application, Role-Based Access Controls (RBAC). An AAD identity that is granted access to the application could allow the external system (or a compromised set of credentials) to access application functionality not intended for use by that external system. Eliminating this class of users from the Roles and Permissions matrix that the primary application must implement removes one more thing to implement and test. We must still be aware of authorization for these external systems, but that is implemented and tested entirely separately from the main application.
Moving to API Management doesn’t wholly eliminate code; it simply moves it out of the backend application code and into API Policy, another form of code. Because of the power of the available API Policies, the number of lines of code to be written was reduced. Another significant benefit of API Management is separating functionality into smaller, simpler, easier-to-test components, which sounds a little like a Micro Services architecture.
Costs
The additional Basic Tier API Management Service cost is roughly equivalent to the cost of our Standard App Service Plan (generally with two instances in production), roughly doubling our compute costs. This constitutes less than 20% of our overall environment cost after factoring in the other services we are using (App Gateway, Database, Bandwidth, etc.), equivalent to only a couple hours of labor per month.
Our application did not have the requirements to justify the utilization of higher-priced API Management performance tiers. Economies of scale and ease of implementation could translate into higher performance and lower cost of implementation that would justify the cost of the additional firepower. The bottom line is, as always, to evaluate all the potential costs and weigh them against the cost of doing it another way.
Architecture
Next, let’s explore the architectural changes. After adopting Azure API Management, the resulting changes to our architecture involved:
- Creating a new App Service to host the external API.
- Adding in the API Management service.
- Integrating our Application Gateway with the new API.
Network
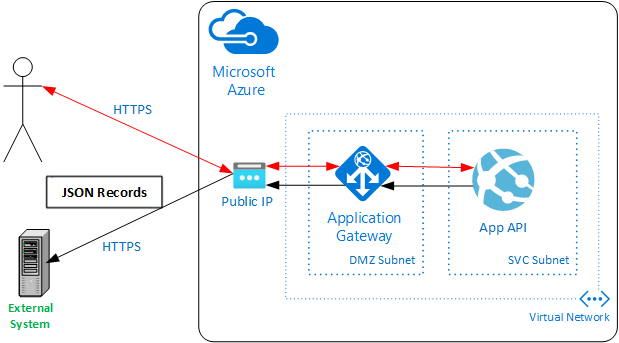
Our initial network architecture consisted of a Virtual Network with two subnets, a DMZ for the App Gateway, and an SVC subnet for our App Services. A single public IP is used for the App Gateway. CNAME records pointing to the DNS entry for this Public IP are registered with our DNS Provider.
Microsoft Network Security Guidance
Microsoft recommends integrating the API Management service with a Virtual Network (VNET) (See Microsoft’s Azure security baseline for API Management) to keep the backend traffic isolated and to allow control through Network Security Groups (NSGs).
VNET integration requires the Premium tier of the Azure API Management service. The Premium tier starts at $2,795/month (East US Region as of 3/29/2021). The Basic tier is $147/month (East US Region). The Basic Tier has a small cache and throughput starting at 1,000 requests/second at that price compared to 4,000 requests/second with Premium.
Microsoft also recommends placing a Web Application Firewall (WAF) in front of your API Management service. This can be done with or without a VNET integrated API Management service.
App Gateway
We already had an App Gateway with WAF enabled, so we placed our API Management service behind this gateway and forwarded the API traffic to the API Management service. This provides us the full power of the firewall without introducing anything new into the architecture or doubling our App Gateway costs. The throughput-based cost of the App Gateway may go up slightly, depending on traffic, but this is a small percentage of our overall costs.
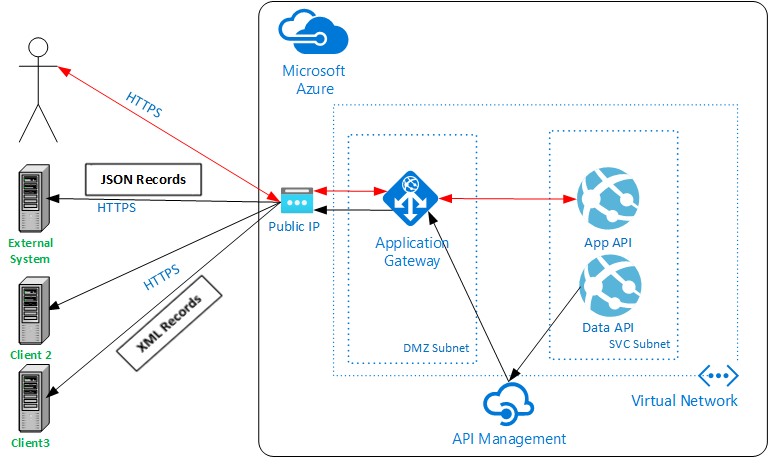
New Network Architecture
Our needs didn’t require the massive throughput or the high cost of a Premium API Management service, so we chose to go with the Basic tier and mitigate the Network security risks by locking down traffic between our components by other means.
The modified architecture now looks like this:
IP Restrictions
To ensure that our network traffic is locked down, we utilize IP restrictions to ensure that the only traffic accepted into our App Services comes from our API Management service. The Azure API Management Service only accepts inbound traffic from our App Gateway, and the external API only accepts requests from known external systems.
App Gateway to Azure API Management
We implemented an IP-filter API policy for the API Management service, supplying the Public IP(PIP) of the App Gateway as the only allowed inbound IP address. The PIP is stored in an API Management Named Value “gateway-pip”, which is referenced in the policy shown below.
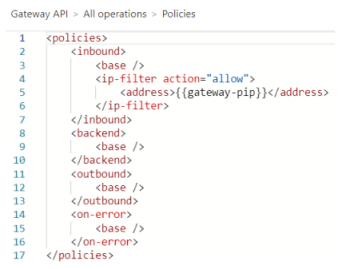
Azure API Management to Backend API
Our Azure App Services are integrated with the VNET, allowing inbound traffic from the App Gateway (the DMZ subnet) and denying all inbound traffic from the Internet. The API Management Service must also be allowed in. We do this by adding the Public IP of the API Management Service to the allowed IPs for each App Service that API Management needs to connect to.

External System Inbound Traffic
We don’t want to open our API to just anyone, so we want to limit inbound traffic to the API used by the external systems to the known inbound IP addresses for those systems. Since we’re sharing a single App Gateway with a single Public IP for our main application, we have to allow incoming HTTPS traffic on port 443 from the entire Internet. Our users are coming in from the Internet, and we don’t know their IP addresses. This prevents us from using Network Security Groups (NSG) since the same port is used for both kinds of traffic. The only way to restrict NSG would be to create a second App Gateway (with firewall) on a different Public IP. To deal with this, we implemented an inbound IP restriction for the true client at the API Management Layer, given our aversion to increased costs.
This is implemented with a set-header policy and some code as shown below. The actual client IP is passed from the App Gateway in the X-Forwarded-For header, which we then compare in C# code and combine with other API Policy primitives to decline traffic from non-approved addresses.
See Microsoft’s Azure API Management tutorial for how this is done.
Automated Deployment
In the spirit of modern DevSecOps practices, we use Azure DevOps Pipelines for our infrastructure and deployment of our application. These pipelines, templates, and scripts automatically provision and configure all aspects of the API Management feature, including:
- API Management Service
ARM Templates to deploy Service and APIs - API Policy Publishing
API Policies are kept in separate XML files
Policies published via a PowerShell script - App Gateway Listener
Add listener and routing rules - Secret Generation and Storage
Generate or retrieve required secrets and store them in a KeyVault - Network Security Groups
- IP Restrictions on App Services
API Management
Our Azure API Management service implementation involves a single API Management instance with several APIs. Each API answers a different path on the primary hostname for the API (/API/service1api, API/service2api, etc.). One API is for our primary data feed to the external systems, and another acts as a proxy for our geocoding service and another for our mapping provider. Since the mapping and geocoding APIs are called from the client SPA, they must be authenticated with Azure AD and authenticated the same way with the same token already acquired to talk to the primary Application API. Named Values are configured with various values to assist in our API policy implementations. Some of these are secrets that are directly bound to an Azure KeyVault secret.
Frontend Authentication
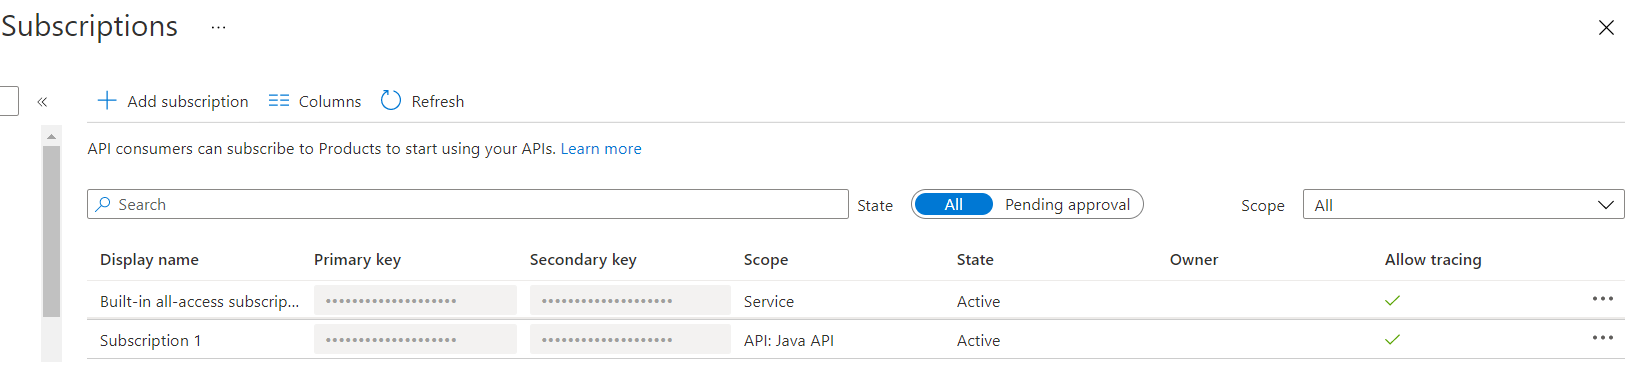
Authentication of the external system is handled in the API Management layer using built-in API Management Subscription Keys. We can create subscriptions, generate and revoke subscription keys and even provide external system engineers the ability to perform some self-service through the API Management Developer Portal. For now, we are not enabling the Developer Portal and are handling Subscription Key generation and Key dissemination ourselves.
The mapping and geocoding APIs use Azure AD authentication because it is end-user traffic coming from our SPA. Because we’re authenticating against the same Azure AD App Registration as the application API, the same tokens issued for the standard backend API can be used with calls to the API Management API. This made changing the existing calls relatively easy because we didn’t have also to introduce a new token retrieval component.
Subscription Key Authentication
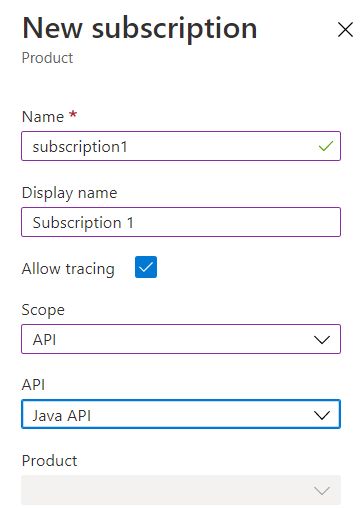
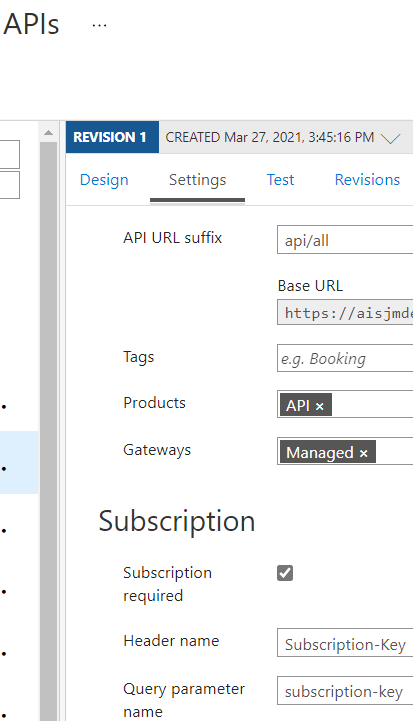
To utilize Subscription Key authentication, you need to create a Subscription, generate and share a Subscription Key, associate the Subscription with either a Product or an API, and then set “Requires Subscription” to true on the API.
Creating a Subscription
Requiring a Subscription
Azure AD Authentication
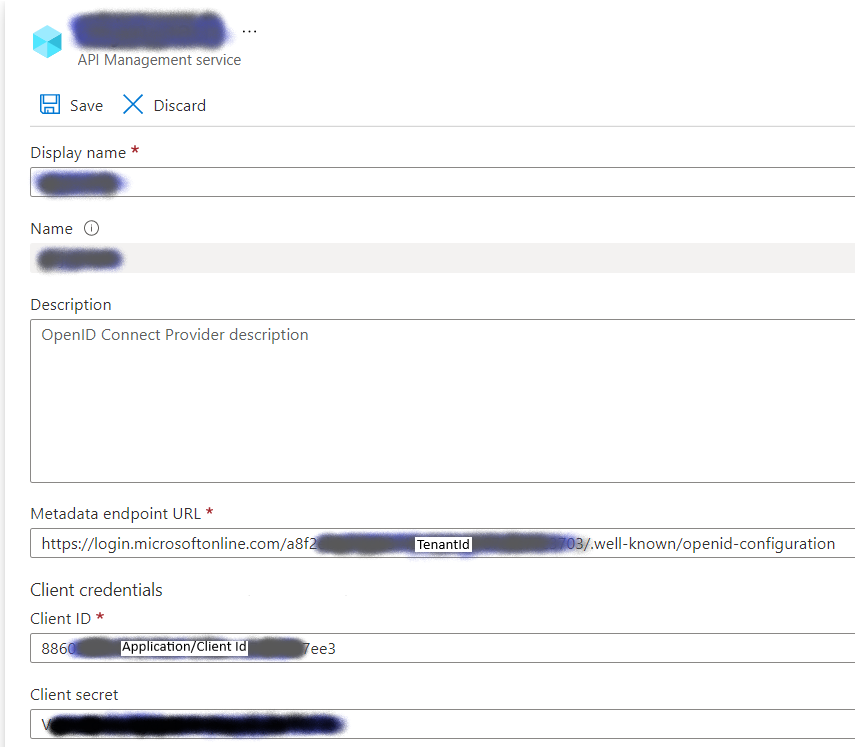
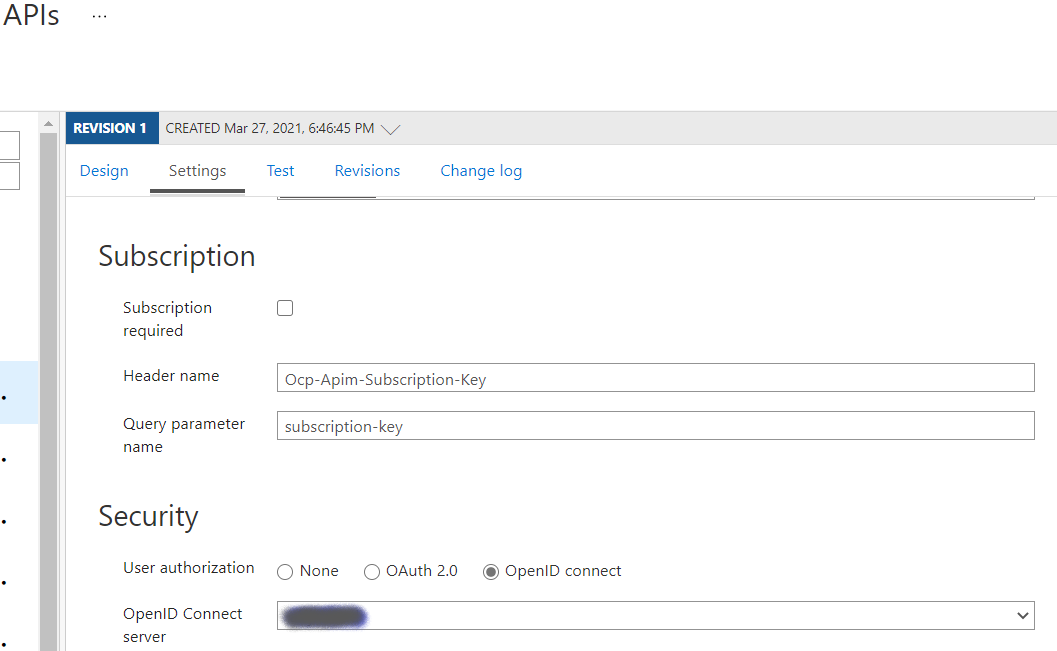
Authenticating the front-end with Azure AD requires creating an OpenID Connect Provider and then configuring the API to use it. There is also an OAuth option here, but we found the OpenID connect simpler and got it working first.
Create Open ID Connect Provider
The critical aspects of the OpenID Connect Provider are the Metadata endpoint URL and Client credentials. Generate a new Client Secret for the chosen Azure AD Application and enter the details here.
Configure API to use Open ID Connect Provider
In the API Settings tab, scroll down to the Security section and select OpenID to connect, and then choose the configured OpenID server configured in the previous step.
Unselect the “Subscription required” checkbox. It is unlikely you will be using both OpenID and a Subscription Key simultaneously, though you could. In this scenario within our application, the client application is a browser where we can’t provide or protect a subscription key.
Backend Authentication
One approach sometimes proposed for microservices architectures is not complicating internal services with authentication built-in to the services themselves. The idea is that the environment it’s hosted in provides sufficient guard rails to ensure only trusted callers can reach the service. In Kubernetes and other containerized approaches, the default implementation is not Internet-connected. In these scenarios, you must explicitly expose services, and you can apply policies or other restrictions to prevent unwanted inbound traffic. In our case, an Azure App Service is Internet visible by default (we do not use an App Service Environment, by the way). Unless you modify the configuration, your application is accessible from the Internet, so you have to choose to integrate it with a VNET and/or deny inbound traffic explicitly.
Authentication with API Key
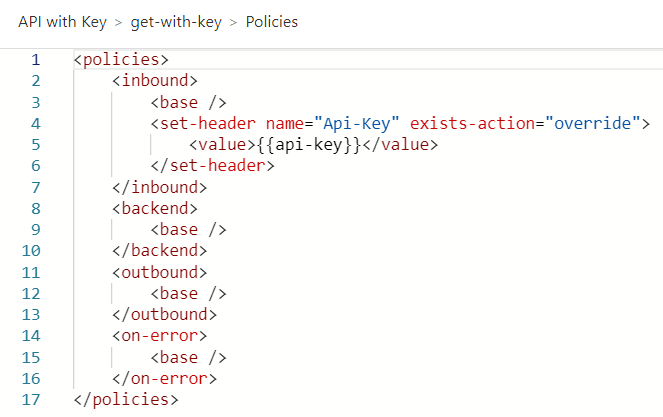
Our goal is to be secure by default. For this reason, we added a simple API Key mechanism to the backend API application such that an accidental misconfiguration (or no configuration at all) would result in “Access Denied,” regardless of allowed network traffic. We placed the API key in an Azure KeyVault Secret. The Application and the API Management system identities are granted access to this KeyVault, allowing them to share the same secret. The key is automatically generated and doesn’t ever need to be seen by humans. Only privileged users can access them, and you don’t have to expose them to developers in Production. The Azure API Management service retrieves and caches the key and passes it to the API.
The same approach to authenticating our backend application applies to passing a subscription key to a third-party service, like the geocoding service we use.
Here’s an example of a policy that retrieves a backend API Key from an API Management Named Value (which is bound to a KeyVault Secret) named “API-key” and passes it to the backend in the API-Key HTTP Request Header:
Authentication with Azure AD
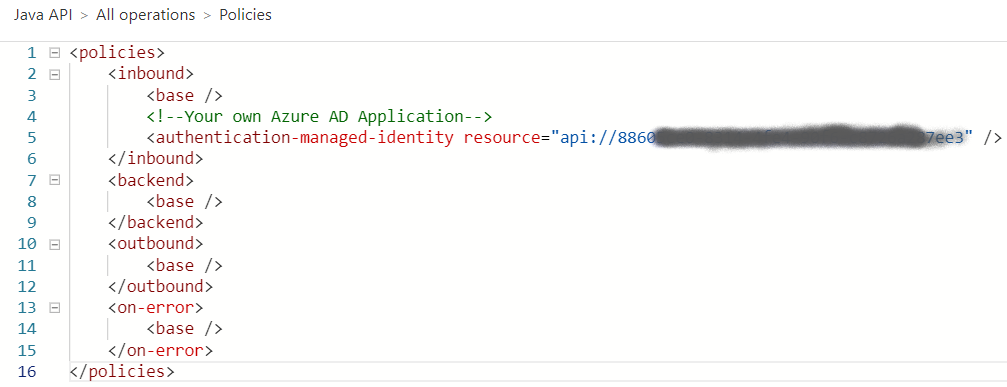
It is also possible to authenticate to the backend with Azure AD using an API Management System Assigned Identity. In this example, the backend Java App Service is configured for Azure AD authentication using the Azure AD App Registration shown here.

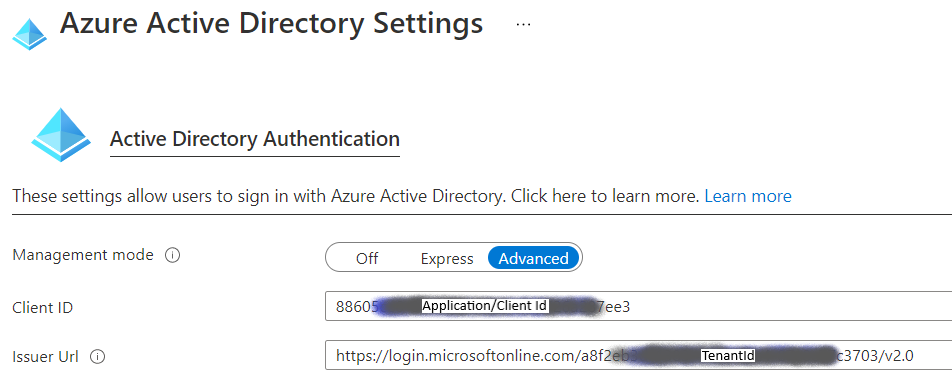
This Application ID URI is passed into the API Management policy above as the “resource.” The App Service is configured to authenticate with this App Registration by configuring authentication for Azure AD:
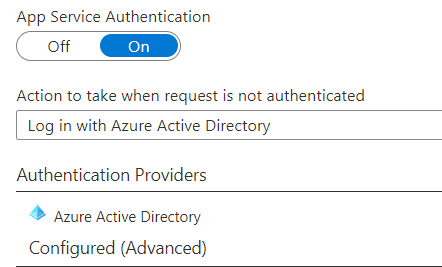
The Client ID is set to the Application ID for the AAD Application, and the Issuer URL is configured for the appropriate login URL with the tenant injected.
Response Formatting
Another benefit of the wide range of available API Policy features is the rapid implementation of response formatting. Our new backend API implementation didn’t support XML serialization out of the box, so we couldn’t take advantage of some of the standard ASP.NET Core response formatting without changing code, searching out a third-party XML formatter, or building a custom XML formatter.
The JSON to XML formatting policy built into API Management is one line of code:
<policies>
  <inbound>
    <base />
  </inbound>
  <backend>
      <base />
  </backend>
  <outbound>
      <base />
      <json-to-xml apply="content-type-json" consider-accept-header="true" />
  </outbound>
  <on-error>
      <base />
  </on-error>
</policies>

For JSON that is simply an array of unnamed objects, this produces output like this:
[code]
<Document>
    <Array>
        <property1>value/property1>
        <property2>value</property2>
    </Array>
    <Array>
        <property1>value</property1>
        <property2>value</property2>
    </Array>
</Document>
If this output does not meet the requirements, you have the opportunity to modify the result more before it goes out the door. For example, we could place proper element names by searching and replace on the output:
<policies>
<inbound>
<base />
</inbound>
<backend>
<base />
</backend>
<outbound>
<base />
<json-to-xml apply="content-type-json" consider-accept-header="true" />
<choose>
<when condition="@(context.Request.Headers.GetValueOrDefault("Accept","") == "application/xml")">
<find-and-replace from="&lt;Document&gt;" to="&lt;contacts&gt;" />
<find-and-replace from="&lt;/Document&gt;" to="&lt;/contacts&gt;" />
<find-and-replace from="&lt;Array&gt;" to="&lt;contact&gt;" />
<find-and-replace from="&lt;/Array&gt;" to="&lt;/contact&gt;" />
</when>
<otherwise />
</choose>
</outbound>
<on-error>
<base />
</on-error>
</policies>
This produces the following:
<Contacts>
<Contact>
<property1>value/property1>
<property2>value</property2>
</Contact>
<Contact>
<property1>value</property1>
<property2>value</property2>
</Contact>
</Contacts>
The policy is applied from the top down. You can add more modifications to the block, including C# code, to continue to modify the results.
If you need more complex transformations, you might need to modify the back-end API, but you should consider Azure API Management Services before taking that step.
Conclusion
I hope you found this post informative and helpful in evaluating Azure API Management Services as a part of that journey. I found it easy to use and cost-effective for the solution we implemented. I believe we’ve just scratched the surface of its potential and expect to leverage it more as we build and enhance our system.

