


I just finished working on a proof of concept using Microsoft Dynamics CRM 2011. The application needed to support the activities of a crime investigation unit in the government.
As a devoted Lennie Briscoe fan, I felt I knew my way around a crime scene…but what I didn’t know was CRM. As it turned out, it didn’t matter! Microsoft Dynamics CRM 2011 was fairly easy to get up and running. I put together a cloud-based implementation that included:
- CRM Online w/Office 365
- Azure VM for the installation of the e-mail router
- SMTP Server: SendGrid
- POP3 server: Gmail
All were “free” (free as in “trial”). All were in the cloud. All played nicely together.
That said, there were several confusing bits to sort out regarding the e-mail configuration. I’ll share what worked (and what didn’t work) for me. Maybe it can be a timesaver for you.
The Easy
To start, you’ll create a CRM Online account. It includes Office 365. Why? You’ll need it to manage and create your CRM users. It’s free and good for 30 days. Ask nicely after that and they’ll extend it one time for you. This should be straightforward. Just read and click your way through this install.
Batteries Not Included
CRM does not have a built-in interface for sending e-mail. There are two options:
- Install the Microsoft Outlook plug-in
- Install the Microsoft CRM 2011 E-mail Router Configuration Component
Decisions, decisions. Microsoft describes various scenarios to help you decide on the direction for your e-mail configuration. For my purposes, I wanted to jump in and start using CRM. I didn’t want to worry about configuring SMTP servers and installing router software. (Spoiler alert: This is what I ended up doing anyway.) But initially, I went the seemingly easier route and installed the Outlook plug-in.
Plug-in Says What?
The Outlook plug-in installed quickly on my local machine. The important thing to remember about the plug-in is this:
The Outlook client must be open in order for CRM to send and receive email. Once opened, the plug-in connects to CRM and to your Exchange server or SMTP server. At that point, e-mails are sent out by the CRM or received into CRM.
If e-mails aren’t sent in real-time in CRM 2011, then they will creep up…and queue up on you. Case in point: I imported hundreds of rows of sample data into CRM which triggered workflows to send out e-mails. I was reminded of this when I opened Outlook and it fired off e-mails that had been queuing up overnight.
 As my Inbox flooded with messages, I quickly closed Outlook and disabled the queued e-mails in CRM Online. Total whack-a-mole. The truth is, you can configure the frequency and amount of e-mails that are sent to avoid this scenario. It just wasn’t for me. I wanted an automated solution without a dependency on user behavior. Next stop, e-mail router component.
Cloud. Meet Cloud.
The e-mail router component has to be installed on a server accessible by CRM. I created an Azure trial account and installed the component on a VM in Azure.
If you haven’t done it before, creating a VM in Azure is easier than ordering at Starbucks. I chose a Windows Server 2008 R2 SP1 from the gallery. Small (one core, 1.75 GB memory). Skinny. No whip.
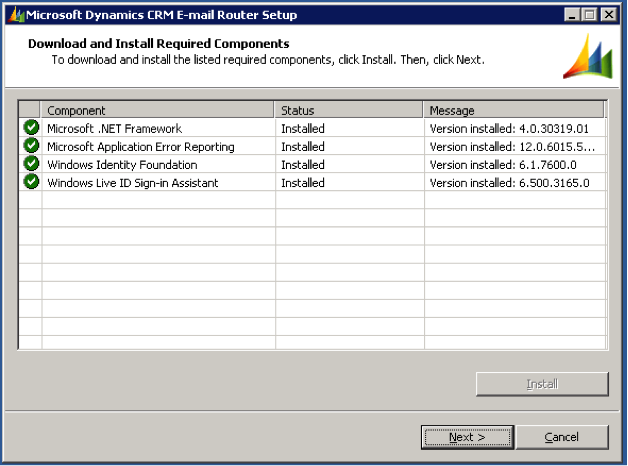
Installing the CRM e-mail router proved to be a little tricky. The VM image did not have all of the prerequisites, so I fumbled around a bit. The following steps work on both Windows Server 2008 R2 and on Windows Server 2012 R2 images:
- Before installing the router component, download and install these files on to your VM:
MS Online Services Sign-In Assistant (msoidcli_64bit.msi)
MS Exchange Server MAPI Client and Collaboration Data Objects 1.2.1 (ExchangeMapiCdo.exe) - Now you’re ready. Download and run the 64bit version of the CRM E-mail Router component on your VM.
- When prompted, download both the E-mail Router Setup Updates and the Required Components. Click Install.
- A dialog box may indicate that you are still missing files. Call their bluff and click Install. This should shake out the crumbs. Your prerequisites should be satisfied now and you’ll see this (hopefully):
 Note to Windows 2012 server users:
You may need to install Windows Identity Foundation 3.5. To do so, use “Add Roles and Features in Server Manager.” WIF is built in to Windows 2012; it’s just not installed by default. - Click Next. Check the Router and the Rule Deployment Wizard. Click Next.
- Installation complete!
Configuring Outgoing E-mail Profile With SendGrid
I used SendGrid as my SMTP server for three reasons:
- It offers cloud-based SMTP services and you can send up to 25,000 emails/month for free.
- It’s an add-on in Azure so installation is quick.
- My boss’ boss suggested it 😉
Get an account and head back to the E-mail Router Configuration Manager on your VM.
Under the Configuration Profiles tab, click New.

Profile Name: SendGrid
Direction: Outgoing
E-mail server Type: SMTP
Authentication Type: Clear Text
E-mail Server: smtp.sendgrid.net
User Name and Password: Generated by SendGrid
SendGrid generates your credentials; to find them look in Azure -> Add-Ons -> Connection info.

Configuring Incoming E-mail Profile with Gmail
SendGrid doesn’t offer POP3 (at least in the free version), so I chose Gmail.

Profile Name: Gmail
Direction: Incoming
E-mail server Type: POP3
Authentication Type: Clear Text
E-mail Server: pop.gmail.com
Password xxxx
Incoming and outgoing configurations completed? Click Publish.

In the Deployments tab, select New, then select Microsoft Dynamics CRM Online.
Enter your CRM Server: https://disco.crm.dynamics.com/<YourOrganizationName>
Click OK, then Publish.
Gotcha
Remember that the Outlook plug-in is the default e-mail configuration for all users in CRM Online. If you haven’t already done so, set each user to use “E-mail Router” in CRM Online.

Think It’ll work?
The final tab is the Users, Queues and Forward Mailboxes tab. To test your configuration, click on Load Data. This retrieves and displays all users configured for “E-mail Router.”
Select a user, and click Test Access.

Hopefully, you have now successfully completed your CRM Online and E-mail configuration.
My next post will cover customizing xRM with business entities.

