In this blog, we will discuss Kubernetes (aka k8s for short). In this blog, we will cover the following:
- What is Kubernetes?
- How is it different from the traditional model?
- How has Kubernetes evolved?
- Why would you need k8s?
- What can k8s do?
In the end, we will walk through setting up a Kubernetes cluster on the Microsoft Azure cloud.
What is Kubernetes
Kubernetes or k8s is an orchestrator to build, deploy, update, and manage containers. A container is a standard unit of software that packages up code and all dependencies, so the application runs quickly and reliably from one computing environment to another.
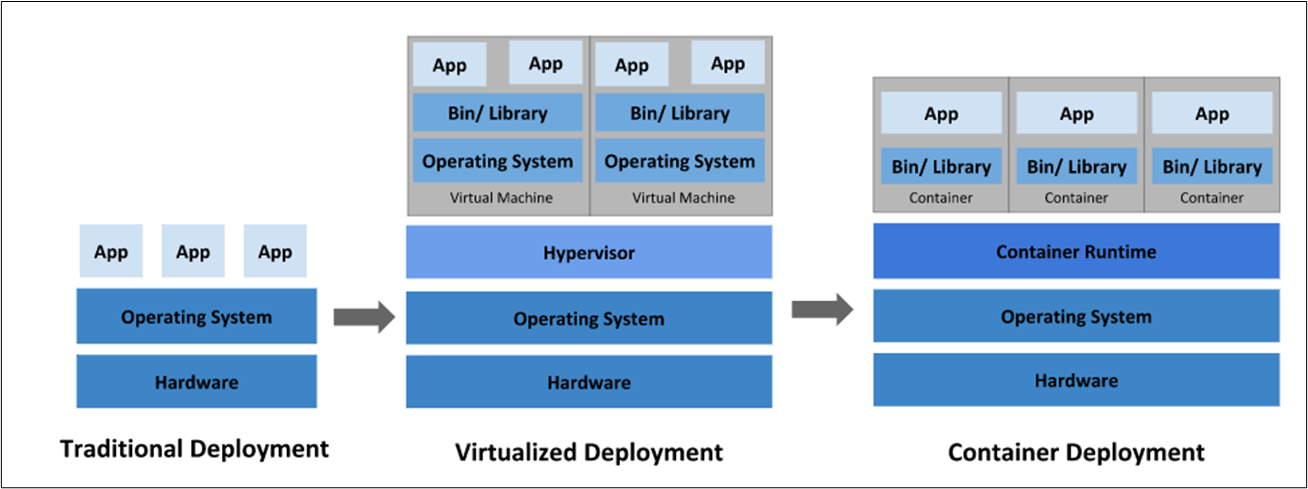
Traditional Deployment Era
Traditionally, customers ran applications on physical servers. However, there was no way to define resource boundaries for Apps in a physical server, and this caused resource allocation issues. For example, suppose multiple applications run on a physical server. In that case, there can be instances where one application would take up most of the resources, and as a result, the other applications would underperform. A solution would be to run each application on a different physical server. But this did not scale as resources were underutilized, and it was expensive for organizations to maintain many physical servers.
Virtualized Deployment Era
As a solution, virtualization was introduced. It allows you to run multiple Virtual Machines (VMs) on a single physical server’s CPU. In addition, virtualization will enable applications to be isolated between VMs and provide security as the information of one application cannot be freely accessed by another application.
Virtualization allows better utilization of resources in a physical server and allows better scalability because an application can be added or updated easily, reduces hardware costs, and much more. In addition, with virtualization, you can present a set of physical resources as a cluster of disposable virtual machines.
Each VM is a complete machine running all the components, including its own operating system, on top of the virtualized hardware.
Container Deployment Era
Container engines often referred to as operating-system-level virtualization, are operating systems where the kernel allows multiple isolated instances. Each instance is referred to as a container, virtualization engine. Developers use these to create secure, virtual hosting environments with isolated resources.
Therefore, containers are considered lightweight. Similar to a VM, a container has its own filesystem, the share of CPU, memory, process space, and more. However, as they are decoupled from the underlying infrastructure, they are portable across clouds and OS distributions.
Container Run-Time Engine
To create a microservice ecosystem, software solutions such as container management software, container orchestration software, container networking software, container monitoring software, and service discovery software. There are various Container run time engines available in the market, below are a few popular ones:
There are various Container run time engines available in the market, below are a few popular ones:
- Containers
- CRI-O
- Docker
- Rocket
- LXD
Docker container runtime integrates well with the Kubernetes engine of the above Container runtime.
Kubernetes is a portable, extensible, open-source platform for managing containerized workloads and services. It also facilitates declarative configuration and automation. It has a large, rapidly growing ecosystem. Kubernetes services, support, and tools are widely available.
Looking for more information on container orchestration? Check out our blog, A Developer’s Guide to Container Orchestration, Kubernetes, & AKS.
Why Do I Need Kubernetes?
Containers are an excellent way to bundle and run your applications. However, you need to manage the containers that run the applications and ensure no downtime in a production environment. For example, another container needs to start if a container goes down. Wouldn’t it be easier if a system handled this behavior?
That’s how Kubernetes comes to the rescue! Kubernetes provides you with a framework to run distributed systems resiliently. It takes care of scaling and failover for your application, provides deployment patterns, and more. For example, Kubernetes can easily manage a canary deployment for your system.
Kubernetes provides you with:
- Service discovery and load balancing. Kubernetes can expose a container using the DNS name or IP address. Then, if traffic to a container is high, Kubernetes can load balance and distribute the network traffic to stabilize the deployment.
- Storage orchestration. Kubernetes allows you to automatically mount a storage system of your choice, such as local storage, public cloud providers, and more.
- Automated rollouts and rollbacks. You can describe the desired state for your deployed containers using Kubernetes, and it can change the actual state to the desired state at a controlled rate. For example, you can automate Kubernetes to create new containers for your deployment, remove existing containers and adopt all their resources to the new container.
- Automatic bin packing. You provide Kubernetes with a cluster of nodes that it can use to run containerized tasks. Then, you tell Kubernetes how much CPU and memory (RAM) each container needs. As a result, Kubernetes can fit containers onto your nodes to make the best use of your resources.
- Self-healing. Kubernetes restarts containers that fail, replaces containers, kills containers that don’t respond to your user-defined health check, and doesn’t advertise them to clients until they are ready to serve.
- Secret and configuration management. Kubernetes let you store and manage sensitive information, such as passwords, OAuth tokens, and SSH keys. You can deploy and update secrets and application configuration without rebuilding your container images or exposing secrets in your stack configuration.
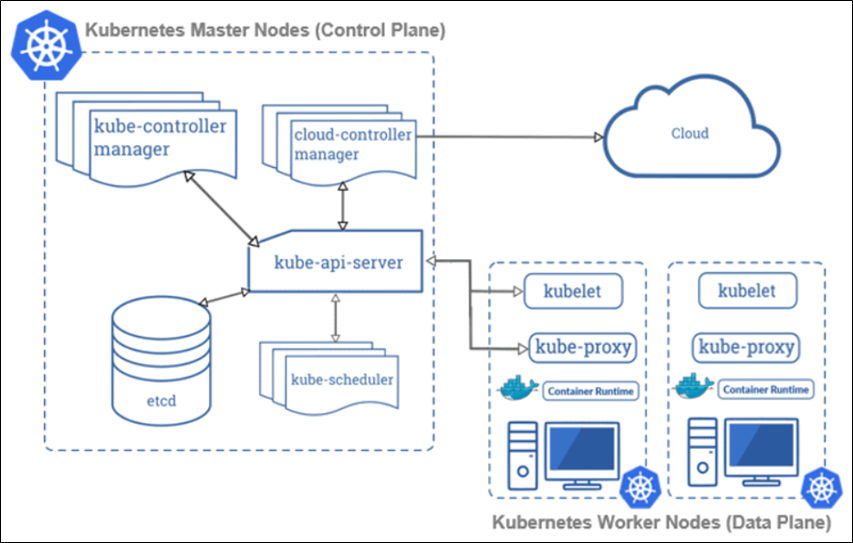
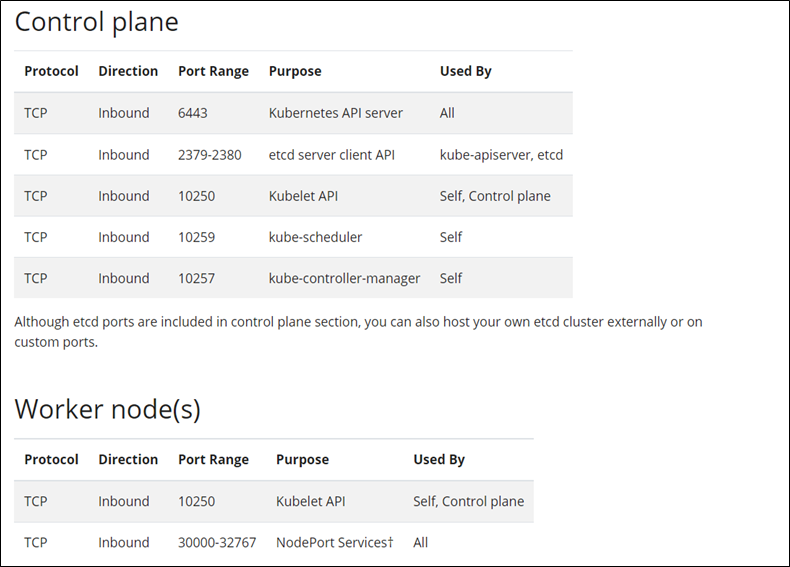
A Kubernetes Cluster is a group of machines (Virtual or physical) running together. There are two types of systems in the k8s cluster a Master and a Worker node. Together, these servers form a Kubernetes cluster and are controlled by the services that make up the Control Plane. As a best practice, the worker node hosts user applications, whereas the Master node hosts all system components. However, the master can host user applications, but it is not recommended.
Kubernetes Cluster Infrastructure Setup
Below is the architecture diagram set up on the Azure cloud. We will set up a single Vnet and two subnets for easier management. One subnet will host worker nodes, and the other subnet will host the master node. Ubuntu LTS 20.x OS will be used for Master and worker nodes. In addition, we will deploy the Windows 10 system to test our applications.
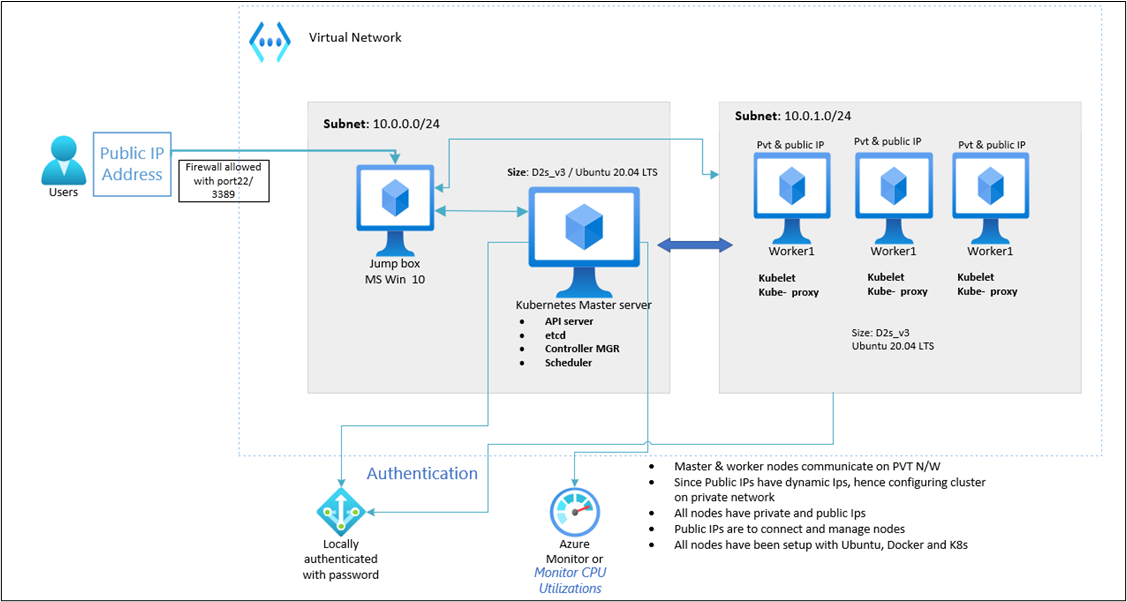
Since we are creating a k8s cluster setup for learning purposes, all ports are opened to communicate across subnets. Below are the default ports to communicate across cluster components for enterprise-class clusters.
Azure Virtual Network Setup
Here, we create a single Vnet and two subnets thru the Azure portal. I’ve included screenshots below to navigate and submit for creation after logging into https://portal.azure.com.
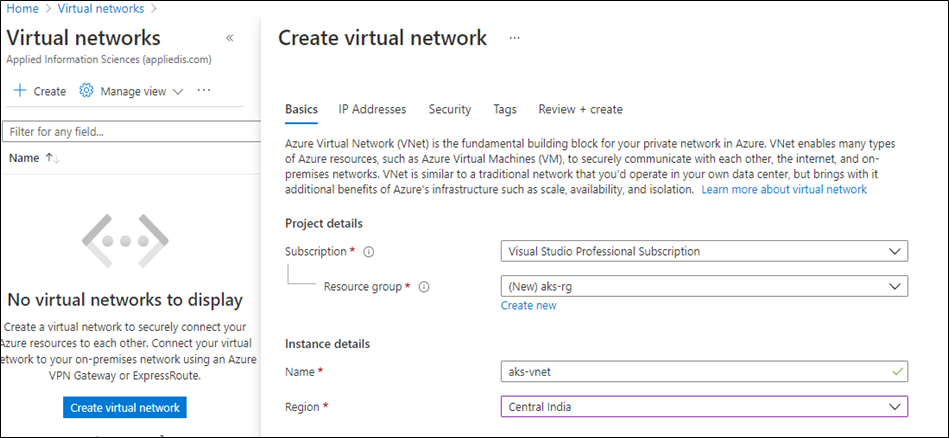
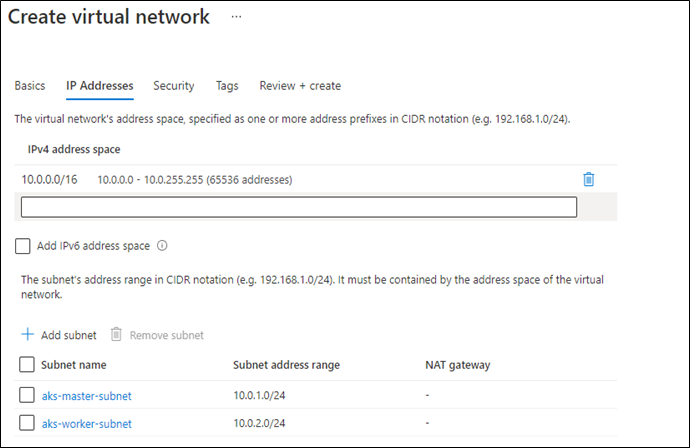
The above step creates one Vnet named aks-vnet with a CIDR of 10.0.0./16. And also creates two subnets, one with a CIDR range of 10.0.1.0/24 by name aks-master-subnet and the other subnet with 10.0.2.0/24 CIDR range by name aks-worker-subnet.
Azure VMs Setup
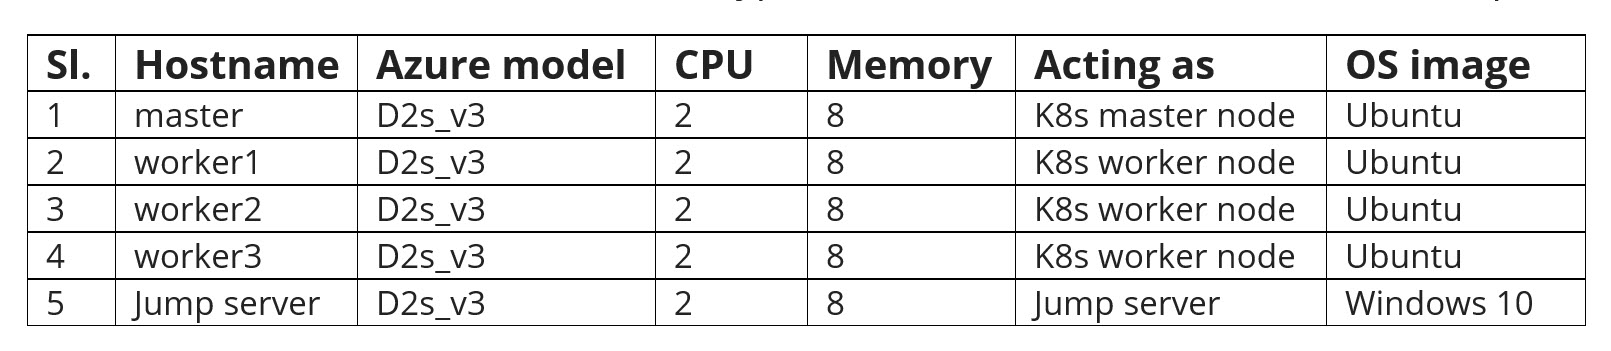
We will set up three Ubuntu 20 LTS systems for worker nodes, one Ubuntu 20 LTS for the master node, and one for Windows 10. As per official documentation, it is recommended to have 2GB Memory and 2 CPUs. But to get better performance, at least 8GB of Memory and four vCPUs are suggested.
Below table shows – the VM sizes, OS type, and hostnames used in our lab setup.
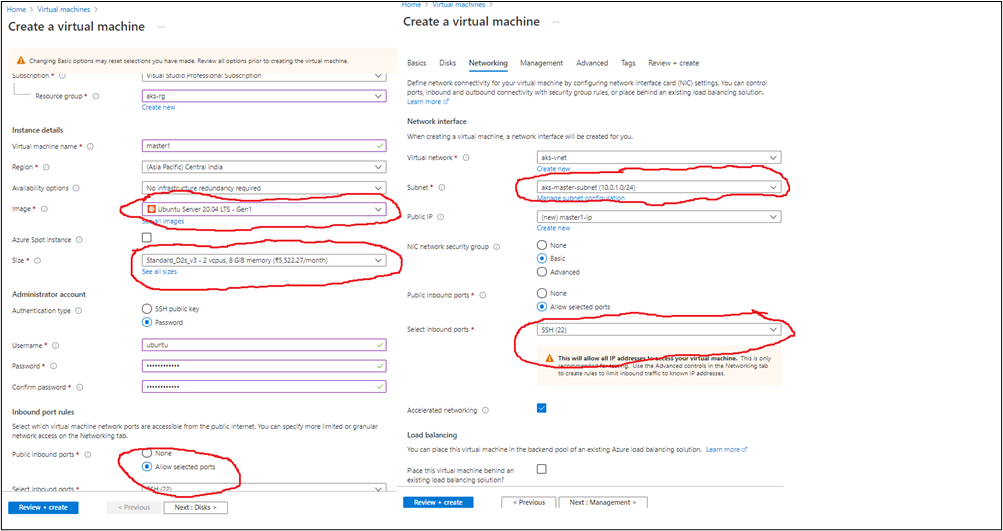
After logging into the Azure portal thru (https://portal.azure.com), please follow “Virtual machines” à Create à”Virtual machine” and follow the below screenshots. This procedure will create a new master node with 8GB Ram, two vCPUs, and four disks. First, choose subnet “aks-master-subnet.” Next, select “password” as the mode of “authentication type” and provide 12 characters long alphanumeric string with lower n upper case and special characters. Also, allow port 22 for “Public inbound” options, allowing ssh and sftp protocols to connect it to this system.
The same steps need to be followed to create Worker nodes but choose “aks-worker-subnet” to create instances under 10.0.2.0/24 CIDR.
Windows 10 jump server is set up in subnet 10.0.1.0/24, and this instance will be used to test applications deployed onto the k8s cluster. A minor modification is needed to connect to this VM and setup while creating, please follow the below screenshots.
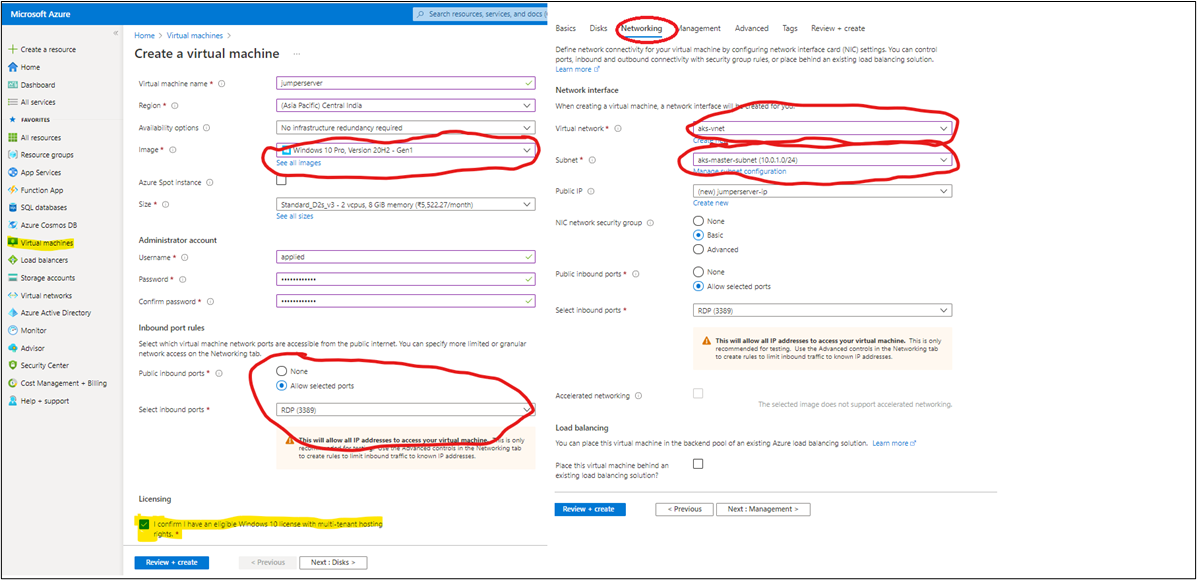
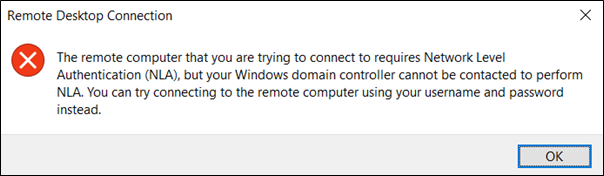
By default, the windows system requires Network-level authentication, which requires a domain controller. However, as we set it up for learning purposes, we will disable the NLA.
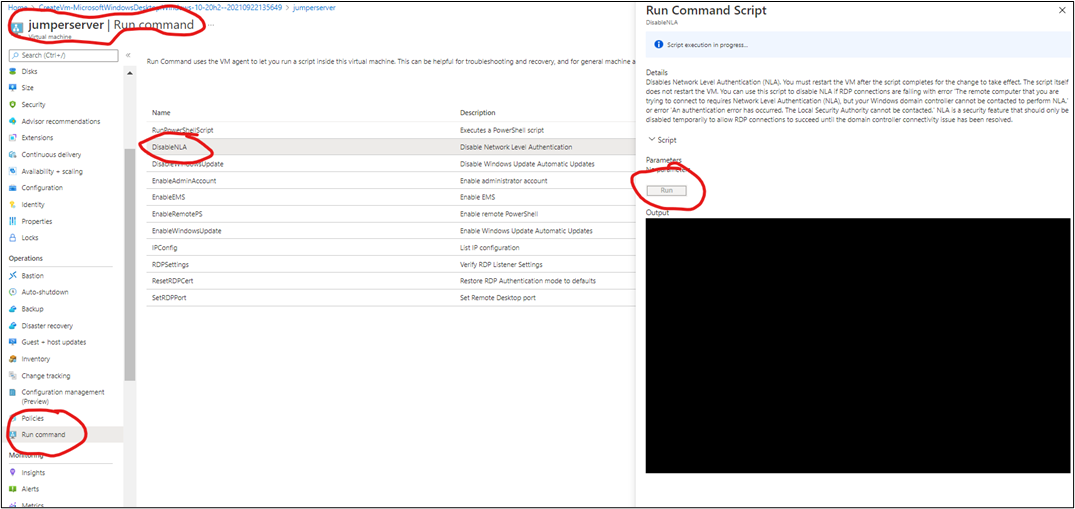
Follow the below screenshot to disable NLA. Next, select VM, “Jumpserver” à” RUN Command” à”DisableNLA” à”RUN.” Once this is successful, VM needs to restart, this change to take effect.
With the above updates to the jumpserver configuration, you will be able to connect thru the “remote desktop connection” utility. Once logged, you can check connectivity to all four systems by using ssh from the command line. It would be best if you got successfully authenticated and logged into master and worker nodes.
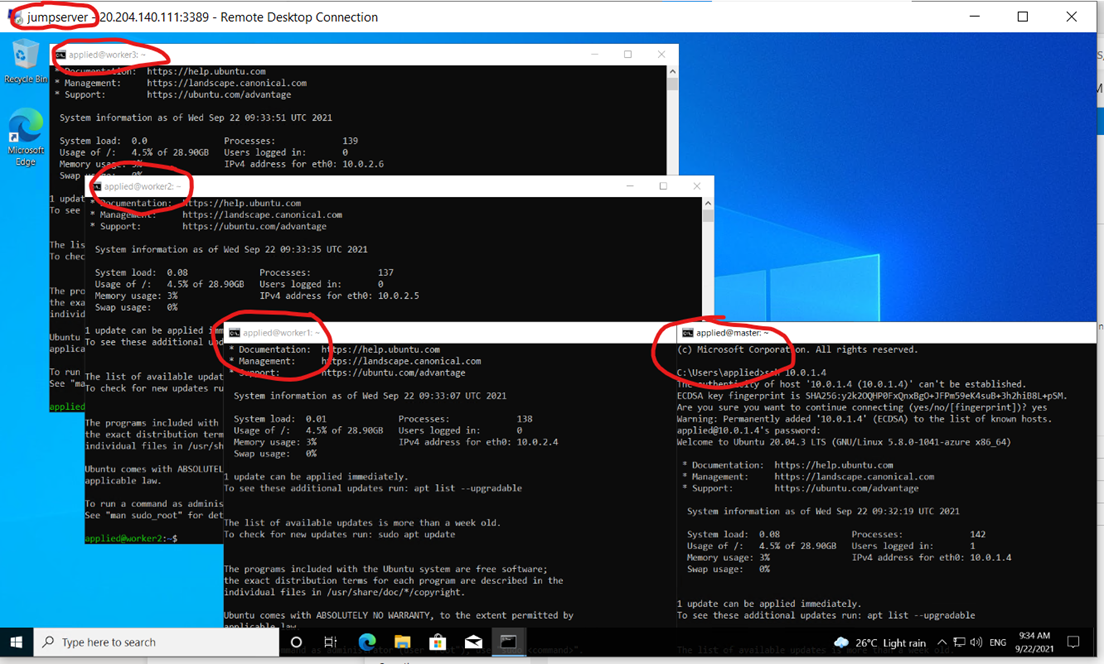
Installing Prerequisite Software
After building the network and systems, we have to update system packages and install the required software on Master and worker nodes. These packages are:
- Docker
- CRE – A software responsible for running the containers.
- kubeadm
- A CLI tool that will set up the cluster, upgrade and join worker nodes.
- Kubelet
- The kubelet is the primary “node agent” that runs on each node and handles node level operations
- Kubectl
- A CLI tool – Used to manage k8s cluster through its API Server.
To install these packages, follow the steps mentioned below on Master as well as Worker nodes:
Step 1. We have to do SSH to our virtual machines with the username and password and switch user to superuser by using Sudo.

Step 2. Now we will install the Docker package in our machine using the following command:
apt-get update && apt-get install docker.io</li>

Step 3. Update the apt package index and install packages needed to use the Kubernetes apt repository:
apt-get update && apt-get install -y apt-transport-https ca-certificates curl</li>

apt-package-index.png" alt="Update the apt package index " width="800" height="134"
Step 4. Add below lines into /etc/docker/daemon.json to declare systemd as cGROUP driver for docker runtime. If the file is not present, you can create it with the below commands.
}
EOF
chmod 600 /etc/docker/daemon.json
Step 5. Download the Google Cloud public signing key:
curl -fsSLo /usr/share/keyrings/kubernetes-archive-keyring.gpg https://packages.cloud.google.com/apt/doc/apt-key.gpg
Step 6. Add the Kubernetes apt repository:
echo "deb [signed-by=/usr/share/keyrings/kubernetes-archive-keyring.gpg] https://apt.kubernetes.io/ kubernetes-xenial main" | tee /etc/apt/sources.list.d/kubernetes.list
Step 7. Update apt package index, install kubelet, kubeadm, and kubectl, and pin their version:
apt-get update
apt-get install -y kubelet kubeadm kubectl
apt-mark hold kubelet kubeadm kubectl
Setup Kubernetes Cluster
As we have successfully installed Kubeadm, next we will create a Kubernetes cluster using the following mentioned steps:
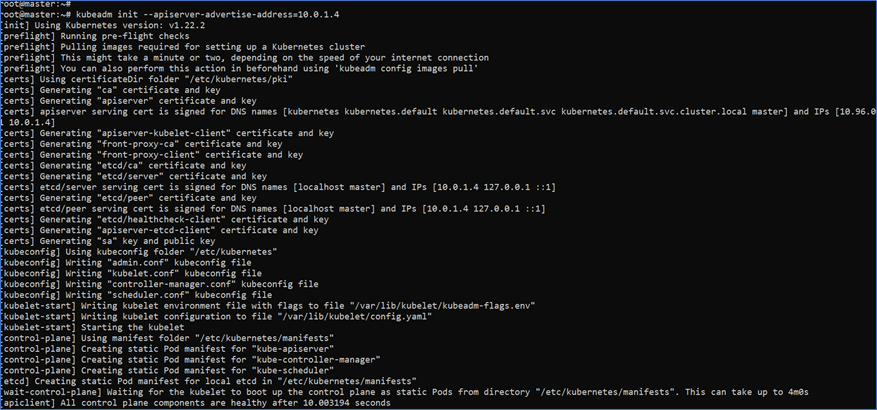
Step 8. We have to initialize kubeadm on the master node. This command will check the node for all required dependencies. Once successful, then it will install control plane components. We will set up the k8s cluster on private IPs. Hence, we need to get the private IP of the master node from Azure portal à Virtual Machine à master à networking à NIC Private IP
(Note: Run this command in Master Node only.)
kubeadm init --apiserver-advertise-address=10.0.1.4
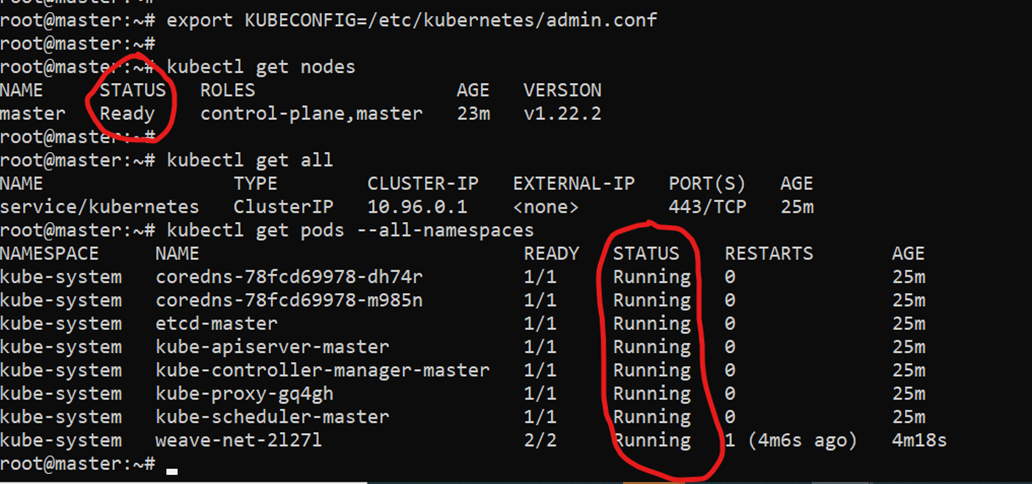
The Kubeadm will run multiple preflight checks, create certificates, and build kubeconfig configuration and this step will take 4-6 minutes depending upon the system’s size.
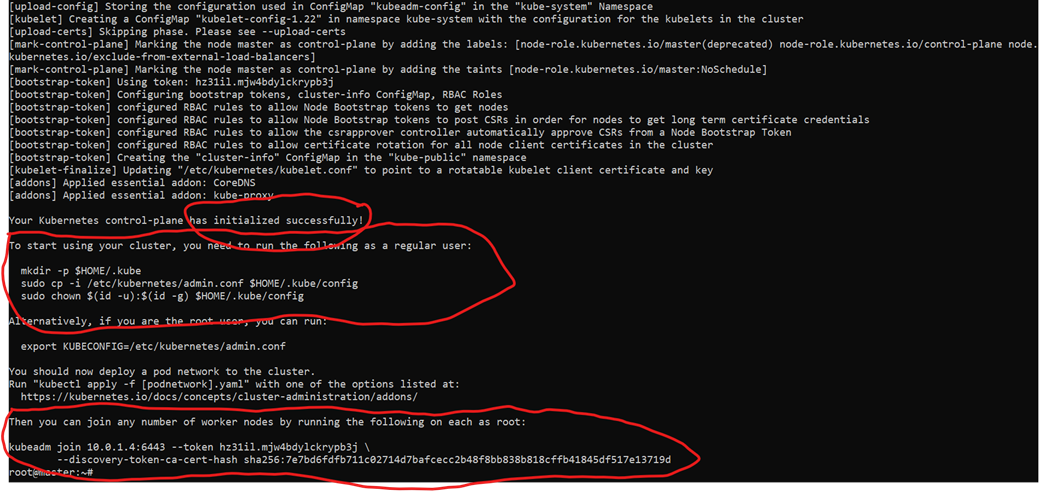
Successful k8s cluster creation will generate the below output and print some commands to join worker nodes to this cluster and make kubectl work.
Please note the highlighted part in the below screenshot, which is required to join worker nodes.
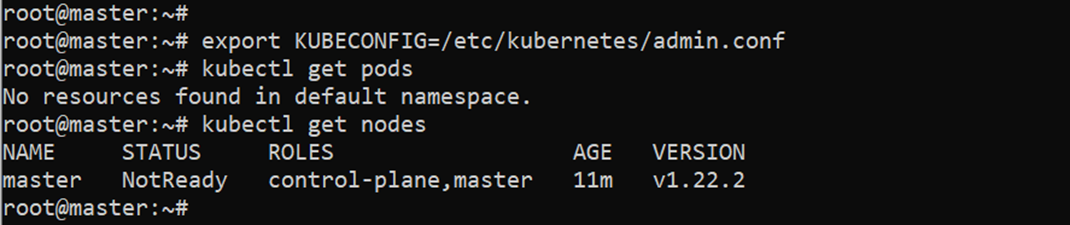
The above screenshot output shows that cluster is up and running, and the master node is in “Not ready” status. We will have to install CNI to enable communication channels across nodes and Cluster DNS to start functioning. Apply Weave CNI (Container Network Interface) on the master node.
kubectl apply -f "https://cloud.weave.works/k8s/net?k8s-version=$(kubectl version | base64 | tr -d '\n')"
The above command will take a minute to create weaver pods by downloading from weave works, creating weave pods, and bringing coreDNS pods online.
Run below commands as normal user (Non root user to have kubectl connect to K8s cluster)
-
mkdir -p $HOME/.kube</li>
-
sudo cp -i /etc/kubernetes/admin.conf $HOME/.kube/config</li>
-
sudo chown $(id -u):$(id -g) $HOME/.kube/config</li>
Join Worker Nodes to the Kubernetes Cluster
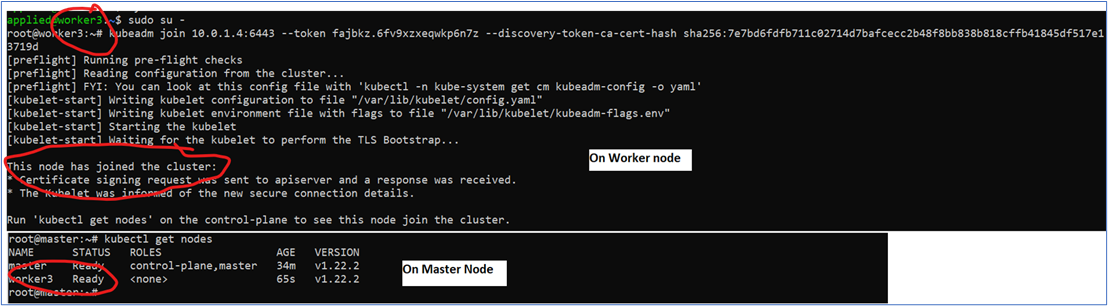
Our Kubernetes master node is set up, and we should join Worker nodes in our cluster. Perform the following step on all worker nodes as root users or using “sudo.”
kubeadm join 10.0.1.4:6443 --token fajbkz.6fv9xzxeqwkp6n7z --discovery-token-ca-cert-hash sha256:7e7bd6fdfb711c02714d7bafcecc2b48f8bb838b818cffb41845df517e13719d
Also, you can regenerate the above “tokens” and “hash” codes by running the below command on the master node.
kubeadm token create --print-join-command #(On MASTER node only)
The below screenshot shows the successful joining of worker node to cluster. Follow the same procedure on other worker nodes.
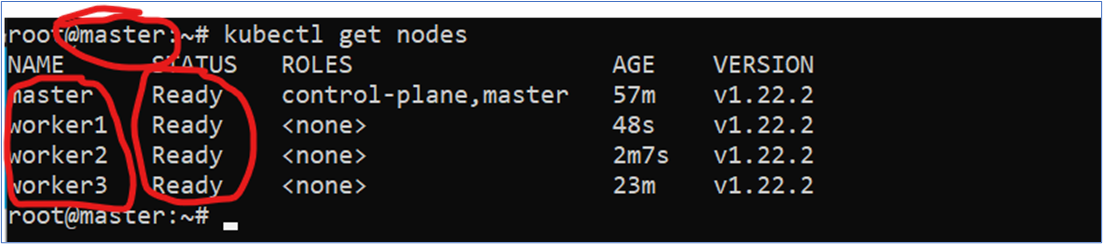
The below screenshot shows the successful k8s cluster with one master node and three worker nodes.
Conclusion
Kubernetes can be set up in multiple ways depending on your comfortability; I have leveraged kubeadm tool to build a k8 cluster. However, for a better understanding of k8s concepts and to have hands-on. I have opted for the kubeadm tool with one master and 3 worker nodes, which are scalable and single worker nodes.
Alternatively, you may also use minikube to set up an automated, easy and simple tool for building k8s cluster on a single VM in a minimal and automated way.
References: https://kubernetes.io