


Testing is and has always been a necessary action when writing code or creating templates. Throughout the history of writing code, tools have made it easier and more foolproof for developers to complete tasks and get increasingly better at test-driven development. During some time, I researched and was asked to add content to the Knowledge Center about testing tools Pester and Azure Resource Manager (ARM) Template. Without knowing too much about writing code or developing ARM Templates, I was able to see how these tools are powerful and resourceful when writing PowerShell commands and creating ARM Templates.
ARM TTK or Azure Resource Manager template Test Toolkit, test your ARM Templates by checking through a set of requirements that either pass or fail the test. The tests will check a template or set of templates to code best practices when the tool is run. If your template isn’t compliant with the pre-set list of requirements, it returns an easy-to-read list of warnings with the suggested changes. By using the test toolkit, you can learn how to avoid common problems in template development.
Although also a tool to test a written piece of work, Pester is a little more complicated than ARM TTK. Pester is a framework whose purpose is to ensure the PowerShell commands that are written, whether functions, modules, or scripts, do what is expected. Another way to use Pester is to use it to validate any changes that were made to an already written script.
ARM TTK Deeper Dive
ARM TTK or Azure Resource Manager template (ARM template) utilizes a list of preset unit test requirements for an ARM Template to receive a pass or fail. The tool is an open-source PowerShell library that you can use to validate your templates against a series of test cases. These test cases are generic and designed to validate that your templates are following best practices.
Some examples of the unit test:
- VM-Size-Should-Be-A-Parameter
- Virtual-Machines-Should-Not-Be-Preview
- Resources-Should-Have-Location
The philosophy behind ARTM TTK is to validate the author’s intent when writing the templates, such as checking against unused parameters or variables. The tool utilizes knowledge on security practices for the language and uses the appropriate language construct for the task at hand. In other words, the tool would be checking environmental functions instead of hard-coding values. Yet as we know, not everything is appropriate for a universal set of tests as every test will not apply to every scenario. For flexibility, the framework allows for easy expansion and a unique selection of tests by simply skipping whatever test does not apply to your particular scenario.
For information on results and how to download the Linux tool, Windows, or Mac OS, click here.
ARM TTK Extension for Pipeline
For my research for the knowledge center, I focused on how to test ARM Templates that are part of a repository for a release pipeline. I had created a test Azure DevOps Organization and a test Azure DevOps Project to try the tool. Once I created the project, I cloned the ARM TTK Repo provided by Azure (https://github.com/Azure/arm-ttk). The repo provided me with the unit test and other files to help me understand the tool better. I had also downloaded the “Run ARM TTK Tests” (https://marketplace.visualstudio.com/items?itemName=Sam-Cogan.ARMTTKExtension) to be able to run the RunARMTTKTests@1 task.
Below is the YML file to run the tool. It is a very vanilla file, but its primary purpose is to test the repo’s ARM Templates by specifying the JSON file’s path.
name: armTTKbuiltINtool

trigger:
  batch: true
  branches:
    include:
    - 'master'
  paths:
    include:
    - '.azure'

pool:
  vmImage: 'windows-latest'

stages:
- stage: Build
  jobs:
  - job: BuildJob
    steps:
    - script: echo Building!
- stage: Test
  jobs:
  - job: TestOnWindows
    steps:
    - task: RunARMTTKTests@1
      displayName: TTK Built In Tools Test
      inputs:
        templatelocation: '$(System.DefaultWorkingDirectory)\.azure'
        resultLocation: '$(System.DefaultWorkingDirectory)\results'
        skipTests: 'Location Should Not Be Hardcoded'
    - task: PublishTestResults@2
      inputs:
        testResultsFormat: 'NUnit'
        testResultsFiles: '$(System.DefaultWorkingDirectory)\results\*-armttk.xml'
        searchFolder: '$(System.DefaultWorkingDirectory)'
        mergeTestResults: false
        failTaskOnFailedTests: false
        testRunTitle: ARMTTKtitle1
      condition: always()

- stage: Deploy
  jobs:
  - job: Deploy
    steps:
    - script: echo Deploying the code!
The main focus is on the part that details, which calls the task and has the basic parameters to go by:
task: RunARMTTKTests@1
  inputs:
    templatelocation: '$(System.DefaultWorkingDirectory)\templates'
    resultLocation: '$(System.DefaultWorkingDirectory)\results'
    includeTests: ''
    skipTests: ''
ARM TTK Results
Once your build is finished, you will be able to see where to click on to view your test results, as shown below:
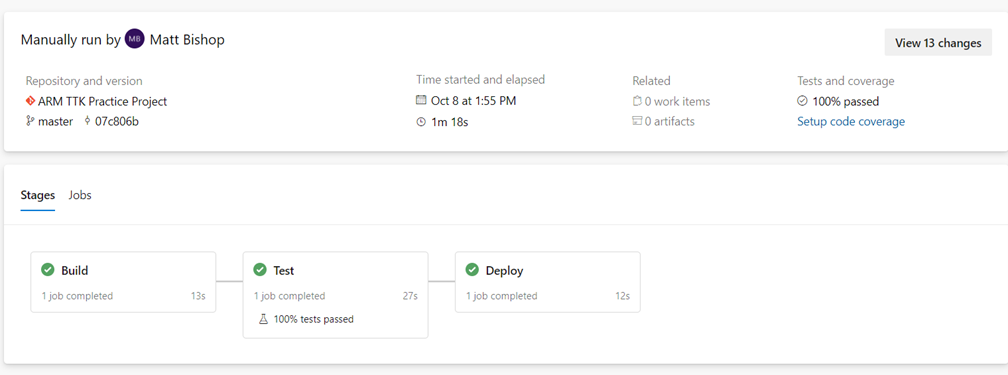
In the “Test” stage, there is not a percentage on pass test which when clicked on, shows more details as shown below:
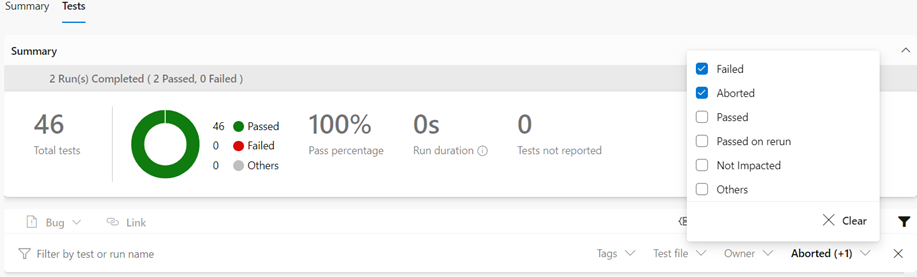
This shows you the number of tests run and the percentage of passing tests.
Pester Deeper Dive
Pester, as mentioned earlier, is a framework which purpose is to ensure the PowerShell commands written, whether it be functions, modules, or scripts, meet expectations. As of now, Pester is in version 5.0. this version update came with a new way of writing your code which we will touch on later in the article.
To install Pester, you run “Install-Module Pester -Force” first, then “Import-Module Pester.” After which, you will see an output that details the name (Pester) and version (5.0 as of right now). Pester identifies which PowerShell (.ps1) scripts to test by a file name. This is important as Pester uses a naming convention, as “*.Tests.ps1” files will be inspected for tests. For example, a file can be named “ExampleScript.Tests.ps1” or “ExampleScript2.Tests.ps1”. Pester will then look for those files to test.
Now you may ask how all this is set up for Pester to identify those scripts. Picture a folder with ten scripts in that folder. Any script that has “.Tests.ps1” will be tested by Pester but must be pathed to get a better understanding; look at this example below.
Pester Example
- Write a script and make sure the file ends in “.Tests.ps1”
- For this example, let’s call it “ExamplePeser.Tests.ps1”
BeforeAll { function Get-Planet ([string]$Name = '*') { $planets = @( @{ Name = 'Mercury' } @{ Name = 'Venus' } @{ Name = 'Earth' } @{ Name = 'Mars' } @{ Name = 'Jupiter' } @{ Name = 'Saturn' } @{ Name = 'Uranus' } @{ Name = 'Neptune' } ) | ForEach-Object { [PSCustomObject] $_ } $planets | Where-Object { $_.Name -like $Name } } } Describe 'Get-Planet' { It 'Given no parameters, it lists all 8 planets' { $allPlanets = Get-Planet $allPlanets.Count | Should -Be 8 } } - Run “Invoke-Pester -Output Detailed
Starting discovery in 1 files.
Discovering in <file path on computer/ ExamplePeser.Tests.ps1>.
Found 1 tests. 41ms
Discovery finished in 77ms.

Running tests from <file path on computer/ ExamplePeser.Tests.ps1>'
Describing Get-Planet
  [+] Given no parameters, it lists all 8 planets 20ms (18ms|2ms)
Tests completed in 179ms
Tests Passed: 1, Failed: 0, Skipped: 0 NotRun: 0
Pester 5.0 Changes
The below information is from Pester Repository Readme file found at https://github.com/pester/Pester.
The fundamental change in this release is that Pester now runs in two phases: Discovery and Run. It quickly scans your test files and discovers all the Describes, Contexts, Its, and other Pester blocks during discovery. This powers many of the features in this release and enables many others to be implemented in the future.
For best results, there are new rules to follow:
- Put all your code into It, BeforeAll, BeforeEach, AfterAll, or AfterEach.
- Put no code directly into Describe, Context, or on the top of your file, without wrapping it in one of these blocks, unless you have a good reason to do so.
- All misplaced code will run during discovery, and its results won’t be available during Run.
This will allow Pester to control when all of your code is executed and scope it correctly. This will also keep the amount of code executed during discovery to a minimum, keeping it fast and responsive. See discovery and script setup article for detailed information.

