You are about to start and new C# project and have opened Visual Studio. Let’s discuss some best practices you should employ or consider before writing that first line of code. These practices are just a start. I have scoped this blog post to only cover those best practices to those that can be enabled before you write a single line of code and utilize the built-in features of Visual Studio and VS Code. Of course, there are other best practices you should follow, such as unit testing, code coverage, continuous integration, etc. and other tools you may consider acquiring, but those are out of scope for this blog post.
These best practices are gleaned from years of experience developing C# solutions. First, let me present my comprehensive list of practices, then we can dive into each one individually. I will be assuming you are using .NET Core 3 and Visual Studio 2019 or later for each of the below practices. Most of the below practices are still recommended for earlier versions of .NET and Visual Studio but may be configured differently.
- Turn on Warnings as Errors
- Turn on Code Analysis
- Establish Code Conventions
- Consider Enabling Nullable Reference Checking
1. Turn on Warnings as Errors
Why?: You might think that having warnings is enough. However, even for some of the most diligent programmers on a project, they might have a bad day and miss a warning message from the compiler or forget to fix it before committing code to a project. Instead of relying on human discipline, why not merely automate that discipline by asking for the compiler’s assistance. By enabling warnings as errors, every compiler warning will now manifest as an error preventing compilation until addressed. As a developer, you can still disable alerts at the entire project level, or you can #pragma directives to disable warnings for given cases in the codebase. In either case, you now have an affirmative decision in the codebase that can be traced back with version history. It would be best if you considered asking developers to include comments explaining why the warning was disabled. This is the single biggest thing I do when starting any C# project. It keeps unfixed warnings from ever entering my codebase.
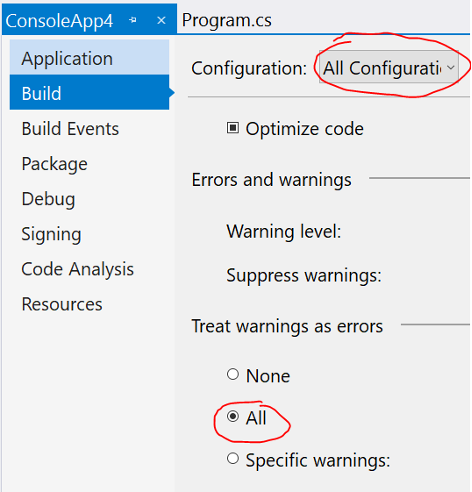
How?: You can right-click on a Project in Visual Studio and select “Properties…”. On the properties screen, you can navigate to the Build tab. On the Build tab, be sure and use the drop-down for Configuration to select “All Configurations.” Then, under the Treat warnings as errors, select “All” for the radio button and save the project. You can reference the screenshot below.
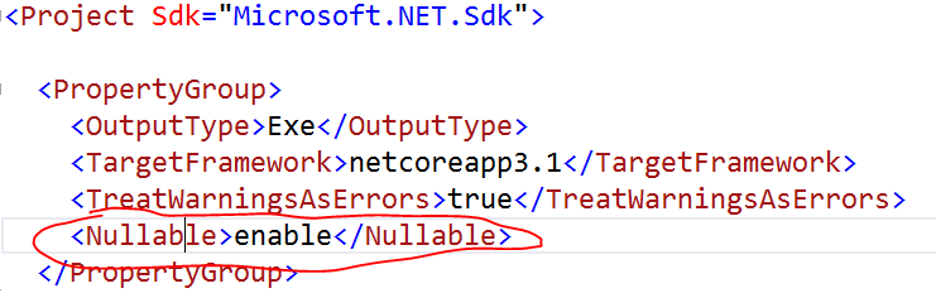
For those of you on Linux/MacOS X or using VSCode, you can instead open the .csproj file directly in a text editor. You can then add the following code inside the top-level tag:
<TreatWarningsAsErrors>true</TreatWarningsAsErrors>
See the screenshot below:

2. Turn on Code Analysis
Why?: Let’s talk about compiler warnings and errors first. Compiler errors are typically there because you made a syntax error, and the compiler can’t generate any code. Compiler warnings are provided typically because the compiler may be a deciding factor, but isn’t sure of your intention, hence a warning that they hope you will read and then fix. Most compiler teams are wary of adding new errors because it will discourage upgrades to a new compiler version. So, most of the time, compiler teams will only add recent warnings to a compiler, and by default, those warnings can be disregarded. But in general, I like to consider new compiler warnings as errors the compiler team wished they could have written. Hence, the rationale in the previous section for always enabling warnings as errors.
Now, let’s continue with the viewpoint that compiler warnings are errors, just left as warnings because the compiler team was worried about upgrades to new compiler versions and backward compatibility. With that viewpoint, warnings are still essentially only pointing out significant faults in your codebase; they aren’t pointing out suggestions or even best practices. So, how can we get recommendations or best practices? The answer to that question is to enable Code Analysis and then configure your desired ruleset.
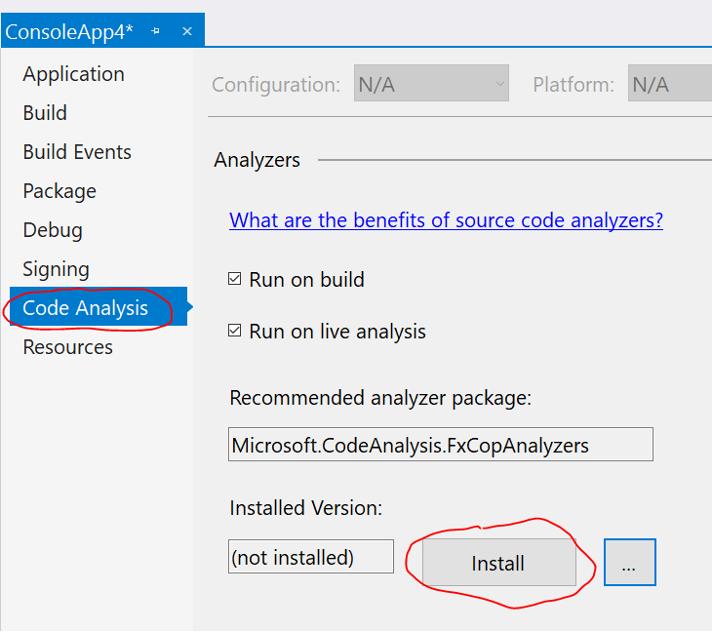
How?: You can right-click on a Project in Visual Studio and select “Properties…”. On the properties screen, you can navigate to the Code Analysis tab. On the Code Analysis tab, click the Install button. The install button will download a NuGet package that contains the code analysis rules. In general, leave both checkboxes enabled. This ensures rules during a full build of the project, and the rules built as you are typing live in the editor. You can reference the screenshot below.
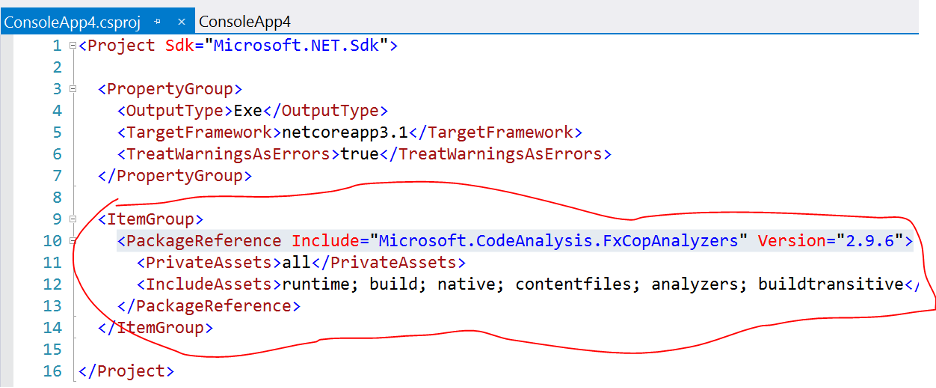
For those of you on Linux/MacOS X or using VSCode, you can instead open the .csproj file directly in a text editor. You can then add the following code inside a new tag:
<PackageReference Include=”Microsoft.CodeAnalysis.FxCopAnalyzers” Version=”2.9.6″>
See the screenshot below.
If you have enabled Warnings as Errors as recommended in the previous section, the Code Analysis rules will be considered compiler errors.
What to do once you’ve turned on Code Analysis
Let’s imagine you have created a new console application using the provided templates. Now imagine you followed my recommendations and enabled warnings as errors and turned on code analysis. Now, if you compile that application for the first time, you immediately see 2 Code Analysis errors, and your project will no longer compile. See the screenshot below.
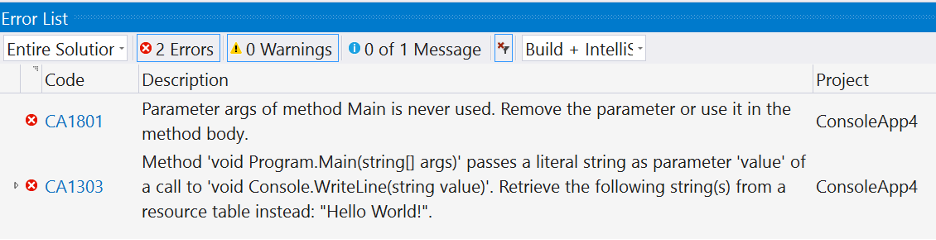
Keep in mind all you’ve done is used a provided template project and turned on some Code Analysis rules. You haven’t added any code to the project. Why then, do we see two errors in the code? Let’s talk about each error individually. As you see, the codes for the rules are CA1801 and CA1303.
Fixing Code Analysis Error #1 – CA1801 Unused Argument
How can we fix this code analysis suggestion/error, and what does it mean? The first suggestion is CA1801, which tells us that our Main method accepts a string array of arguments but that we aren’t using them in the method body. This is precisely the kind of assistance we are looking for. In this case, we could remove the arguments to the Main method. This makes our intention clearer; our Console application doesn’t have any arguments.
However, if we were implementing an interface, we might be required to have that argument even though our implementation isn’t using that argument. In this case, we can disable this on a case-by-case basis using #pragma directive. We can disable this by adding the following code around the statements where we want the rule disabled.
#pragma warning disable CA1801 // Remove unused parameter
//other code goes here
#pragma warning restore CA1801 // Remove unused parameter
You can also reference the below screenshot.
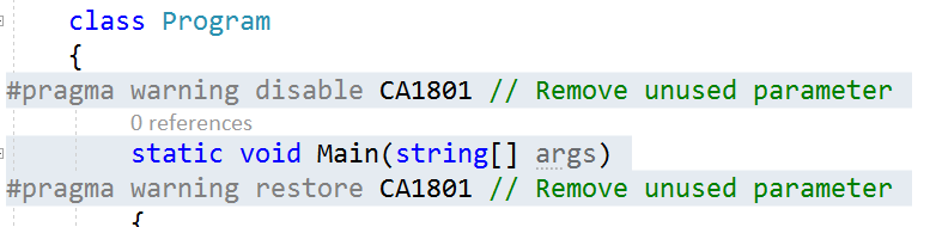
Any code between the #pragma disable, and the restore will not be checked for that given code analysis rule. The developer could also provide comments as to why this choice was made. But it’s now clear and has an intention behind it. This same approach can be used for general compiler warnings that were turned on as errors in the previous section.
Fixing Code Analysis Error #2 – CA1303 Globalization
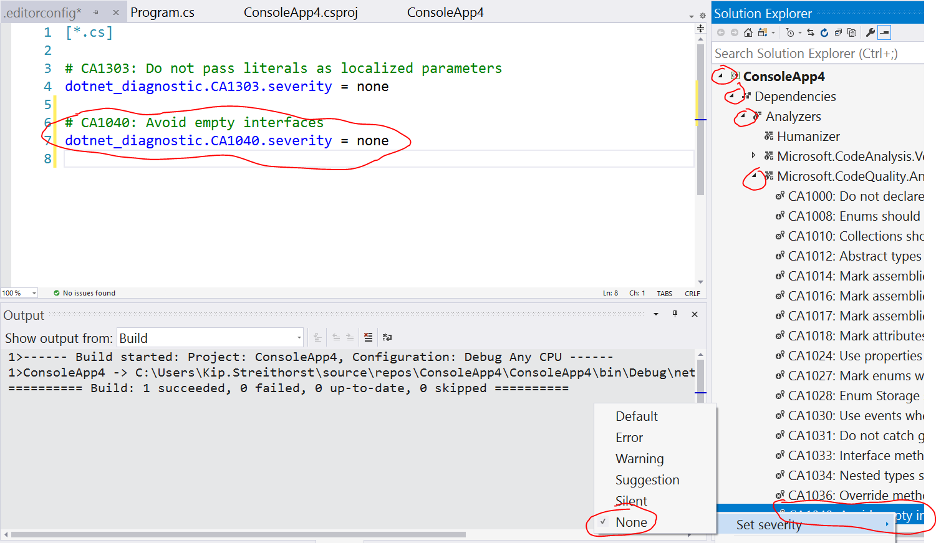
Now, let’s talk about the second code analysis error/suggestion, which is CA1303. This rule was built because internally, Microsoft is required to run it. Microsoft is a multinational company, and they deliver software to many countries in many languages. The CA1303 code analysis warning indicates that we have a hard-coded string, and we should move it to the resource (.resx) file where we could map different versions of the string depending upon the requested language and culture. Now, for our given project, it’s good that Code Analysis pointed this out so early. Because we encountered this error so early in our project, we can ask our requirements team if we need to support globalization. However, let’s assume our requirements team decides we don’t need to perform globalization. How can we turn this off once and not have to litter our code with hundreds of #pragma’s? The answer to that question is to use .editorconfig files. For those working in .NET for many years or before .NET Core, the use of .editorconfig is relatively new but is far easier than the older alternatives. The easiest way to get started is to let Visual Studio help you out. If you right-click on the Lightbulb icon for the given line, you can click to Suppress or Configure Issues. Within that menu, you can Configure CA1303 severity. When you select that option, regardless of the value, it will offer to create a new .editorconfig and add it to your project. See the screenshot below for reference.

For those of you on Linux/MacOS X or using VSCode, create a new file named .editorconfig with the following contents:
[*.cs]
# CA1303: Do not pass literals as localized parameters
dotnet_diagnostic.CA1303.severity = none
Once you have an .editorconfig, if you are using Visual Studio, you can view all of the analysis rules and configure them individually. In the Solution Explorer, expand your project. Then expand the Dependencies node and under that expand the Analyzers node. You can then find a given rule and right-click to configure Severity. This will then add a new line to your .editorconfig. See the below screenshot.
Code Analysis Summary
To summarize, enable Code Analysis. It would be best if you then fixed any code analysis errors or decide you have a good reason for not fixing the suggestion. If you have a good cause, you can use #pragma directives to disable on a case-by-case basis, or you can .editorconfig to disable entire rules.
The .editorconfig works on a directory basis. The compiler will walk up directories from the source file until it finds a .editorconfig file. So, you can stack rules for your entire solution while having different rules for unit test projects, for example.
You can also write custom code analysis rules and find other open-source packages with custom code analysis rules. You should research to see if any of the third-party dependencies also provide code analysis packages.
Establish Code Conventions
Why?: As you start work on a project, you are implicitly making some code style conventions. You are deciding how indentation is formatted, whether the project will use the “var” keyword, the preferred syntax for initializing collections, etc. It would be nice to automate enforcement of some decisions and have the compiler or formatting tool to help enforce these decisions. In previous years, your only option was to find a third-party tool, either free or commercial. With a more recent version of Visual Studio and VS Code, there are built-in tools that provide some of this capability for free. So, let’s take advantage of those provided features. The benefit of code conventions is enabling consistency across projects and making it easier to start working on an existing project. To that end, I would recommend you begin with well-established code conventions like those provided by Microsoft and only diverge where necessary for your project or organization.
How?: If you agree with the Why section above, let’s talk about How. All you need to do is use Visual Studio’s built-in support for .editorconfig. If you’ve been following my guidance from earlier sections, you should already have an .editorconfig file. That’s it, and you are done. As your team makes decisions, apply the setting to your .editorconfig file. Visual Studio then provides several tools to help you update code to match your agreed-upon conventions.
References:
https://docs.microsoft.com/en-us/visualstudio/ide/create-portable-custom-editor-options?view=vs-2019
https://docs.microsoft.com/en-us/visualstudio/ide/editorconfig-language-conventions?view=vs-2019
4. Consider Enabling Nullable Reference Checking
Why?: One of the largest sources of errors in running codebases is unchecked null values, which throw a NullReferenceException. I’m not suggesting you add if (x != null) checks all over your codebase, which can also have unintended consequences and can make your code harder to read. Instead, I might suggest you utilize a new C# 8 feature, which is nullable references checked by the compiler using advanced flow analysis at compilation time. This feature can be retrofitted onto an existing project, but the work is considerable and can be very confusing. But since this best practice guidance is for new projects, I would suggest you strongly consider enabling this on new projects from the beginning.
How?: To enable nullable reference checking, simply right-click on the project in Visual Studio. Then navigate to the Build tab and select “Enable” from the drop-down for the Nullable field. See the screenshot below for reference.
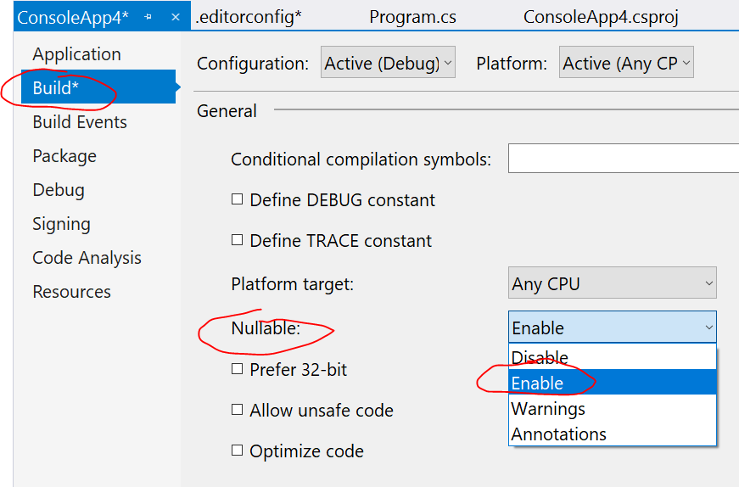
For those of you on Linux/MacOS X or using VSCode, you can open your .csproj in a text editor and add the following to the existing tag:
<Nullable>enable</Nullable>
See the below screenshot.
Once this setting is enabled, any reference type (e.g. string name, Dictionary<string, string> properties) is now considered to be non-null the compiler and the compiler will enforce this. If you wish to permit a null value, you must annotate the type like the long-time support for nullable value types. You would need to use (string? name, Dictionary<string, string>? properties). At this point, the compiler will warn you if you attempt to use any part of the object without first checking for null. It provides advanced flow analysis to determine this and supports many of the well-known patterns you already have been using for years to check for null.
Summary
I hope you found the above guidance around best practices useful. Remember, the above best practices are simply a starting point and intended to be steps you take before writing a single line of code and are enabled using only built-in features of Visual Studio or VS Code. It would help if you considered techniques such as unit testing, code coverage, and continuous integration, and potentially using other free or commercial tools such as Resharper or CodeIt.Right.
The goal for all the above practices is to ensure you start a new project out on the best foot and ensure high code quality from the beginning of the project. By creating early, it should be a low effort to maintain high code quality. It should also result in code with fewer bugs, which always makes users happy and should result in easier code because intentions in the code are clear.