First, What is Git?
Git is a DevOps tool used for source code management. It is a free and open-source distributed version control system used to manage small and large projects efficiently. Git tracks changes to source code, allowing multiple developers to collaborate on non-linear development.
Before Git
Previously, developers sent code to a central server without a copy of themselves. Changes to the source code are not known to other developers. There was no communication between the developers.
After Git
- Every developer has a local copy of the code
- Source code changes can be tracked by others
- Developers regularly communicate with each other
How Does Git Work?
Git allows users to use simple commands to track code changes and manage their projects. Git’s heart is a repository that houses a project. A repository can be kept locally or on a website like GitHub. Users of Git can keep numerous distinct repositories and track each one separately.
The project has several savepoints during the development stage. Those save points are called “commits.” Every modification made to the project during development, or a commit, is listed in the commit history. Commit allows for rolling back or forwarding the code to any commit history commit.
To refer to commit, Git uses “SHA-1 hashes”. Every hash points to a specific commit in the repository. With the help of hashes, Git creates a tree structure for easy data storage and retrieval.
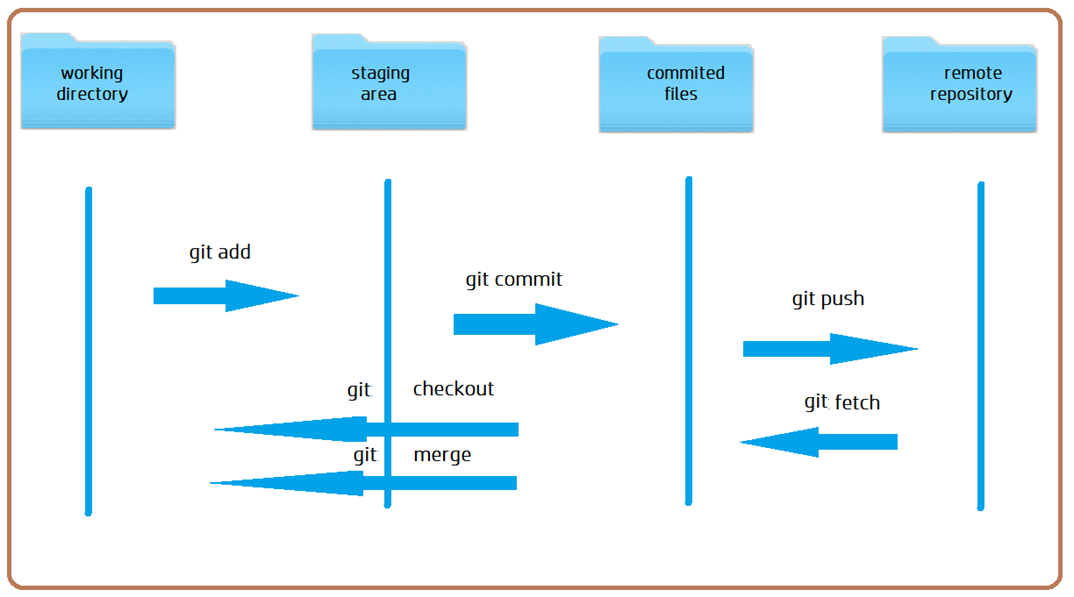
Each Git project’s files go through several stages:
- Working Directory: This stage has modified files, but they are untracked and not yet ready to commit.
- Staging Directory: Modified files are prepared for commit when added to the staging environment.
- Committed: File snapshots from the staging area are saved in the commit history.
Basic Git Workflow Diagram
Staging
To track changes made to a file it must be added first to the staging area. Whenever a file is modified, Git recognizes it, but unless and until it is not staged, Git does not track it. The staging area adds an extra layer of security that allows us to audit the changes before they are pushed to commit.
It is the preliminary step for all the files to be in the staging area before they are pushed to commit, i.e., deployed on the master branch.
We can check the status of the files that Git tracks with the use of the following command: git status
To add files to the staging area, use the below syntax:
git add [filename]
Where [filename] is the name of the actual file.
For example:

If we have multiple files to add we can use a command for staging faster: git add
we can remove the file from the staging area with the below command: git rm –cached [filename]
Example:

Commit
These are like snapshots of our work, a snapshot of the repository at a specific time. Commit snapshots do not change unless specifically executed.
We can check if any files are ready to commit by using the following command: git status
Example:
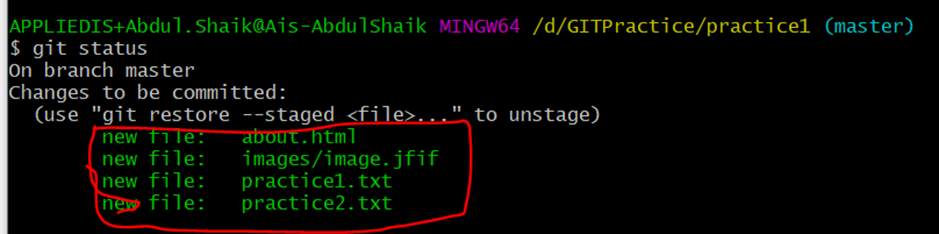
We see in the above screenshot that four files are ready to commit.
To commit them, we use the syntax: git commit -m “Notes about the commit”
We use the -m flag followed by the description of the commit to identifying why the commit was made.
Example:

The output will have the commit and states what has been changed.
Commit history can be checked using the below command: git log
The result will give us the history that includes information on who made commits and what those commits are when it was made, and the description of the commit.
Adding – oneline flag will display the history in a one-liner.

Reverting
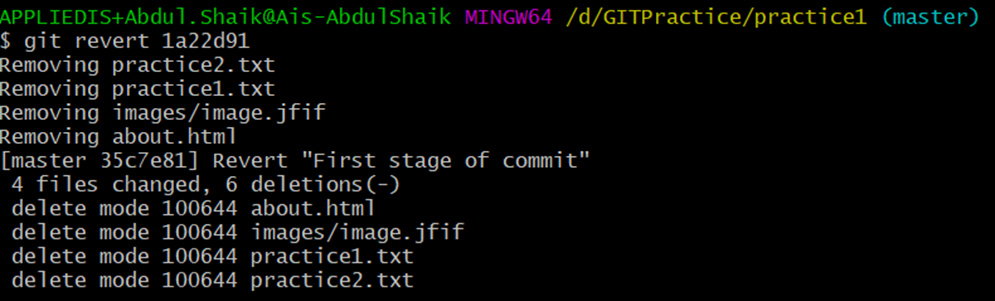
Git revert enables us to roll back a commit if we made a mistake during project development or for any other reason. The Git revert rolls back the commit that is made to remove the changes from the master branch: git revert [commit_ID]
We can get the information of commit_ID using the command: git log
The Git reset command takes back to a particular point in the development permanently. If we want to re-add files or updates that were added after that time, they are all unstaged.
Git reset [commit_ID]if we add the flag – hard to the above command it removes the unstaged files after then it is impossible to bring them back.
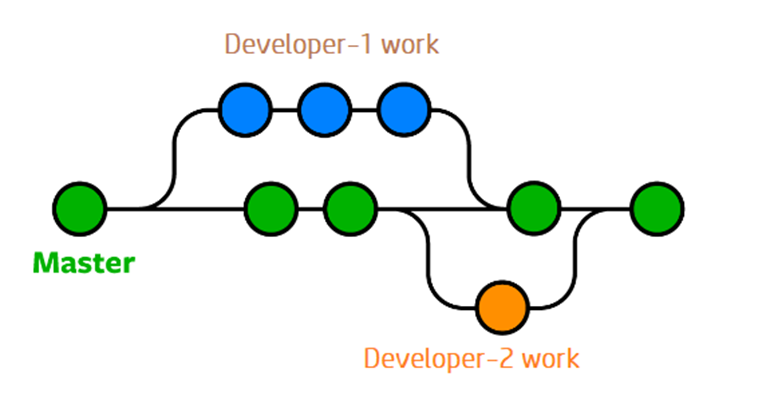
Branching:
Git branching enables programmers to deviate from the code in use to correct bugs or add features. To work with a copy of the code without altering the original, developers create branches. To isolate the code changes, we establish branches. We test these branches before integrating them into the main branch.
The master branch is nothing but the stable version of the code which is created when we initialize a Git repository using the Git init command.
Branching makes the developers or users create an isolated environment where they can add features or edit code without touching the master branch. Once everything goes well then, we can merge it into the master branch. If something goes wrong, then we can delete the branch and the master branch is untouched.
With branching every developer of the project to work on it parallelly.
To create a branch use the command: git branch [branch-name]

Here we have created a new branch with the name feature-1.
Merging and Conflicts
Once the developers finish their work on a new feature or a bug fix on a separate branch, using the git merge command, the developers can
merge their changes to the main branch without sending the work to other developers in the project. Merging changes entails incorporating the code into the master branch.
Existing branches can be seen using the command: git branch -a

The screenshot above shows that we have one branch, feature-1. To merge with the master branch, we follow the steps below:
- We need to switch to the master branch.
- git checkout master
- Once we switch to the master branch to merge the branch, we use the command below:
- git merge [branch-name]

A conflict occurs when someone decides to make changes to the master branch while we are working on another branch. This type of conflict occurs when we attempt to merge changes with the master branch, which is now distinct from the code copy.
Fetching and Pulling Changes:
To retrieve changes from the remote repositories, use git fetch and git pull commands.
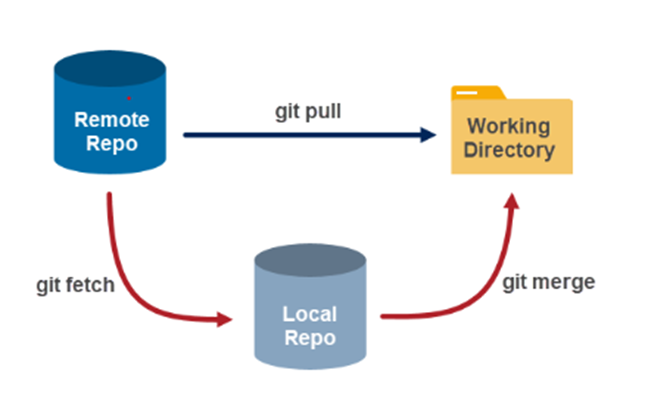
git fetch only fetch all the changes that are in the remote repository. There will be no changes to the local repository.
git pull fetches the metadata from the remote repository and adds new changes to the local repository.
In general git pull = git fetch + git merge
Pushing Changes:
In contrast to git pull, git push enables you to share modifications and publish them in the remote repository.
Most frequently, local modifications are published and uploaded to a central repository using git push. A push is used to distribute changes made to a local repository with team members who are working remotely.
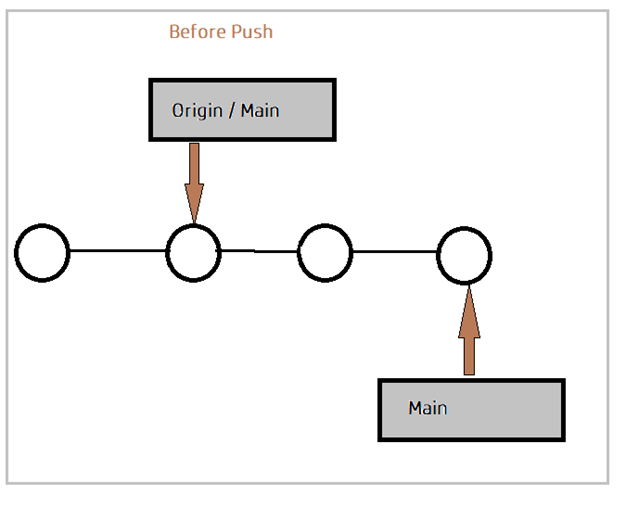

When you make changes locally and want to push them to a remote repository, run: git push
Rebasing:
Git makes a copy of the existing code when we create a branch so we can continue to work on it. To keep up with general development, developers might occasionally need to incorporate fresh modifications from the master branch.
Rebasing entails merging fresh changes from your feature branch into the master branch. Git then creates commits on top of the tip of your feature branch by replaying the most recent modifications from the master branch.
To rebase the feature branch, we use the following steps:
- Use the command git checkout and move to the feature branch.
- git checkout [branch-name]
- Use the below command to rebase the branch.
- git rebase master.
Both rebasing and merging, but in different methods, are intended to incorporate changes from one branch into another branch. In pictorial representation if we have commits as shown below, the merge will result in a combination of commits, whereas rebase will add all changes in the feature branch beginning with the last commit of the master branch:
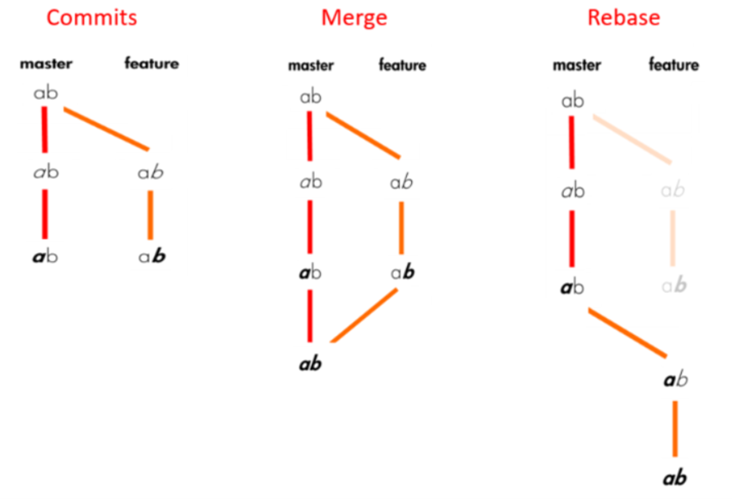
Merge vs. Rebase
Rebasing is not advised if the feature branch from which you are getting changes is shared with other developers because it will result in inconsistent repositories.
Merge is the best option if you want to observe history exactly as it occurred. Rebase rewrites history while merge maintains it.
Conclusion:
There are definite benefits of using Git. It saves time, works offline, undoes mistakes, and tracks changes. With this, we get an idea of what Git is and how it works, basic commands to use in Git, and what is branching, merging, rebasing, push and pull. I hope this should help move forward in learning Git.