If you are familiar with Kubernetes, you must know Kubernetes installation is one of the challenging topics of Kubernetes. This challenge occurs because a multitude of installation methods exist.
Practicing Kubernetes with a production-grade cluster with no or low cost is difficult, and many still doubt it. Let’s see a few methods of installing Kubernetes.
Single-node Installation
minikube is a single-node Kubernetes distribution that releases officially by the Kubernetes community.
Manual Cluster Installation
kubeadm is a tool used to deploy a cluster by human hands. It is used to bootstrap Kubernetes components, not provision machines. Before bootstrapping the cluster, some actions should be done manually.
Automatic Cluster Installation
kops will manage the cluster lifecycle but also will provision the necessary cloud infrastructure. Deploying on AWS is officially supported.
Managed Clusters
EKS stands for Elastic Kubernetes Service, is the amazon solution to provide managed Kubernetes cluster.
GKE is a Google Cloud version of Kubernetes, just like AWS EKS.
AKSis managed by Microsoft Azure and can be deployed easily. This managed Kubernetes solution is suitable for Azure users because it can integrate with other Azure tools available in the Azure ecosystem.
I prefer to learn that it is better to control a cluster fully. kOps is designed for the production-grade cluster and will take less time to install. Most of the configurations are just one-time configurations. Every time with new AWS instances, we can deploy the k8’s infrastructure in just 5 to 10 min.
Let’s understand what kOps is and its advantages.
What is kOps?
Kubernetes kOps is a free and open-source command-line tool for configuring and maintaining Kubernetes clusters and provisioning the cloud infrastructure needed to run them. With kOps, teams can automate the management of Kubernetes clusters. For example, kOps can create, apply, and update cluster configurations. It can also provision the cloud infrastructure that clusters require, such as (for AWS) virtual private clouds (VPCs), autoscaling groups, security groups, and IAM roles.
Dependencies to install kOps:
- AWS account
- Create VPC & Deploy t2.micro Instance for management
- Create AWS S3 Bucket
- Domain Name (can be purchased from Godaddy)
- Create AWS Route53 Zone using the domain from step 4.
- Create Ec2 Instance and Access key & secret key of the user
- Generate SSH-Keys
- Download the kOps binary to the management server and execute the permission
- Download the kubectl binary to the management server and execute the permission
- Deploy Kubernetes server with kOps
AWS Account
Create an AWS account using https://aws.amazon.com/premiumsupport/knowledge-center/create-and-activate-aws-account/ if you do not have it already.
Create VPC & Deploy t2.micro Instance for Management
There is no mandated requirement to create a new VPC to create instances. We can use default VPC to create an Instance.
Create AWS S3 Bucket
kops lets you manage your clusters even after installation. To do this, it must keep track of the cluster you have created, its configuration, the keys they are using, etc. This information is stored in an S3 bucket. S3 permissions are used to control access to the bucket.
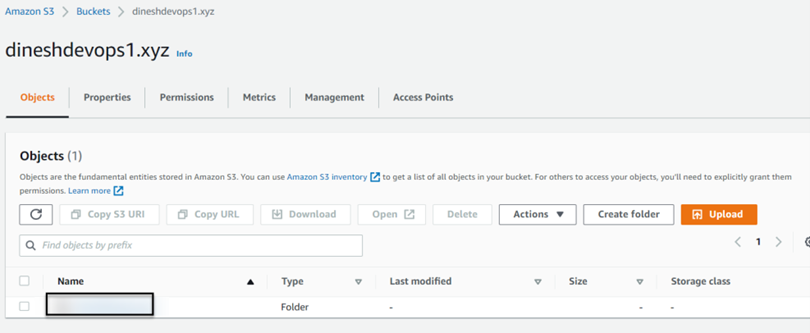
We can create an S3 bucket with a name. I created it with my domain name in this example:
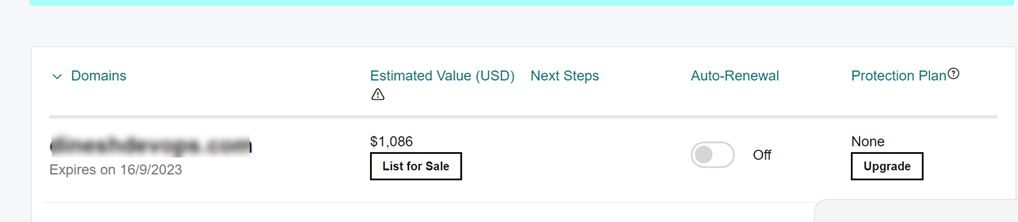
Domain Name (can be purchased from Godaddy) and Create AWS Route53 Zone using the domain. A domain name is an address of your website that people type on a browser to visit your website. In layman’s terms, if you consider your house a website, a domain can be considered your house’s address.
Since this is a test cluster, we choose a GoDaddy domain. At the Enterprise level, companies either register/buy domains from Amazon Route 53 or maintain a separate team to provide you with the desired domain name. Any domain with .xyz will be the least cost for yearly subscriptions.
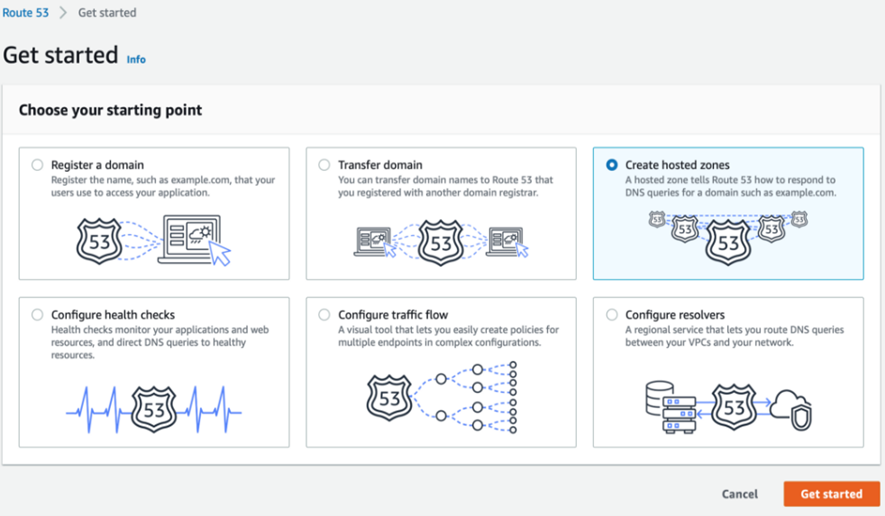
Route 53 DNS: Create a hosted zone on Route 53 with the domain bought at godaddy.com and configure the GoDaddy domain to use name servers (NS) on Route 53.
Navigate to Services > Route 53 > Create hosted zones > Get Started
Now, go to My Domains on GoDaddy and click on manage domain. You should select ”using custom name servers,” remove the existing entries in GoDaddy, and enter the NS records from the AWS-hosted zone we created.
Whenever the user access URL: on the browser, as godaddy.com is hosting the website, GoDaddy routes the request to nameservers present at Manage DNS Tab. In the previous step, we replaced the GoDaddy nameservers for the domain with Amazon-hosted zone nameservers.
Create an Ec2 Instance and Access key & secret key of the userDeploy an EC2 instance (Redhat or Ubuntu or Amazon AMI)to install tools needed for cluster deployment.
a. EC2 Instance Type: t2.small
b. EBS Volume: 20 GB
c. Enable the following ports in the Security Group: HTTPS (80), HTTPS (443), SSH (22).
d. Purchase Elastic IP and associate to EC2 Instance. (This Step is Optional if you are using it for testing purposes)
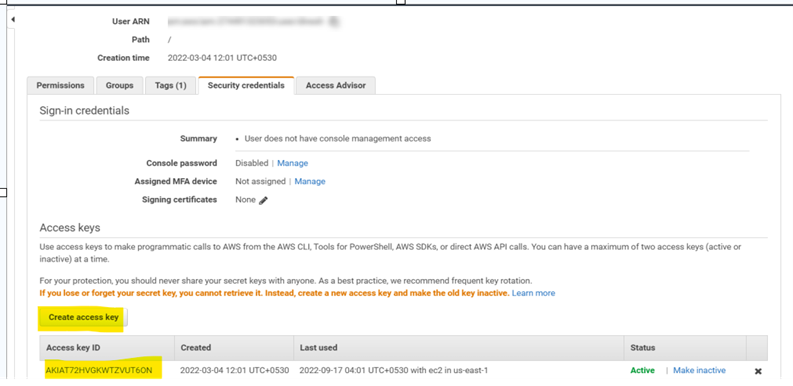
IAM User: Create a user on IAM and provide programmatic access to the user to generate an access key and secret key at the end. Also, provide full permissions on the S3 bucket, EC2, Route 53, VPC, and IAM to the user, as shown below.
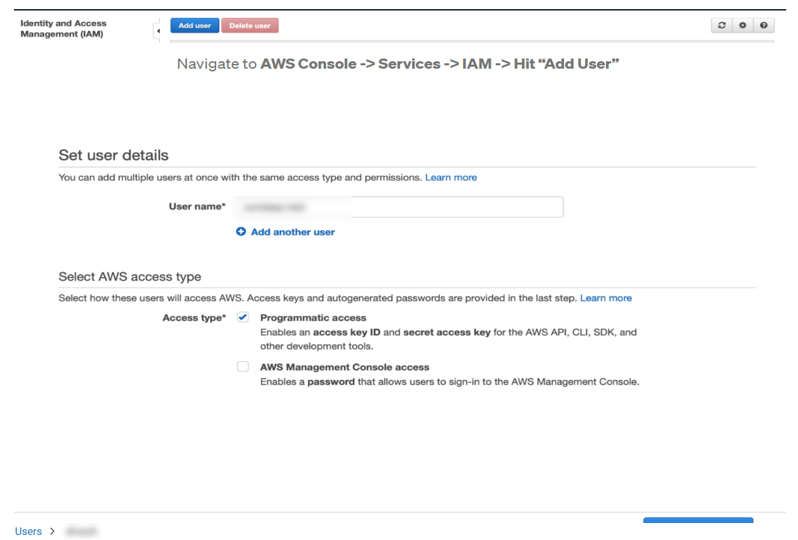
We can give admin access to the user (as it is for practice purposes), generate access and secret keys as below, and save the file.
Configure IAM User on Management Server: Run the below steps on the management server.
Note: Download Amazon CLI if it’s not available on the server. In this case, as we are using Amazon AMI Instance, it is available by default.

Update the packages first
yum update -y
Generate ssh keys
ssh-keygen -f ~/.ssh/id_rsa -P ""
Configure IAM User on Management Server:
Run the below steps on the management server.
Note: Download Amazon CLI if it’s not available on the server. In this case, as we are using Amazon AMI Instance, it is available by default.
mkdir .aws && cd .aws/
cat <<EOF > credentials
[default]
aws_access_key_id=<Access key of IAM user created>
aws_secret_access_key=<Secret key of a IAM user created>
EOF

cat <<EOF > config
[default]
region=us-east-1
output=json
EOF

[root@ip-172-31-88-136 .aws]# ls
config  credentials
[root@ip-172-31-88-136 .aws]# cat config
[default]
region=us-east-1
output=json

[root@ip-172-31-88-136 .aws]# cat credentials
[default]
aws_access_key_id=AKIAT72HVGKWTZVUT6ONXx
aws_secret_access_key=gqhfFH5xdAYEbV/xmktvazz5CU3pvNzEQFPpOU1WMX
[root@ip-172-31-88-136 .aws]#
Download Kops binary and move it to /usr/local/bin directory to access the binary from any path.
[root@ip-172-31-88-136 .aws]# cd /usr/local/bin/
[root@ip-172-31-88-136 bin]# curl -LO https://github.com/kubernetes/kops/releases/download/$(curl -s https://api.github.com/repos/kubernetes/kops/releases/latest | grep tag_name | cut -d '"' -f 4)/kops-linux-amd64
chmod +x kops-linux-amd64
mv kops-linux-amd64 kops
kops version  % Total    % Received % Xferd  Average Speed   Time    Time     Time  Current
                                 Dload  Upload   Total   Spent    Left  Speed
  0     0    0     0    0     0      0      0 --:--:-- --:--:-- --:--:--     0
100  155M  100  155M    0     0   183M      0 --:--:-- --:--:-- --:--:--  176M

[root@ip-172-31-88-136 bin]# chmod +x kops-linux-amd64
[root@ip-172-31-88-136 bin]# mv kops-linux-amd64 kops
[root@ip-172-31-88-136 bin]# kops version
Client version: 1.25.0 (git-v1.25.0)
Download the latest version of kubectl using the below URL
[root@ip-172-31-88-136 bin]# curl -LO "https://dl.k8s.io/release/$(curl -L -s https://dl.k8s.io/release/stable.txt)/bin/linux/amd64/kubectl"
  % Total    % Received % Xferd  Average Speed   Time    Time     Time  Current
                                 Dload  Upload   Total   Spent    Left  Speed
100   138  100   138    0     0   2785      0 --:--:-- --:--:-- --:--:--  2816
100 42.9M  100 42.9M    0     0   131M      0 --:--:-- --:--:-- --:--:--  131M

[root@ip-172-31-88-136 bin]# chmod +x kubectl

[root@ip-172-31-88-136 bin]# kubectl version
WARNING: This version information is deprecated and will be replaced with the output from kubectl version –short. Use –output=yaml|json to get the full version.
Client Version: version.Info{Major:"1", Minor:"25", GitVersion:"v1.25.2", GitCommit:"5835544ca568b757a8ecae5c153f317e5736700e", GitTreeState:"clean", BuildDate:"2022-09-21T14:33:49Z", GoVersion:"go1.19.1", Compiler:"gc", Platform:"linux/amd64"}
Kustomize Version: v4.5.7
GitCommit:"5835544ca568b757a8ecae5c153f317e5736700e", GitTreeState:"clean", BuildDate:"2022-09-21T14:33:49Z", GoVersion:"go1.19.1", Compiler:"gc", Platform:"linux/amd64"}
Kustomize Version: v4.5.7
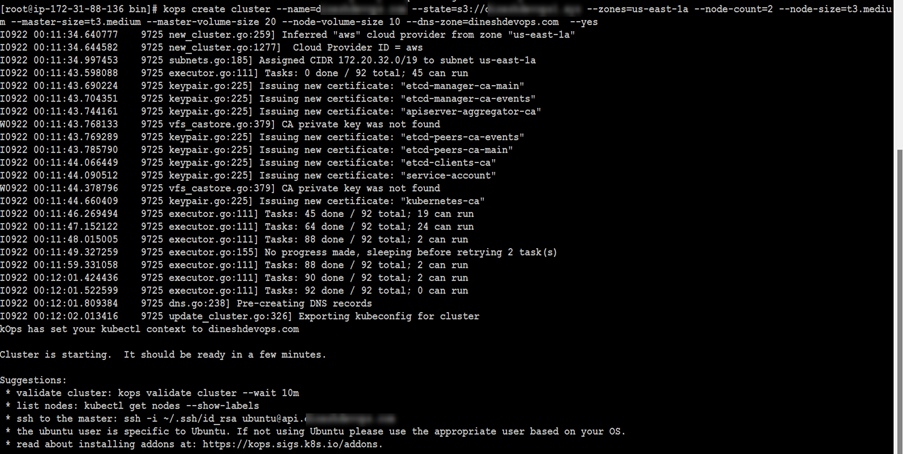
Next, create a cluster using the command.
Note: Cluster name can be anything. State S3 should be the name of the S3 bucket we created on AWS. DNS zone is the domain name we created on GoDaddy. This will create three t3.medium instances (we can not deploy t2.miro or t2.medium instances for cluster). One is the master, and two are slave nodes.
kops create cluster --name=mycluster --state=s3://mys3bucket.xyz --zones=us-east-1a --node-count=2 --node-size=t3.medium --master-size=t3.medium --master-volume-size 20 --node-volume-size 10 --dns-zone=godaddy.xyz --yes
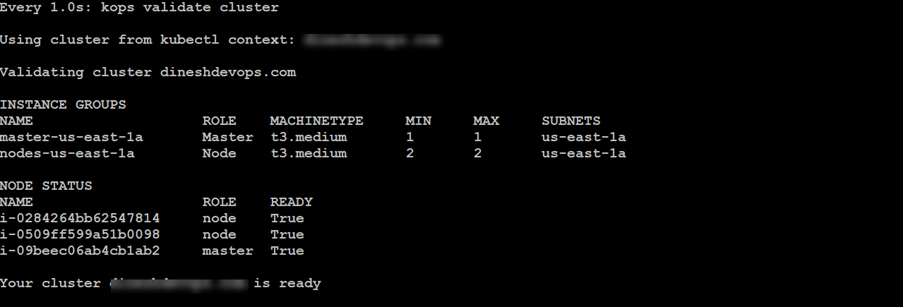
Validate the cluster using the below command:
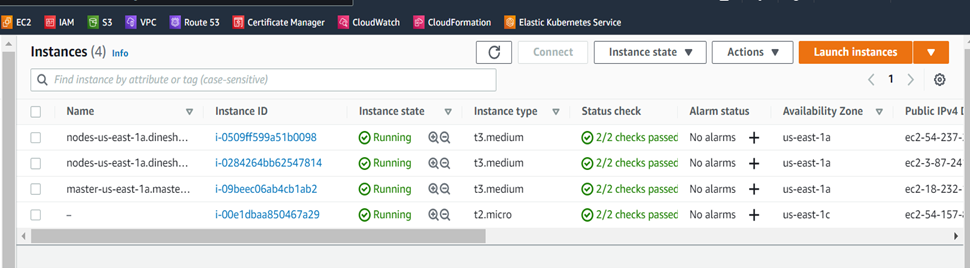
We can see the provisioned servers on AWS console:
Delete the cluster. It will delete the entire cluster and its dependencies created on AWS.
kops delete cluster --name dineshdevops.com --state s3://dineshdevops1.xyz --yes
PROS
1. Prduction-grade Kubernetes Cluster can be created using kops.
2. Since the Kubernetes control plane has many components, kOps take care of automation during cluster formation.
3. Hard to break cluster as kube-apiserver always monitors new changes and maintains the cluster state using other components.
CONS
1. Little complex to build initially. But the Domain, IAM user, and S3 buckets are one-time configurations.
2. Expensive if it needs to be used correctly. We can only deploy the cluster and keep it live for a short time as it has t3 instances.
Conclusion
Once the above steps are configured on the management server, you are good to configure your applications. Compared to kubeadm, kubernetes cluster setup using kOps is little complex and needs ample knowledge on AWS but is referred to as a stable way to spin up production-grade cluster.