


The cloud-oriented domain presents numerous styles of building automated solutions for various personal & business use cases. And there is no such thing as a correct or incorrect solution to these problems. It all depends on your requirement and any restraints in building the solution.
The introduction of serverless solutions proved to be a perfect fit for scenarios where you must perform event-driven tasks cost-effectively and flexibly.
Azure Functions
Azure Functions are a lightweight serverless compute-on-demand, Platform-as-a-Service (PaaS) offering from Microsoft where you can run & deploy your code directly without being bothered by the underlying infrastructure to host your application. They scale automatically as the load increases & you just need to pay for the execution time of the functions.
Azure Functions execution mode: In-process vs. Out-of-process
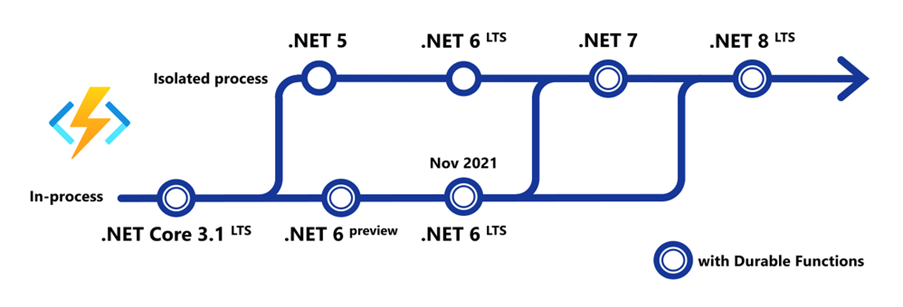
Initially, .NET Azure Functions only supported a strongly coupled mode of execution known as In-process mode, where your function code runs in the same .NET process as the host (Azure Functions runtime). In this mode, your code should run on the same framework version used by the runtime. The tight coupling certainly provided performance benefits such as faster cold start times but had shortcomings, such as the inability to create/use your Host instance to register your own Middleware, Logger, etc.
Starting .NET 5, Microsoft introduced a new Isolated-process (aka Out-of-process) mode for running your code in Azure Functions. The main benefit of isolated mode is that it decouples your function code from the Azure Functions runtime, thus letting the users utilize any supported version of .NET, even if it’s different from the runtime version.
Isolated mode removed the limitations of in-process execution mode, as it provided the user with the following:
- Full control over how you configure & run your code inside Azure Functions
- Ability to utilize features such as implementing custom Middleware, Logging, etc.
- Encountering fewer conflicts between the code assemblies & the assemblies used by the host process.
Isolated-process Function Apps certainly offer numerous advantages compared to In-process Function Apps. And as per the roadmap shared by Microsoft for Azure Functions, isolated process functions are indeed the future & eventually will be the only choice from .NET 7 onwards.
This means that if you choose to go with isolated mode, the upgrade process for your codebase would be easier than in-process mode.
When writing this blog, our codebase is running on .NET 6 framework. So, for our solution, we decided to implement Azure Functions (version 4.x) based on the Isolated process model.
Isolated-mode Timer triggers Azure Functions
To set up an Azure Functions project to run in Isolated process mode, select the Azure Functions project template & select the “.NET 6.0 Isolated (LTS)” type in the dropdown:
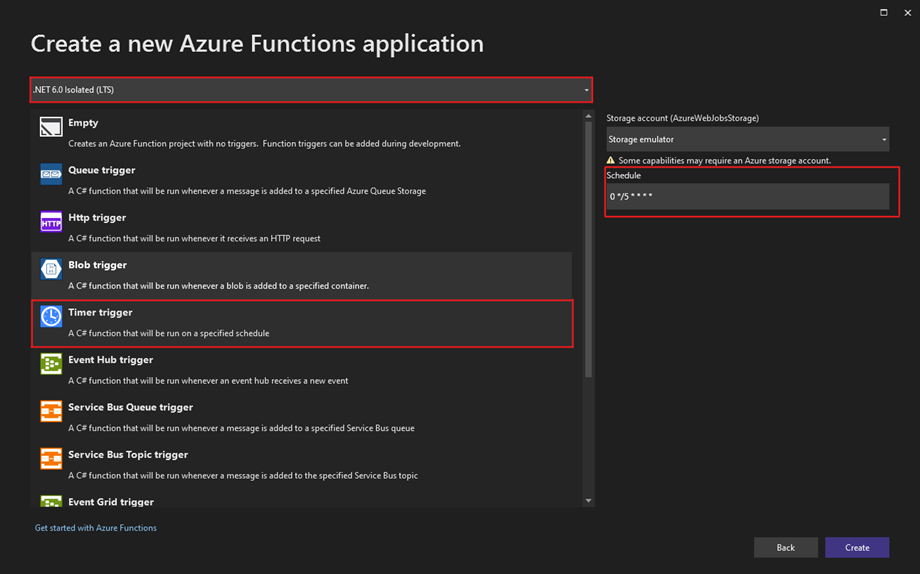
The requirement was to implement an automated solution scheduled at certain time intervals, so we decided to work with Timer trigger functions as they let you run your code on a specified schedule.
Timer trigger functions use a CRON expression which describes a schedule on which the function is supposed to execute. A CRON expression contains six space-separated values represented as:
{second} {minute} {hour} {day} {month} {day-of-week}
In the above expression, each field can hold a specific (valid) numeric value, a range of values (2-4), a set of values (2,4,6), an interval value (e.g., /5 means every fifth of that unit) or all values (represented by an asterisk *).
The value in the “Schedule” column in the above screenshot is an example of a CRON expression. The value says:
10 */5 * 15-20 * *
This CRON expression translates to “Run the Timer Trigger function at 10th second of every 5th minute of every hour between day 15 and 20 in every month”.
After creating a .NET isolated function project, the Solution Explorer will contain the following files:
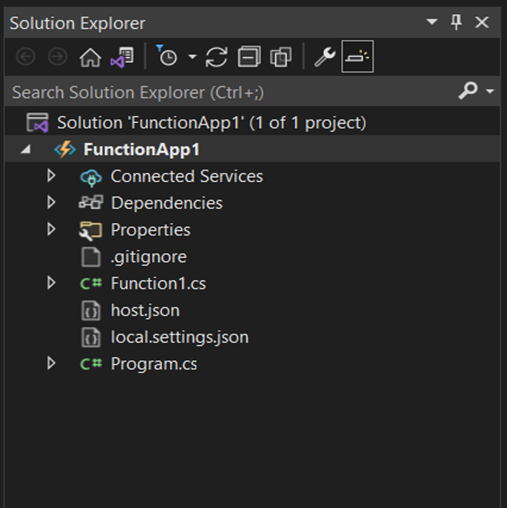
The critical point to notice in an isolated functions project is that it contains a Program.cs file provides direct access to the Host instance, giving you complete control over setting any code configurations & dependencies. There is no separate Startup class available/required here.
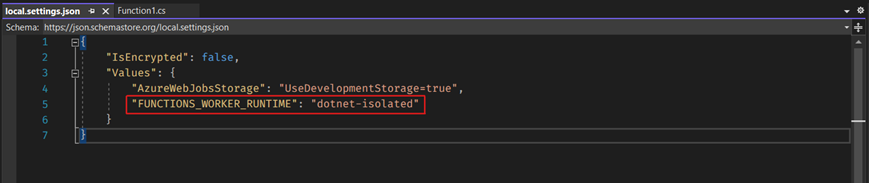
Another difference is the local.settings.json file, where the FUNCTIONS_WORKER_RUNTIME application setting is set to “dotnet-isolated”. The value is set to “dotnet” for an in-process Azure Function.
Note: If you are using your appsettings.json files to store configuration values for various environments, you need to add the FUNCTIONS_WORKER_RUNTIME variable in the parent appsettings file as well, so that it gets inherited & applied to all your appsettings.json files.
Using Middleware with Azure Functions
For our use-case, we implemented our own middleware to perform exception handling & log every exception that occurs in our Function App. To do that, we created a class called “ExceptionHandlingMiddleware.cs”. Now, for this class to act like a middleware, it needs to inherit IFunctionsWorkerMiddleware interface & implement it. At this point your code should look like this:
public class ExceptionHandlingMiddleware : IFunctionsWorkerMiddleware
{
    public async Task Invoke(FunctionContext context, FunctionExecutionDelegate next)
    {
        await next(context);
    }
}
Now, let’s add some code to our middleware class so that it can grab those exceptions and log them to the respective logger sources.
public sealed class ExceptionHandlingMiddleware : IFunctionsWorkerMiddleware
{

   public async Task Invoke(FunctionContext context, FunctionExecutionDelegate next)
   {
       try
       {
           await next(context);
       }
       catch (Exception e)
       {
           var log = context.GetLogger<ExceptionHandlingMiddleware>();
           log.Log(LogLevel.Error, eventId: 101, e, $"An exception occurred while calling the timer-triggered function. Exception message: {e.Message}. Original exception type: {e.GetType().Name}.");
       }
   }
}
Our custom middleware is all set to handle any exceptions occurring during the execution of our function app. Now, in order to actually use it, we need to register it in our Program.cs file.
public class Program
{
    public static void Main()
    {
        var host = new HostBuilder()
            .ConfigureFunctionsWorkerDefaults(
                builder =>
                {
                    builder.UseMiddleware<ExceptionHandlingMiddleware>();
                }
            )
            .Build();

        return host.Run();
    }
}
If an exception occurs in your Function App, it will get caught and logged to your console window, and if you have Application Insights configured, it will be logged in the respective Azure App Insights resource.
Conclusion
Isolated-process mode of Azure Functions certainly provides users with full control over the code, from deciding how to start the app to control the configuration of our functions. And it can significantly reduce the execution costs compared to other automation solutions such as Azure Runbooks (which was the initial solution in our use-case before introducing Azure Functions), not to mention other benefits such as auto-scaling, ability to perform code-based regression testing, availability of multiple input/output options (compared to just JSON input for Runbooks) & various upgradeable tiers to host them.
Considering the above-mentioned benefits, I guess it is safe to say that Azure Functions will play a key role in helping people solve complex problems in the cloud automation domain in the future.

