


One of our clients has been pushing big to migrate all the application infrastructure to Azure. Some of the applications have been using on-prem file servers and we have been looking at different options available to migrate these file shares to Azure. We looked at Azure Blob storage, Azure Files and Azure Disks to find out the most fitting solution for us that would offer high performance, permissions at the folder level, and long-term backup retention.
Although Azure Blob storage is great for massive-scale storage, it was easy to dismiss it as our applications were using the native file system and didn’t have to support any streaming and random-access scenarios. Azure Files offered fully managed file shares in the cloud. Unlike Azure Blob storage, Azure Files offer SMB access to Azure file shares. By using SMB, we could mount an Azure file share directly on Windows, Linux, or macOS, either on-premises or in cloud VMs, without writing any code or attaching any special drivers to the file system. It provided windows like file-locking but there were some limitations with Azure Files e.g., we don’t have folder/file level control over the permission and the only way to accomplish that was to create shared access signature on folders where we could specify read-only or write-only permissions, which didn’t work for us. Azure Files Backup provided an easy way to schedule backup and recovery. However, the important limitation was that backups could retain files only for a maximum of 180 days.
Azure Disk fulfilled all our requirements. Although running a file server with Azure Disk as back-end storage was much more expensive than Azure File share but it was the most high-performance file storage option in Azure, which was very important in our scenario as files were used in real-time under heavy load. For compliance and regulatory reasons, all files needed to be backed up, which could be easily done by Azure Virtual Machine Backup without any additional maintenance. The only limitation of Azure Virtual Machine Backup was that it only supports disks that are less than 4 TB. So, in the future, if a need arises for additional storage that meant having multiple disks in a striped volume. Also, after implementing the file server in Azure VM, we could still get the best of both Azure Files and Data Disk by using Azure File Sync. Having a file server and Azure file share in the Sync group would ensure minimal duplication and set the volume of free space. So finally, we decided to deploy a file server in Azure Windows VM with premium SSD.
Troubleshooting
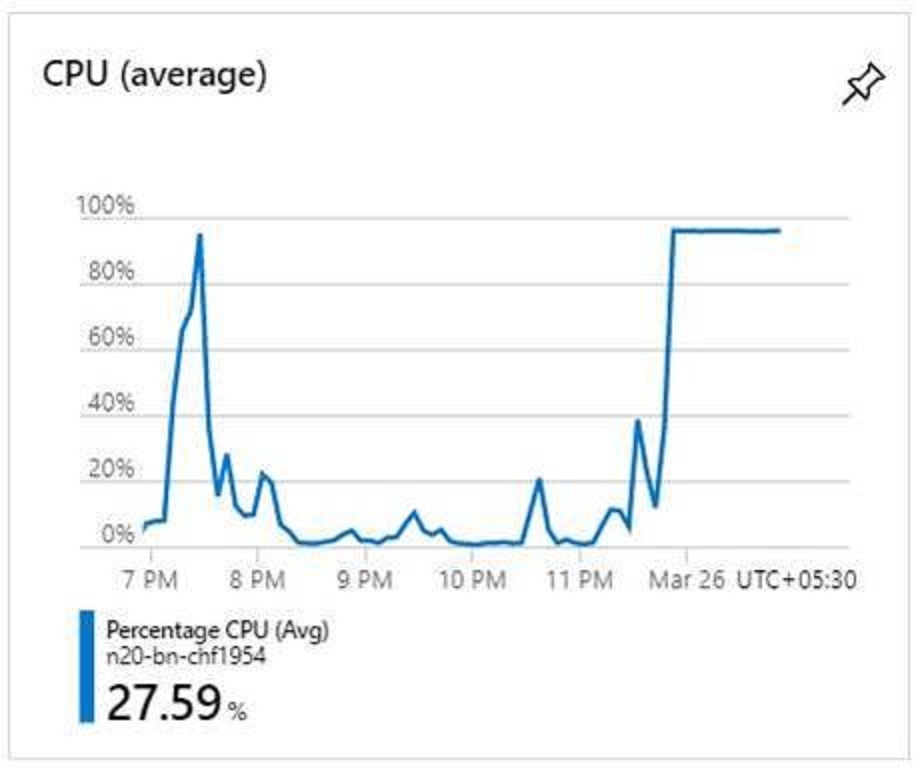
After we deployed the file server in Azure Virtual Machine everything worked like a charm and we had found an ideal solution in Azure for our file servers. However, after some time we used to encounter intermittent issues in the VM, CPU usage would near 100 percent, shares would become inaccessible and VM would hang at OS level bringing everything to a halt.
Generally, to troubleshoot issues in Azure VM, we can connect to a VM using the below tools:
- Remote CMD
- Remote PowerShell
- Remote Registry
- Remote services console
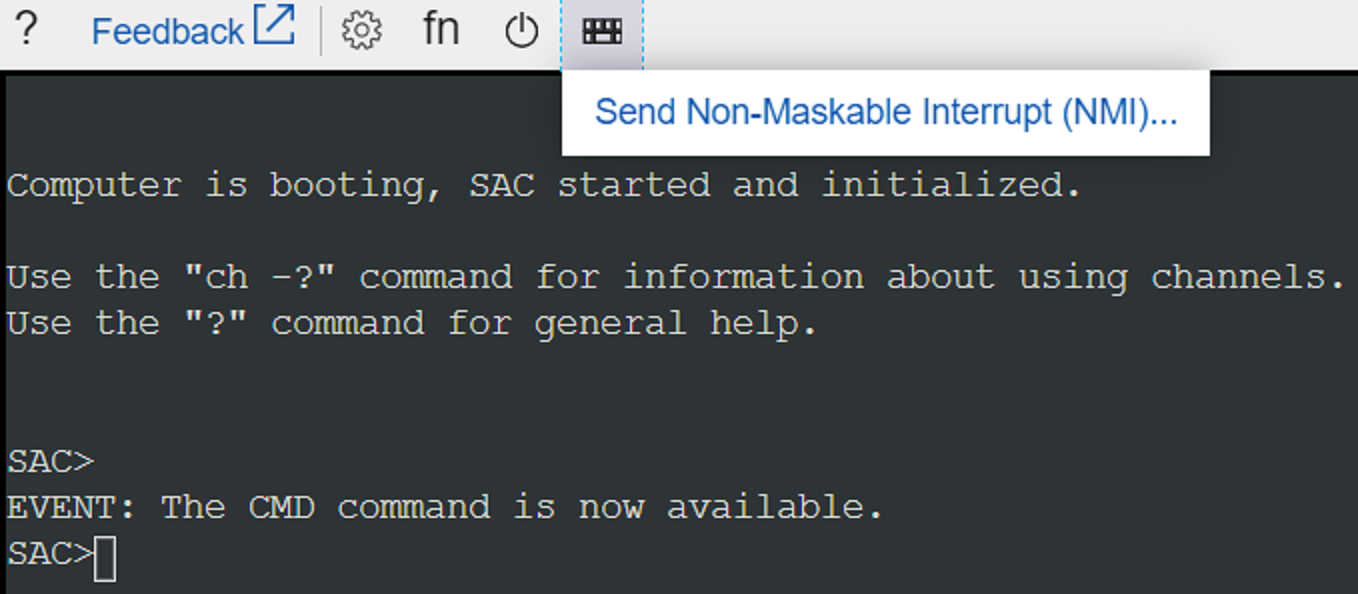
However, the issue we were encountering hung the OS per se so we could not use the above tools to troubleshoot the VM. There was not even any event log generated that would indicate the possible guest OS hung situation. So, the only option left was to generate the memory dump to find the root cause of the issue. Now, I will explain how to configure the Azure VM for a crash dump and how to trigger the NMI (Non-Maskable Interrupt) crash dumps from the serial console.
Serial Console is a console for Azure VMs that can be accessed from the Azure portal for VMs that have been deployed using the resource management deployment model. It connects directly to COM1 serial port of the VM. From Serial Console we can start a CMD/PowerShell session or send an NMI to VM. NMI creates a signal that VM cannot ignore so it is used as a mechanism to debug or troubleshoot systems that are not responding.
To enable Serial Console, we need to RDP into the VM and run the below commands.
bcdedit /ems {default} on
bcdedit /emssettings EMSPORT:1 EMSBAUDRATE:115200
We also need to execute the below commands to enable boot loader prompts.
bcdedit /set {bootmgr} displaybootmenu yes
bcdedit /set {bootmgr} timeout 7
bcdedit /set {bootmgr} bootems yes
When the VM receives an NMI, its response is controlled by the VM configuration. Run the below commands in Windows CMD to configure it to crash and create a memory dump file when receiving an NMI.
REG ADD "HKLM\SYSTEM\CurrentControlSet\Control\CrashControl" /v DumpFile /t REG_EXPAND_SZ /d "%SystemRoot%\MEMORY.DMP" /f
REG ADD "HKLM\SYSTEM\CurrentControlSet\Control\CrashControl" /v NMICrashDump /t REG_DWORD /d 1 /f
REG ADD "HKLM\SYSTEM\CurrentControlSet\Control\CrashControl" /v CrashDumpEnabled /t REG_DWORD /d 1 /f
Before we can use Serial Console to send NMI, we also need to enable Boot diagnostics of VM in Azure portal. Now we are all set to generate the crash dump. Whenever the VM hangs all we need to do is open the Serial Console in the Azure portal, wait till it displays SAC prompt, and hit the Send Non-Maskable Interrupt (NMI) from the menu, as shown below.
In our case, we have been using FireEye service for security purposes. After we analyzed the memory dump it was found the FeKern.sys (FireEye) is stuck waiting for a spinlock and the driver exhausting CPU % time. FeKern.sys is a file system filter driver that intercepts the requests and in this case, was not able to handle the load. There can be varied reasons for unresponsive VMs and NMI crash dumps can be of great help to troubleshoot and resolve the issues.
Happy Computing!
Sajad Deyargaroo

