


 Today I want to talk about a process we created for building out machines using Virtual Machine Manager (VMM) as part of our daily build process within Team Foundation Server (TFS).
As part of our nightly build process, we actually recreate the entire environment from scratch. We don’t use snapshots; we actually delete and provision a series of VMs. This may sound like overkill and I’ve seen other approaches that use snapshots and revert each night…and I think that’s great. Use what works for you. However, we wanted something that could not only exercise our code base, but also our scripts that we use for building our environment. In a way, this allows us to test both pieces at the same time.
At this point I should throw in the disclaimer that this blog post builds on one written by my colleague David Baber: Driving PowerShell With XML. We use the same XML-driven framework to build out our machines. In reality the process of removing and creating VMs is treated as just one “step” in our build-out process. Executions of other steps obviously follow, but this post is primarily concerned with standing up that environment. What happens next is up to you.
Since we use Virtual Machine Manager (VMM), the contents of these scripts are specific to that product. The spirit of these scripts could be translated to something like VMWare, or you could use VMM to manage a VMWare infrastructure if you really wanted.
I’m including a copy of the function we use called Provision-Environment. This function takes a lot of the built-in PowerShell functions exposed by VMM (kudos to Microsoft for this approach) and just wraps it with some additional logic to put all the pieces together for you.
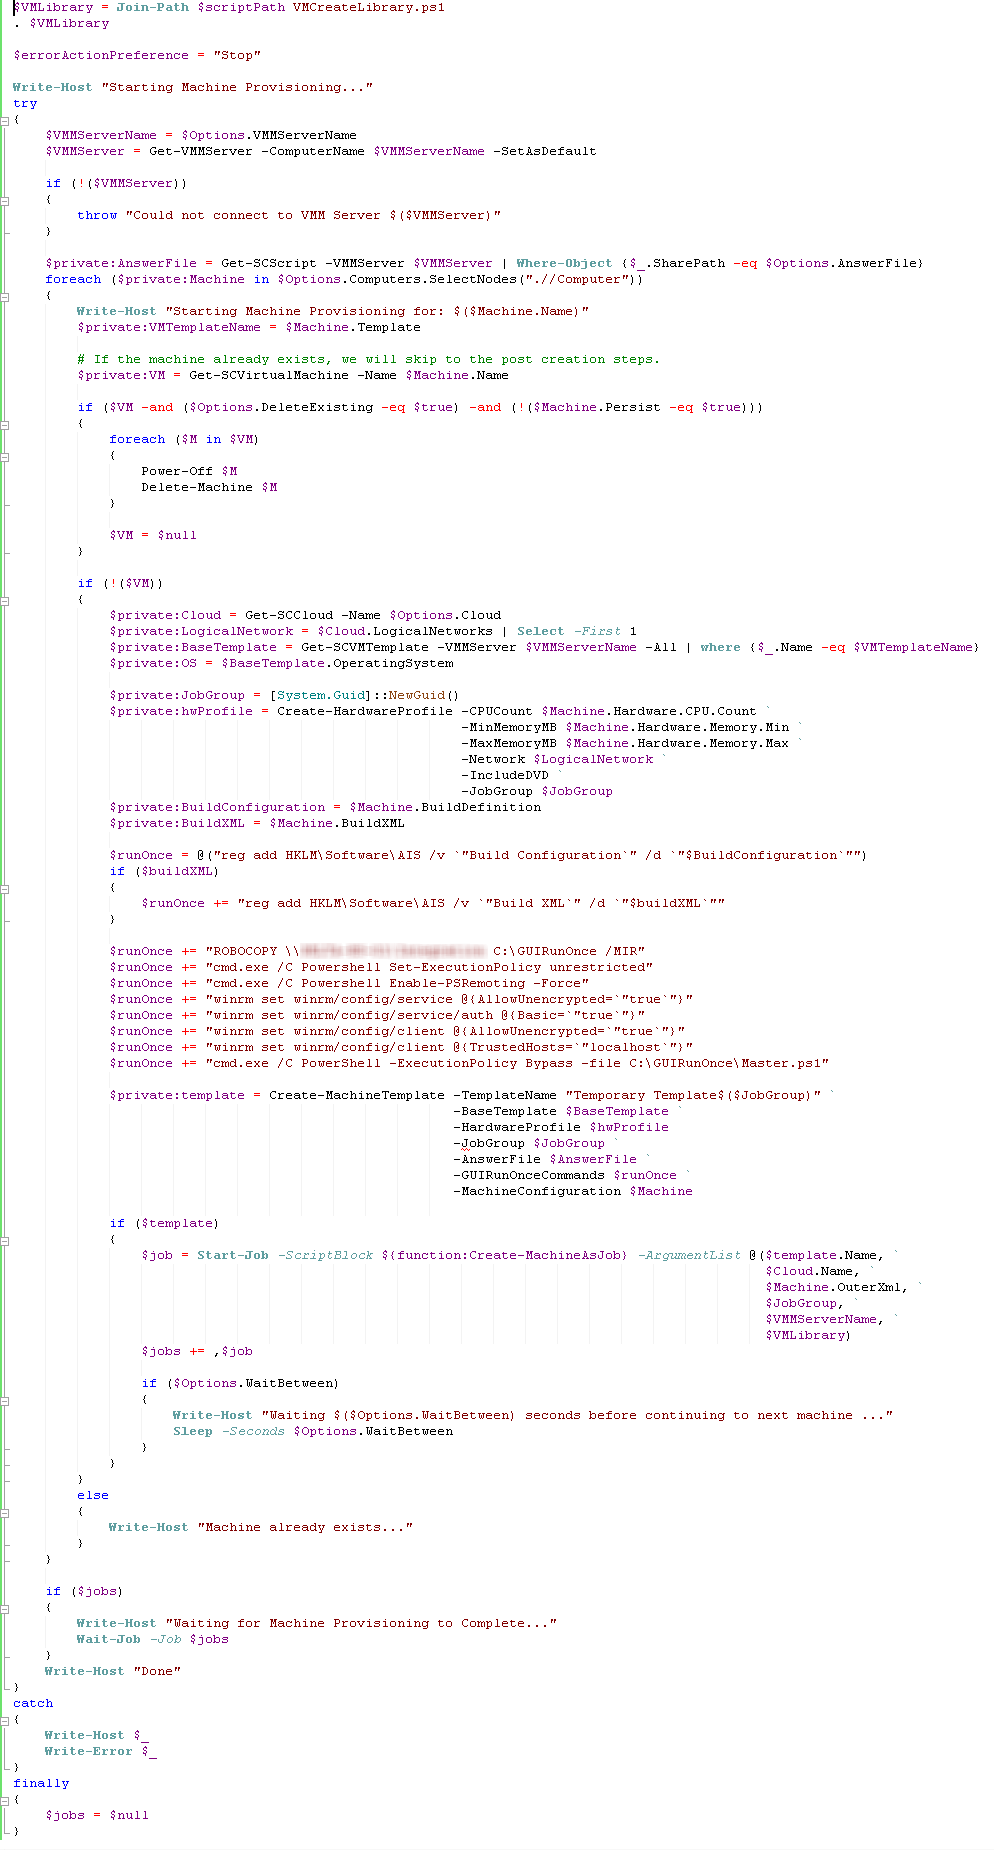
- The PowerShell function used to provision a VM environment. A copy is available for download here. A copy of the VMCreateLibrary that we use is also available here.
In the above function, we actually loop through a series of XML elements where each element represents a machine. As we do this, we look for any existing machines by that name and remove those. (This functionality can be overridden using Persist=”true” on the machine element or by setting DeleteExisting=”false” on the Provision-Environment element).
As part of each element we provide some additional metadata that will be used during this process such as the name of the machine, size of the drives, etc… A sample XML configuration is shown below. This format is flexible and easy to modify and/or extend.
Provision-Environment Cloud="MyPrivateCloud" VMMServerName="vmmserver" AnswerFile="\\host\Library\Custom Configurations\Unattend.xml" DeleteExisting="True" WaitBetween="120">

<Computers>

<Computer Name="Server1" BuildDefinition="SharePoint Server" Template="Windows 2008 R2 Enterprise with Service Pack 1">

<Hardware>

<CPU Count="1" />

<Memory Min="1250" Max="2048" />

<Drives>

<SystemDrive Size="60"/>

<Drive Size="1024" Interface="SCSI" />

</Drives>

</Hardware>

</Computer>

<Computer Name="Server2" BuildDefinition="SQL Server" Template="Windows 2008 R2 Enterprise with Service Pack 1">

<Hardware>

<CPU Count="1" />

<Memory Min="1500" Max="3072" />

<Drives>

<SystemDrive Size="60"/>

</Drives>

</Hardware>

</Computer>

</Computers>

</Provision-Environment>
Our next step is to gather up the required information needed to provision our new machines. We take the following steps:
- Get the private cloud the machine belongs to using Get-SCCloud.
- Grab the first logical network associated with that cloud for our use. This is an all too easy assumption on our part — but our example is simple.
- Get a machine template from the library.
- Create a hardware profile.
- Build out our list of GUIRunOnce actions. These commands are executed as part of the GUIRunOnce process when the machine first boots. You can find more information about the GUIRunOnce process by checking out this content on technet. Fortunately, VMM exposes this functionality to us and only requires a simple array of commands to execute. We use this to download scripts to build the server and configure some registry settings to tell the machine what kind of machine it will be. These settings in turn drive our scripts.
- Create a new temporary template from the above five pieces of data.
- Create a machine from this template.
- Wait for our new machines to provision. Note that in our example configuration above, we wait two minutes between each machine we kick off. You can choose to modify that up or down depending on your environment. We found two minutes was enough time for VMM to get things created and well underway in regards to provisioning the new machine, since we didn’t want to cause undue contention.
So the last part of this process is actually tying all this into our nightly build process within TFS. This is fairly trivial, and there are probably many ways to accomplish this. We chose to extend the build process template that we already had in place for our nightly build and just have it kick off a PowerShell script for us. I prefer this approach since we can just modify the script anytime without modifying our build template and kick things off outside of TFS if we choose to.
And, that’s it! Just like that we have a process that automates our machine provisioning. This foundation can be a springboard for some fairly cool things, like having VMM automate machines inside of VMWare, or possibly — as we’ve done and prototyped — taking this script and having it spin up machines directly in Azure.
Happy coding!
Check out more of the exciting work we do and the clients we serve at the AIS website.

