


I recently had the opportunity to perform a lift-and-shift migration of a SharePoint 2016 environment to cloud Infrastructure as a Service (IaaS) in Amazon Web Services (AWS). To support the long-term goals of the client, Okta would be implemented for authentication. Additionally, the client had several product integrations, including SQL Server Reporting Services (SSRS) (Integrated Mode), Office Online Server (OOS), Gimmal, and Nintex.
One of the first problems that I ran into was very little knowledge or lessons learned available. Okta does provide an Integration Guide; however, it simply walks you through setting up Okta as a Trusted Claims Provider for SharePoint. The guide does not cover or even mention potential architectural, migration, or integration concerns. I found a useful article at SharePointDoctors.com that does a great job filling in some of the gaps left in the Okta documentation, and I highly recommend reviewing it. One of the most critical points made by SharePointDoctors.com was to “Test, Test, and Test Again,” which is exactly what we did to discover and solve migration issues. In this post, I will share some of the issues we encountered migrating to Okta and what we did to mitigate them.
Lesson 1: Authentication Providers and the People Picker
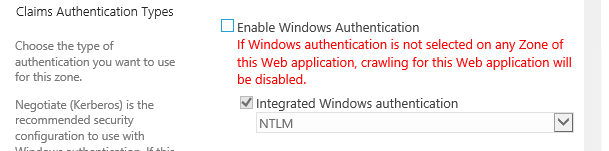
When configuring Okta, there is no way to switch to Okta entirely; Windows Authentication is required for service accounts, and search crawls — watching an Okta product presentation, around the 8:20 mark, the presenter glazes over this fact. He claims that when they are ready for the final cutover, they disable Windows Authentication.
Initially, we had both Okta and Windows Authentication enabled for the Default Zone. If you configure SharePoint this way, users will be asked to select which credentials to use to log on to the site when they navigate the site.
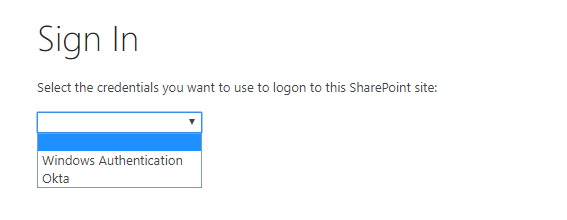
If you do not want users to be prompted with this, follow these steps:
- Open Central Administration
- Select Manage Web Applications
- Select your web application and then Authentication Providers from the ribbon
- Select the Zone (usually Default)
- Scroll down to the Sign In Page URL and select Custom Sign In Page
- Enter /_trust/
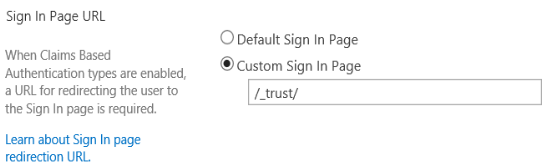
This will force the user to use Okta when navigating to the site. You can find additional information about the login sequence here.
When we configured both authentication modes in the Default Zone, we found that whenever the People Picker was used, it would return two users: The Windows User and the Okta User. We knew that this would be very confusing and decided to extend the Web Application with a different Zone. Thus, we had a web application (ex. internal.contoso.com) in the Default Zone with Windows Authentication and a second web application (ex. contoso.com) in the Internet Zone with Okta Authentication. Using this arrangement, admins, third-party integrations, and search crawls could operate in the Default Zone, and all users would have access within the Internet Zone. You will understand why we chose this as you see the issues we encountered later in this article.
If the issues that we encountered are not applicable and you decide to use both authentication types in the Default Zone, you can hide AD from the People Picker using the following script:
Add-PSSnapin Microsoft.SharePoint.Powershell
$cpm = Get-SPClaimProviderManager
$ad = get-spclaimprovider -identity "AD"
$ad.IsVisible = $false
$cpm.Update()
SHAREPOINT MIGRATION FOR DHS
AIS helped the U.S. Department of Homeland Security migrate its large SharePoint Server environment to M365 in just six months, reducing costs and improving collaboration. Read how we did it.
Lesson 2: Migrating Claims
Using Move-SPUser
When I started scripting out the migration of users, I initially started with the script provided by SharePointDoctors.com, iterating over each site collection and calling Move-SPUser for each user.
However, SharePointDoctors.com warns that migrating a user twice is bad:
“SharePoint deletes all instances of the original user and replaces it with a new blank one that owns nothing. As a result, you lose all permissions information about the user.”
This concerned me greatly and since we had four web applications and numerous site collections with the same user in several places. I was concerned that if Move-SPUser was called more than once for the same user, the user would be over-written; after meeting with Microsoft, I found that this is not the case. The overwrite concern would be if a user logged into the system premigration creating a scenario where an Okta user (ex. c:0-.t|okta|chettinger) and a Windows user (ex. i:0#.w|ais\chettinger) exist in the system. Once Move-SPUser migrated the Windows User, the original Okta User would be overwritten with a new Okta user. In other words, there is no problem with calling Move-SPUser more than once if you happen to do so over multiple site collections.
Planning Time for User Migration
Another interesting issue that we encountered was the time it took to migrate many users (20k+). After working with Microsoft and researching the logs, we found that it took longer to migrate a user on servers where 3rd party integrations were installed. For example, when we ran the script on the SSRS or Search servers, it would only take 1 second to migrate a user. If we ran it on one of the application servers, it would take 1.5 minutes per user. In our case, we had Nintex and Gimmal installed. After working with Microsoft and testing thoroughly, we determined that it was perfectly safe to run the migration on the faster servers and that there was no negative impact on the migration.
Using SPFarm.MigrateUser()
While working on the script to migrate groups using SPFarm.MigrateGroup() I found that there was also a SPFarm.MigrateUser() function. It seemed more efficient to build a list of users and iterate over it, calling SPFarm.MigrateUser() for each one. Once again, we met with Microsoft, and they assured us that the SPFarm.MigrateUser() function would behave just like the Move-SPUser command, only at the farm level. Ultimately, we used this as it allowed us to batch up the user migration into PowerShell Jobs easily. This is the script that we ended up using across multiple servers.
Add-PSSnapin Microsoft.SharePoint.Powershell
$domain = "ais"
$dryrun = $true

$muliplier = 0    #The number of server instance migrating users (0,1,2,3,etc.)
$jobCount = 20    #The number of parallel jobs
$chuckSize = 100  #The number of users to process at one time
$maxUsers = 2500  #The number of users to process on this server

$usersString =
"<ActiveUsers>
    <ActiveUser>i:0#.w|ais\user1</ActiveUser>
    <ActiveUser>i:0#.w|ais\user2</ActiveUser>
    <ActiveUser>i:0#.w|ais\user3</ActiveUser>
    <ActiveUser>i:0#.w|ais\user4</ActiveUser>
</ActiveUsers>"

#Using a string in this example, but a separate file would be more appropriate
$ScriptRoot = Split-Path $MyInvocation.MyCommand.Path
#$UsersXml = [xml](Get-Content "$($ScriptRoot)\ActiveUsers.xml")

$UsersXml = [xml]$usersString
$users = $UsersXml.ActiveUsers.ActiveUser

#Use Dry Run to test
$dryrunText = "[DRYRUN]"
if($dryrun -eq $false){
    $dryrunText = ""
}

if($maxUsers -ne $null){
    $users = $users| select -Skip ($maxUsers*$muliplier) | select -first $maxUsers
}

$oktaClaimChar = Get-SPClaimTypeEncoding |  Where-Object { $_.ClaimType -like '*Okta*' }

Write-Host "$($dryrunText)Start: $(Get-Date)"

#Build Chunks
$chunks = [System.Collections.ArrayList]::new()
for ($i = 0; $i -lt $users.Count; $i += $chuckSize) {

    if (($users.Count - $i) -gt ($chuckSize-1)  ) {
        $chunks.add($users[$i..($i + ($chuckSize-1))]) | Out-Null
    }
    else {
        $chunks.add($users[$i..($users.Count - 1)]) | Out-Null
    }
}


for ($i = 0; $i -lt $chunks.Count; $i++) {
    $chunk = $chunks[$i]
    Write-Progress -Id 0 -Activity Updating -Status 'Progress->' -PercentComplete ($i/$chunks.Count * 100) -CurrentOperation Chunks
    $running = @(Get-Job | Where-Object { $_.State -eq 'Running' })
    if ($running.Count -ge $jobCount) {
        $running | Wait-Job -Any | Out-Null
    }
    $jobName = "Chunk$i"
    $job = Start-Job -Name $jobName -OutVariable $job {
        Add-PSSnapin Microsoft.SharePoint.Powershell
        $chunk = $using:chunk
        $dryrun = $using:dryrun
        $dryrunText = $using:dryrunText
        $i = $using:i

        $oktaClaimChar = $using:oktaClaimChar
        $farm = Get-SPFarm

        for ($j = 0; $j -lt $chunk.Count; $j++) {
            $user = $chunk[$j]
            if($user -ne $null)
            {
                $oldUserName = $user.ToLower()
                $newUserName =  $user.Replace("i:0#.w|", "i:0$($oktaClaimChar.EncodingCharacter).t|okta|")
                $newUserName =  $newUserName.Replace("$domain\", "")
                if($oldUserName -ne $newUserName)
                {
                    Write-Host "  $($dryrunText) Moving User $oldUserName  to $newUserName"
                    if($dryrun -eq $false)
                    {
                        try{
                            $farm.MigrateUserAccount($oldUserName,$newUserName,$false)
                        }catch{
                            Write-Host $_
                        }
                    }
                }
            }
        }
    }
}
Wait-Job * | Out-Null

# Process the results
foreach($job in Get-Job)
{
    $result = Receive-Job $job
    Write-Host $job.Name
    Write-Host $result
}
Remove-Job -State Completed
Write-Host "$($dryrunText)End: $(Get-Date)"
Lesson 3: Integration with SQL Server Reporting Services (SSRS)
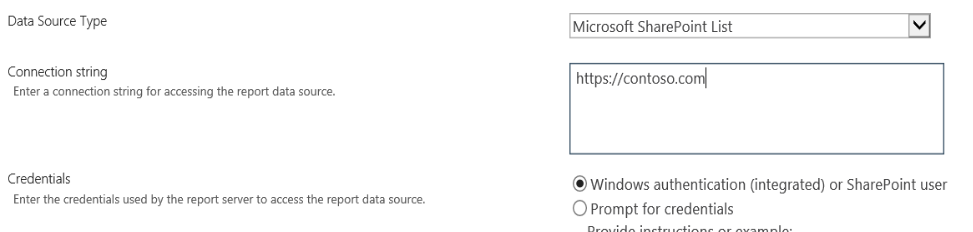
As mentioned earlier, our environment was running SQL Server Reporting Services (SSRS) – Integrated Mode. There were no changes necessary for reports to work for the end-user. However, for report authors to create and edit reports, they needed to use Windows authentication. How you decide to handle this is tightly coupled with what I covered in Lessons 1 and 2. If you choose to use both Okta and Windows Authentication in a single zone, you will face issues when editing a report with the Report Builder while logged in as an Okta user.
This was the second reason why we went with two authentication zones. To edit the report, the authors would connect to the Default Zone URL (ex. https://internal.contoso.com); however, if the data source is a SharePoint list, the Internet Zone URL is used (ex. https://contoso.com). SharePoint will respect the permissions of the SharePoint user (in this case, Okta).
For all of this to work together, we migrated content, then migrated users and groups to Okta claims, and then added new Windows groups so that certain users could log in with Windows credentials and edit reports.
CAUTION: This creates the scenario that I warned about; so, make sure your user migration was successful before adding these groups and letting report authors access the system. If you migrate the Windows user to Okta, and then the user logs in with windows credentials, there will be two claims in the system (ex. c:0-.t|okta|chettinger and i:0#.w|ais\chettinger). If you were to migrate the new Windows user a second time, it would likely overwrite the Okta user and its permissions.
Lesson 4: Integration with Microsoft Office Products
Microsoft Word
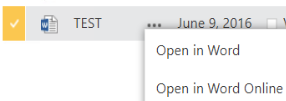
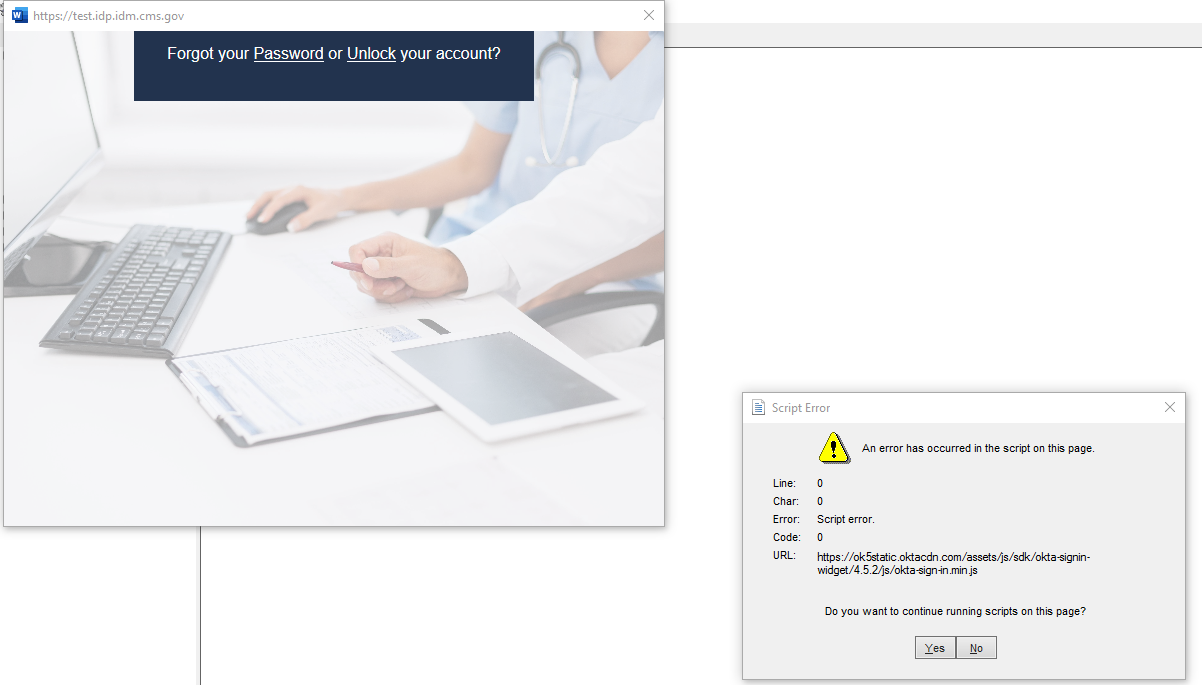
Okta did not seem to consider Microsoft Office when developing its SharePoint integration solution. Editing items in Word, Excel, and PowerPoint is an important feature, and our users wanted it to work. When the Open in Word option is used on a file in SharePoint, the Word application will open on the user’s computer and attempt to authenticate with Okta.
Under the hood, Office products use an outdated browser control based on Internet Explorer version 9. The Okta login page would not render correctly in the browser control due to compatibility issues; instead, it would throw a script error, and controls would not render.
We had to work with Okta to get them to change it for our login page. Microsoft loosely explains how to fix it in this article; however, Okta had to detect the browser version and add the meta tag accordingly. Ultimately, if you plan on using Office products with SharePoint, you will need to work with Okta to get your login page fixed.
Microsoft Outlook
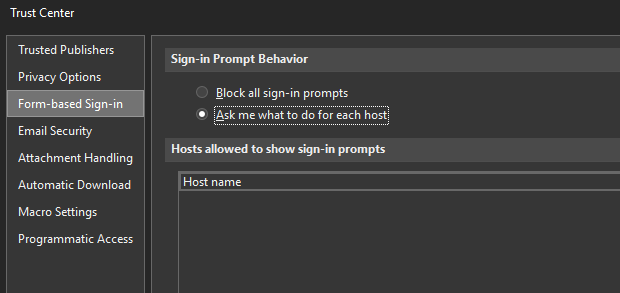
We also ran into a unique issue with Microsoft Outlook and adding Calendars. Outlook 365 users had to go to File > Options > Trust Center > Form-based Sign-in and choose Ask me what to do for each host.
For Outlook clients before 365 (Outlook 2019 in our case), the Form-based Sign-In option was unavailable. We had to work with our Group Policy Object (GPO) Administrators and create a GPO to set this and add the hostname (ex. contoso.com). Unfortunately, this only partially fixed the problem; once users added the calendar, they started getting prompted with Windows credentials. After working with Microsoft, we found out that when the calendar is added to Outlook, it stores the URL somewhere, and it gets it from SharePoint based on the first Zone it finds a URL in.
- It checks the Zones in the following order: Intranet, Default, Extranet, Internet, Custom. If you remember, we had the following:
- Intranet – empty
- Default – https://internal.contoso.com (Windows Auth)
- Internet – https://contoso.com (Okta Auth)
- Extranet – empty
- Custom – empty
Outlook was storing the URL from the Default Zone, which was Windows authentication, and prompted the user. So, what was the fix? First, we had to move https://contoso.com to the Intranet Zone so that Outlook would store it instead.
- Intranet – https://contoso.com (Okta Auth)
- Default – https://internal.contoso.com (Windows Auth)
- Internet – empty
- Extranet – empty
- Custom – empty
Lesson 5: Integration with Nintex Forms and Workflows
When we started testing Nintex Forms and Workflows, we quickly found that users had not been migrated as we had hoped. So the first thing we did was add the Nintex MigrateUser operation right after the farm-migrate user command in the script above:
$farm.MigrateUserAccount($oldUserName,$newUserName,$false)
NWAdmin.exe -o MigrateUser -oldUser $oldUserName -newUser $newUserName
According to Nintex, this command only updates user settings and history, not in the workflow definitions or running workflows. So, to fix the workflows, I wrote a script that recursively goes through all of SharePoint and looks for the hidden library NintexWorkflows. Each of these libraries exports each workflow, replaces the Windows claim with an Okta claim and then deploys the workflow. It does all of this using NWAdmin.exe operations and was approved by Nintex. Here is the script that we used:
$domain = "ais"
$dryrun = $true
$dryrunText = "DRYRUN"


$oktaClaimChar = Get-SPClaimTypeEncoding | Where-Object { $_.ClaimType -like '*Okta*' }
$encodedValue = [int]([char]($oktaClaimChar.EncodingCharacter))
$encodingCharacter = "&#$($encodedValue);"
if($dryrun -eq $false){
    $dryrunText = ""
}

function CheckWorkflow($asset)
{
    $text = [System.Text.Encoding]::ASCII.GetString($asset.OpenBinary())

    if($text.Contains("i:0#.w|$domain\"))
    {

        try {
            $assetConfig = $asset.ParentFolder.Files | Where-Object Name -eq $($asset.Title +".xoml.wfconfig.xml")
            $configText = [System.Text.Encoding]::ASCII.GetString($assetConfig.OpenBinary())
            $configXml = [xml]$configText
            $listId = $configXml.WorkflowConfig.Association.ListID

            $path = $asset.Web.Url.Replace('https://','')
            $pattern = '[\\/]'
            $path = $path -replace $pattern, '-'
            $nwfFile = "C:\Temp\NintexMigration\$path\$($asset.title).nwf"


            if((Test-Path "C:\Temp\NintexMigration\$path") -eq $false){
                New-Item -ItemType Directory -Path "C:\Temp\NintexMigration\$path"
            }

            if($null -ne $listId)
            {
                $list = $asset.Web.Lists | Where-Object Id -eq $listId
                $listName = $list.Title

                $output = & NWAdmin.exe -o ExportWorkflow -siteUrl $($asset.Web.Url) -list "$($listName)" -workflowName "$($asset.title)" -fileName "$($nwfFile)" -workflowtype list
                if ($output  -eq "Exporting complete.")
                {
                    $nwfText = Get-Content -Path "$($nwfFile)"
                    $newNwfText = $nwfText
                    $newNwfText = $newNwfText.Replace("i:0#.w|$domain\","i:0$($encodingCharacter).t|okta|")
                    Set-Content -Path "$($nwfFile)" -Value $newNwfText

                    Write-Host "$dryrun TextChange Type=""List"" SiteUrl=""$($asset.Web.Url)"" TargetList=""$($listName)"" WorkflowName=""$($asset.title)"" NWFFile=""$($nwfFile)"" Web=""$($asset.Web.Url)"" File=""$($asset.Url)"" DateTime=""$(get-date -f MM-dd-yyyy_HH_mm_ss)"""
                    if($dryrun -eq $false) {
                        & NWAdmin.exe -o DeployWorkflow -siteUrl $($asset.Web.Url) -targetlist "$($listName)" -workflowName "$($asset.title)" -nwffile "$($nwfFile)" -overwrite
                    }
                } else{
                    Write-Host "$dryrunText $output"
                }
            }
            else
            {
                $output = & NWAdmin.exe -o ExportWorkflow -siteUrl $($asset.Web.Url) -workflowName "$($asset.title)" -fileName "$($nwfFile)" -workflowtype site
                if ($output  -eq "Exporting complete.")
                {
                    $nwfText = Get-Content -Path "$($nwfFile)"
                    $newNwfText = $nwfText
                    $newNwfText = $newNwfText.Replace("i:0#.w|$domain\","i:0$($encodingCharacter).t|okta|")
                    Set-Content -Path "$($nwfFile)" -Value $newNwfText

                    Write-Host "$dryrun TextChange Type=""Site"" SiteUrl=""$($asset.Web.Url)"" WorkflowName=""$($asset.title)"" NWFFile=""$($nwfFile)"" Web=""$($asset.Web.Url)"" File=""$($asset.Url)"" DateTime=""$(get-date -f MM-dd-yyyy_HH_mm_ss)"""
                    if($dryrun -eq $false) {
                        & NWAdmin.exe -o DeployWorkflow -siteUrl $($asset.Web.Url) -workflowName "$($asset.title)" -nwffile "$($nwfFile)" -overwrite
                    }
                } else{
                    Write-Host "$dryrunText $output"
                }
            }

        } catch {
            Write-Line $_
        }
    }
}

function CheckWorkflows($w)
{
    foreach ($list in $w.Lists)
    {
        if ( $list.title.tolower().contains( "nintexworkflows" ) )
        {
            foreach ($item in $list.items)
            {
                $asset = $item.file
                CheckWorkflow($asset)
            }
        }
    }
    foreach($sub in $w.Webs)
    {
        CheckWorkflows($sub)
    }
}

$spWebApps = Get-SPWebApplication
foreach ($spWebApp in $spWebApps)
{
    foreach ($spSite in $spWebApp.Sites)
    {
        if ($null -ne $spSite)
        {
            CheckWorkflows($spSite.RootWeb)
            $spSite.Dispose()
        }
    }
}
Conclusion
There is much to consider if you want to use Okta as your authentication provider for SharePoint On-Premises. If you are using integrations such as Nintex, SSRS, and Microsoft Office, there will be a lot of work ahead of you. Hopefully, this blog post will save you some time with planning and risk mitigation. Either way, the most important take away to be sure to test thoroughly.
We're hiring for SharePoint careers at AIS. Help us deliver solutions and support client SharePoint environments.

