Want to stream your local user group, code camp live over the Internet? This blog tells you how.
Setup Requirements
- IIS Media Services 4.1
- Expression Encoder 4 with Service Pack 2
- There a couple of new changes/fixes done over SP1; you can read about them here.
What is Live Streaming?
- Enables adaptive streaming of live events to Smooth Streaming clients
- Communicates through HTTP to deliver live events
- As IIS Media Services Extension
- Adaption based on User Network Bandwidth
How Does it Work?
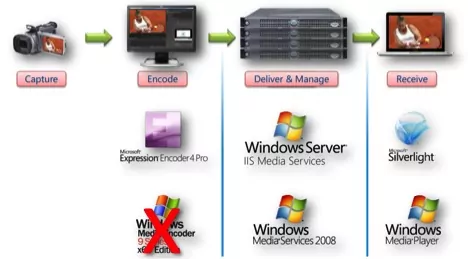
- Acquire will be the source of your input, like a webcam, screen capture, etc.
- Encode & Deliver will be done by the encoding tool (like Expression Encoder) which will perform the real-time encoding and send the streams to the IIS Media Services endpoint.
- On the Consume side you can have a Silverlight player/HTML5 page (for Apple) which can play the live stream in a smooth streaming way. More info on Smooth Stream can be found here.
Live Broadcast Workflow
(Comparison of the live streaming features in Windows Media Services and IIS Media Services can be found here.)
Configure IIS Media Services
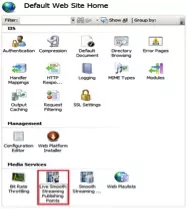
1. In IIS Manager, select the desired Web Site or virtual directory, and then double-click the Live Smooth Streaming Publishing Points icon.
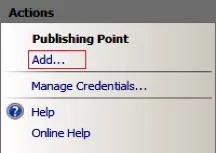
2. On the Live Smooth Streaming Publishing Points page, in the Actions pane, click Add.
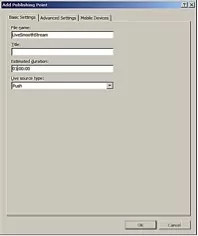
3. In the Add Publishing Point dialog box, on the Basic Settings tab, enter the following information:
File name: Enter a name for the Live Smooth Streaming publishing point definition file. We will be using the file name LiveSmoothStream. If you specify a different file name, be sure to substitute it appropriately as you follow these steps.
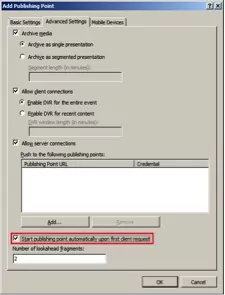
4. On the Advanced Settings tab, select the Start publishing point automatically upon first client request check box. This setting allows an encoder to connect to the publishing point when the broadcast starts. Connection errors might occur if you don’t enable this setting.
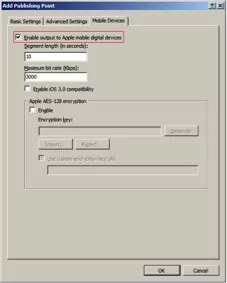
5. If you want to deliver live streams to Apple mobile digital devices, select the Enable output to Apple mobile digital devices check box on the Mobile Devices tab.
* Note: This option is only available on IIS Media Services 4.0 and above
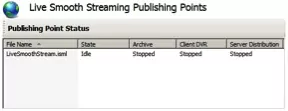
6. Click OK. A newly created Live Smooth Streaming publishing point definition file named LiveSmoothStream.isml is added to the Web site root.
7. Open the “LiveSmoothStream.isml” file by going to the website directory and editing it. Add an new Entry as:
<meta name="restartOnEncoderReconnect" content="true" />
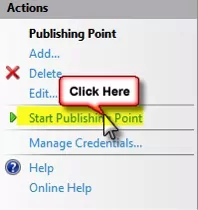
8. Select and right click on created Live Smooth Streaming Publishing Point and Click “Start Publishing Point.”
Configure Expression Encoder
1. Start Expression Encoder & select Live Broadcasting Project, and then click OK.
2. Set up the source to use for your live broadcast
3. Select the Presets tab, choose the preset which shows IIS Live Streaming.
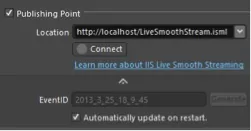
4. On the Output Tab enter the publishing point (ex: https://<server-name>/LiveSmoothStream.isml) and click Connect.
Note: Select the “Automatically update on restart” checkbox for the EventID as a Live Smooth Streaming publishing point must be reset on the server if you wish to broadcast to it multiple times. Each time you start and stop encoding, you must shut down and restart the publishing point on the server before you can connect to it again. Otherwise, data from the last run will still be on the server and you will encounter errors while broadcasting the next time
5. Click Start to begin the live broadcast.
Create a Silverlight Test Page to Watch Live Streaming
1. Download SMF Player.
2. Extract the files and copy “SmoothStreamingPlayer.html” and “SmoothStreamingPlayer.xap” files
3. Modify the “SmoothStreamingPlayer.html” page. Update the below line of code to point to the livestreaming URL as shown below:
<param name="InitParams" value="selectedcaptionstream=textstream_eng,mediaurl=https://<server-name>/LiveSmoothStream.isml/manifest" />
4. Run the “SmoothStreamingPlayer.html” on the browser.
Create an HTML5 Test Page for Apple to Watch Live Streaming
1. Create a simple HTML5 webpage with a video tag.
<html>

<head>

<title>iPhone live streaming page</title>

</head>

<body>

<h1>Live stream.</h1>

<video width="640"

height="480" src=" LiveSmoothStream.isml/manifest(format=m3u8-aapl).m3u8"

poster="MyPosterFrame.png"

autoplay="true"

controls="true" >

Live

</video>

</body>

</html>
2. Run the webpage on the browser
How to Deploy Media Service & Configure Live Streaming on the Cloud
Note: By default, IIS Media Service is not installed on the Cloud Instance
1. Create a new cloud template project and select an ASP.NET Web Role/MVC based Web Role
2. Refer section “Create a Silverlight Test Page to watch Live Streaming” and add the “SmoothStreamingPlayer.html” and “SmoothStreamingPlayer.xap” files to the project.
*This will be used to view the live streaming on the HTML page
3. Add “IISMedia64.msi” to your Web Role project
4. Create a “startup.cmd” batch file which will execute the IISMedia package
Code Snippet for startup.cmd:
set msiexec=%systemroot%\system32\msiexec.exe

set appcmd=%systemroot%\system32\inetsrv\appcmd.exe

%msiexec% /i "%~dp0\IISMedia64.msi" /qn ADDLOCAL=ALL /Le startup_media.txt
5. Add a startup task in the “ServiceDefinition.csdef” file which will execute and deploy the IIS media package on the Cloud Instance
Code Snippet:
<Startup>

<Task commandLine="startup.cmd" executionContext="elevated">

</Task>

</Startup>
6. Build the solution and upload it to the Cloud Service.
7. Once it is successfully published, Remote Login to the instance and configure the IIS Media Service as done in the Configure IIS Media Services section.
8. Provide the publish endpoint to the Expression Encoder in the format https://<name>.cloudapp.net/<name>.isml and click Start.
9. Go to the url https://<name>.cloudapp.net/SmoothStreamingPlayer.html and you can see the live streaming.
Building Scalable and Robust Live Smooth Streaming Solutions: PUSH and PULL Concepts
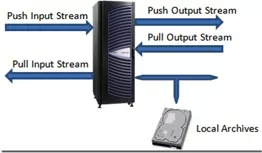
PUSH Input Stream:
This push input is for accepting long-running live streams from a push source which uses HTTP POST requests to push data into the server. A push source can be a group of live encoders or another Live Smooth Streaming publishing point. The more common usage of push input stream is to ingest live stream from Live Smooth Streaming encoders which typically supports push outputs.
As we have seen in the Configure IIS Media Services section, it follows PUSH model where we configured a server in PUSH mode which will receive the encoding packets and can also show the live fragments.
PUSH Output Stream:
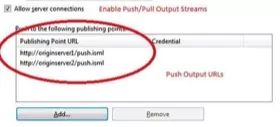
Push output stream means that the publishing point, upon being started or receiving new incoming streams, pushes the same long running fragmented MP4 streams to other publishing points using HTTP POST requests. Push output stream is often used to fan out encoder streams among the servers and provide redundancy in failover scenarios. To configure push output streams, you just need to set it up on the publishing point settings.
PULL Input Stream:
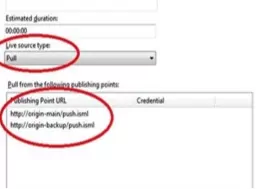
Pull Input Stream is normally used in server-to-server distribution to scale out the streams. It could also be used to ingest live streams from the encoder if the encoder supports pulling. When configured with pull input stream, the server will issue HTTP GET requests to upstream servers to pull down the long running fragmented MP4 streams.
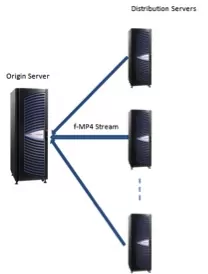
A typical usage of Pull Input Stream is on distribution servers which source from origin servers. The distribution server can offload manifest creation, file archiving and client request serving from the origin server. The distribution server knows how to sync up with the origin server to provide full access to all the live contents to the clients.
One publishing point can only be pulling from a single source publishing point at a time. The additional URLs you enter will become the backup URLs. If the current connection gets broken,the server will do a limited number of retries using the current URL. If all retries with the current URL failed, server will then try the backup URLs one by one until it succeeds.
PULL Output Stream:
Pull Output Stream simply enables downstream servers to pull from the current one. It’s the same “Allow server connections” checkbox that enables both push and pull output stream option. Since the sever will be waiting for downstream requests for pulling, there are no other settings to be configured.
Putting it All Together
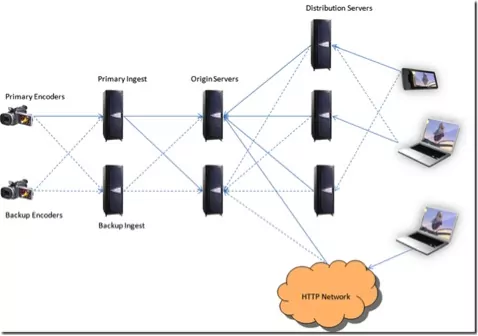
Okay, so we’ve gone through all the possible inputs and outputs and their functionalities. Now let’s take a look at an IIS Live Smooth Streaming server solution as an example and see how these inputs and outputs work.
This is a topology which we’ve used for some live event deployments. We most recently used PUSH scheme to live stream our Azure user group meeting over the weekend.


