The Hyper-V role in Windows Server lets you create a virtualized computing environment to create and manage virtual machines. You can run multiple operating systems on one physical computer and isolate the operating systems from each other. With this technology, you can improve the effectiveness of your computing resources.
Advantages with Hyper-V
- Provide more flexible, on-demand IT services by expanding your use of shared resources and adjusting utilization as demand changes.
- Hardware usage of more effectively for workloads on more powerful physical computers to use required resources for VMs
- Minimize the impact for both scheduled and unscheduled downtime activities for VMs
- Make development and test more efficient. Redeploy different computing environments without buying or maintaining all the hardware
- Complete servers restore point (snapshot) before any changes on the server or application configuration
Hyper-V Availability & Install Using Server Manager
Hyper-V is available from Windows Server 2008 onwards as an inbuilt server role for x64 versions.
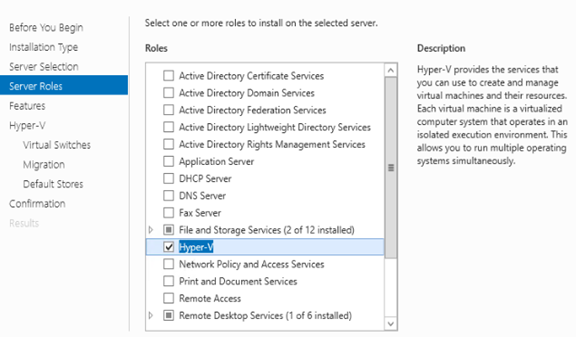
- In Server Manager, click Add Roles and Features.
- Select Hyper-V and follow the steps to finish the installation
Other Operating Systems Support on Hyper-V VMs
Hyper-V supports both emulated and Hyper-V-specific devices for Linux and FreeBSD virtual machines. When running with emulated devices, no additional software is required. However, emulated devices do not provide high performance and cannot leverage the Hyper-V technology. To make full use of all benefits that Hyper-V provides, best to use Hyper-V-specific devices for Linux and FreeBSD. The drivers required to run Hyper-V-specific VMs are known as Linux Integration Services (LIS) or FreeBSD Integration Services (BIS).
Hyper-V Virtual Switch
Hyper-V Virtual Switch is a software-based layer-2 Ethernet network switch available in Hyper-V Manager when you install the Hyper-V role.
Types Hyper-V Virtual Switches
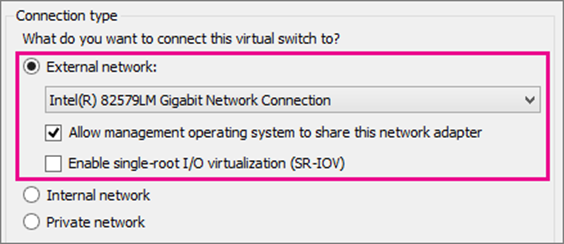
- External: It gives virtual machines access to a physical network to communicate with servers and clients on an external network. It also allows virtual machines on the same Hyper-V server to communicate.
- Internal: Allows communication between virtual machines on the same Hyper-V server and the management host operating system.
- Private: Only allows communication between virtual machines on the same Hyper-V server. A private network is isolated from all external network traffic on the Hyper-V server. This type of network is helpful for cluster configuration.
Create a Virtual Switch by Using Hyper-V Manager
- Open Hyper-V Manager, select the Hyper-V host computer name
- Select Action > Virtual Switch Manager
- Choose the type of virtual switch you want
- Select Create a virtual switch
- Add a name for the virtual switch
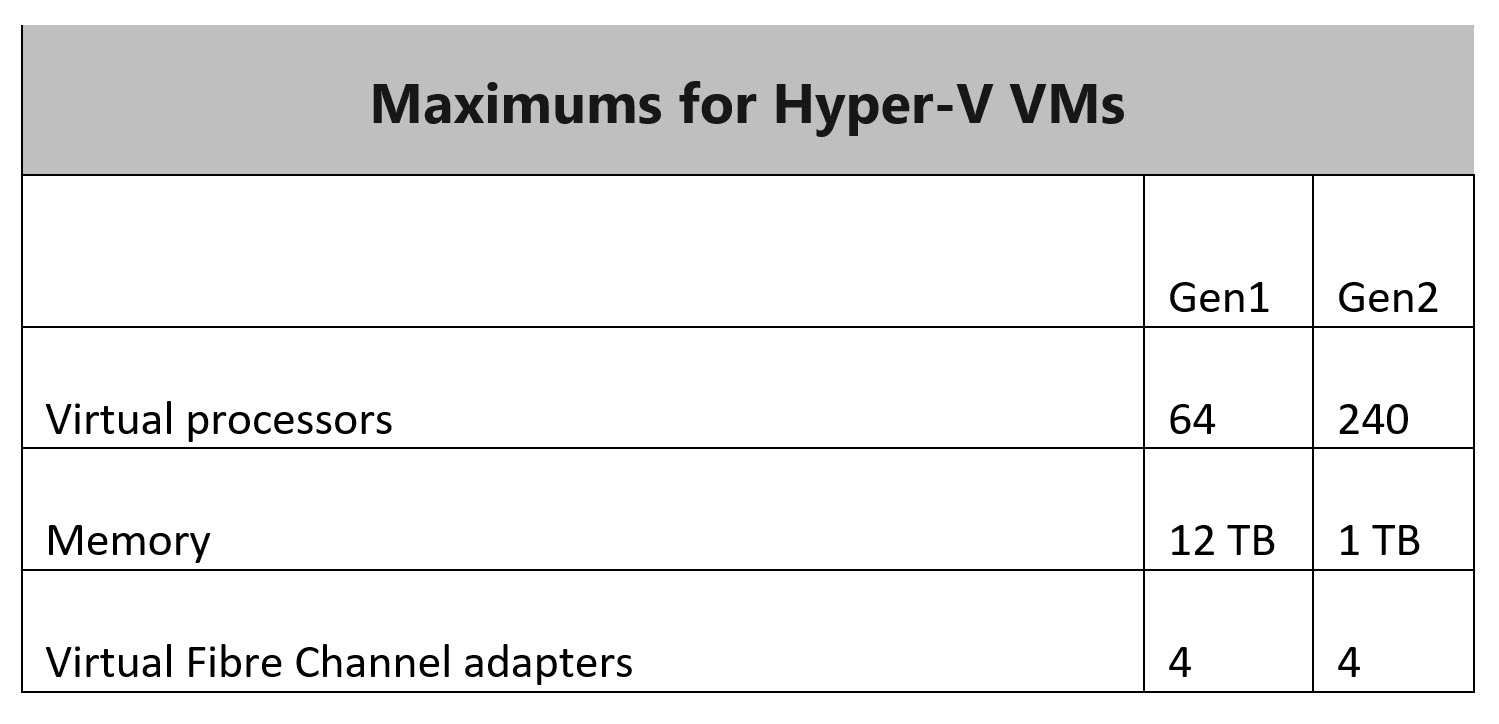
Hyper-V VM Generations
There are currently two generations of Hyper-V virtual machines, Gen1 & Gen2. In general, the choice between these two generations depends on many factors like the OS of the guest operating system, the OS of the host operating system, boot methods, etc. Below are the significant differences on both generations:
Bios
This software is responsible for start-up and hardware configuration.
- Gen1 VMs run only under BIOS control and boot from MBR virtual hard disks.
- Gen2 Hyper-V has UEFI BIOS and GPT support, resulting in increased support for devices and features. For example, GPT partitioning overcomes the 2 TB disk limit. Also, UEFI provides the ability to perform the Secure Boot.
Virtual Disks
- Gen1: Hyper-V only has an IDE virtual controller, as the BIOS does not support other controllers. SCSI controllers can only be recognized after installing the guest OS, and the guest OS cannot boot from the SCSI disk anyway.
- Gen2: Hyper-V can boot from SCSI virtual disks without restrictions or conditions. UEFI gives them this privilege.
Hardware
- Gen1: Hardware components include the network adapter, virtual disk drive, COM ports, and so on.
- Gen2: This is not so important since new equipment is used here with fewer virtual appliances and hypervisor integration.
Hardware Limits of Gen1 VMs
- 2 IDE controllers, each of which can attach up to 2 IDE drives
- A maximum of 4 SCSI controllers and up to 64 attached SCSI drives
- A MBR – 2TB disk with 4 partitions
- A physical DVD drive can be attached to a VM
- x86 and x64 guest OS support
VM Boot
The boot time of Gen2 VM is 20% faster than Gen1 due to the faster start of the UEFI. Installation of a guest operating system also takes up to 50% less time
Gen2 Availability on Hyper-V
Generation 2 VMs released by Microsoft with Hyper-V for Windows Server 2012 R2 and Windows 8.1; hence these versions of 64-bit windows are because of UEFI 2.3.1 with Secure Boot support option.
Hyper-V Security
- Minimize the attack surface by using the minimum Windows Server installation option that you need for the management operating system
- Do not recommend that you run production workloads on Hyper-V on Windows 10
- Keep the Hyper-V host operating system, firmware, and device drivers up to date with the latest security updates.
- Use a separate network with a dedicated network adapter for the physical Hyper-V computer.
- Secure the storage devices where you keep virtual machine resource files
- Use BitLocker for Drive Encryption to protect resources.
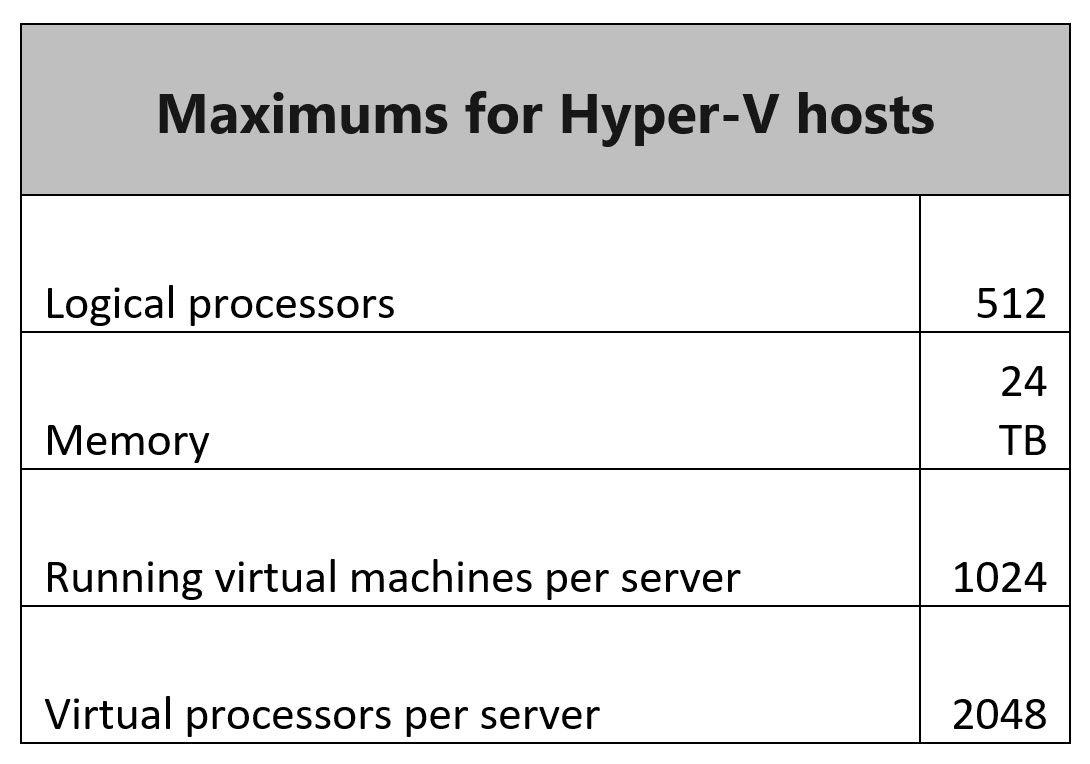
Hyper-V Scalability
High Availability for Hyper-V
One way to ensure Hyper-V High Availability is to place guest VMs to cluster nodes (other physical servers). If one of the physical servers fails, another cluster node automatically detects the system failure and starts running the VM.
A High Availability Cluster is a group of 2 or more bare metal servers used to host virtual machines. The server nodes (physical machines) work together to provide redundancy and failover to your virtual machines, with minimal downtime on the VMs.
A Hyper-V cluster can support up to 64 nodes with a maximum of 8000 VMs. Each node can support a maximum of 1024 VMs. Exactly how many VMs you can get on a node will depend on the resources (CPU and memory) available to the node and how your VMs are configured.
If you are creating a failover cluster that includes clustered virtual machines, the cluster servers must support the hardware requirements for the Hyper-V role. Hyper-V requires a 64-bit processor that provides for the following:
- Hardware-assisted virtualization is available in processors includes a virtualization option specifical processors with Intel Virtualization Technology (Intel VT) or AMD Virtualization (AMD-V) technology.
- Hardware-enforced Data Execution Prevention (DEP) must be available and enabled.
Hyper-V High Availability Requirements
- Cluster nodes should run Hyper-V role.
- At least two cluster nodes are used for running a production workload, and another is used for failover or balance the workload.
- Multiple networks should be connected to cluster nodes to avoid a single point of failure. Alternatively, your cluster nodes can be connected using one network consisting of multiple network adapters, switches, and routers. This way, you can ensure network redundancy in your infrastructure.
- All cluster nodes can access shared storage via iSCSI, fiber channel, or SMB 3.0 protocol. This way, multiple cluster nodes can access the same LUN simultaneously and conduct read/write operations without interruptions.
- Cluster nodes should belong to the same Active Directory domain, which helps to ensure cluster resiliency and provide support for more deployments.
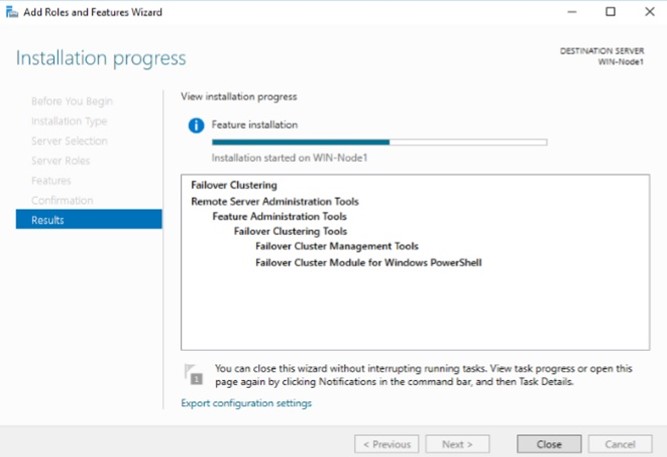
Enable the Failover Clustering Role on a Hyper-V Host
- Open the Server Manager
- Select Add roles and features
- Click Role-based or feature-based installation
- Select a server or a virtual hard disk on which to install the Failover Clustering role
- In the Features section, select Failover Clustering
- In the Confirmation section, click Install
Create a Highly Available Hyper-V VM
To make a Hyper-V VM in a failover cluster highly available, create and configure a Hyper-V failover cluster and validate the configuration in the Failover Cluster Manager.
- Open the Failover Cluster Manager.
- In the left pane, right-click Roles, select Virtual Machines, and then go to New Virtual Machine
- A new Virtual Machine window should open to select the target cluster node on which the VM would run.
- The New Virtual Machine Wizard should open
- In the Specify Name and Location section, enter the name of a new VM and select the folder for storing the VM
- In the Specify Generation section, choose the generation of the new VM
- In the Assign Memory section, you should specify the amount of start-up memory that the new VM can use. Moreover, you can enable the use of Dynamic or Static Memory for this VM
- In the Configure Networking section, select the virtual switch which the network adapter can use
- In the Connect Virtual Hard Disk section, specify on which virtual hard disk the VM should be stored. Here, you can create a virtual hard disk, use an existing virtual hard disk, or attach a virtual hard disk later
- In the Installation Options section, select how you would like the OS to be installed on this VM
Existing Hyper-V VM Highly Available
- In the left pane, right-click Roles and select Configure Role
- Select Role section, click Virtual Machine to enable Hyper-V High Availability for specific VMs
- Select the Virtual Machine section, choose the VMs which you want to make highly available
System Center Virtual Machine Manager
System Center Virtual Machine Manager (SCVMM) is part of Microsoft’s System Center line of virtual machines and Hyper-V hosts management and reporting tools.
System Center Virtual Machine Manager enables increased physical server utilization by making fast and straightforward consolidation on virtual infrastructure.
- Configure and manage your data center components as a single fabric in VMM.
- Datacenter components include virtualization servers, networking components, and storage resources.
- VMM provisions and manages the resources needed to create and deploy virtual machines and services to private clouds
- VMM can add, provision, and manage Hyper-V and VMware virtualization hosts and clusters
- Add networking resources to the VMM fabric, including network sites defined by IP subnets, virtual LANs (VLANs), logical switches, static IP addresses, and MAC pools.
- VMM provides network virtualization, including support for creating and managing virtual networks and network gateways
- Network virtualization allows multiple tenants to have isolated networks and their IP address ranges for increased privacy and security.
- VMs on virtual networks can connect to physical networks in the same site or different locations using gateways.
- VMM can discover, classify, provision, allocate, and assign local and remote storage. VMM supports block storage (fibre channel, iSCSI, and Serial Attached SCSI (SAS) storage area networks (SANs)
- The VMM fabric retains a library of file-based and non-file-based resources that are used to create and deploy VMs and services on virtualization hosts. File-based resources include virtual hard disks, ISO images, and scripts. Non-file-based resources include templates and service profiles that are used to standardize the creation of VMs. Library resources are accessed through library shares.
- Patch management for Hyper-V hosts
To configure the SCVMM below components are mandatory to manage and administer the Hyper-V virtualization.
- VMM Database
- VMM Library
- VMM Console
Install and Configure System Center Virtual Machine Manager
- To start the Virtual Machine Manager Setup wizard, on your installation media, right-click setup.exe, and then click Run as administrator.
- On the main setup page, click Install.
- Select the Select features to install page, select the VMM management server check box, and click Next. The VMM console will be automatically installed. If you’re installing on a cluster node, you’ll be asked if you want to make the management server highly available.
- On the Product registration information page, provide the appropriate information and click Next. If you do not enter a product key, VMM will be installed as an evaluation version that expires 180 days after installation.
- Select whether you want to use Microsoft Update if the Microsoft Update page appears, and then click Next. If you’ve already chosen to use Microsoft Update on this computer, the page won’t appear.
- On the Diagnostic and Usage Data page, review Microsoft’s data collection policy and how to disable data collection. Then click Next
- The setup program checks the computer on which you install the VMM management server to ensure that the computer meets the appropriate hardware and software requirements.
- If you’re using a remote SQL instance on the Database configuration page, specify the computer’s name that is running SQL Server. If you install the VMM management server on the same computer running SQL Server, then in the Server name box, type the server name.
- Specify the SQL Server instance name and whether to use an existing or new database. You’ll need an account with permissions to connect to the instance.
- The Configure service account and distributed key management page specify the VMM service’s account. You can’t change the identity of the VMM service account after installation.
- On the Port configuration page, use the default port number for each feature or provide a unique port number that is appropriate in your environment. You cannot change the ports that you assign during the installation of a VMM management server unless you uninstall and then reinstall the VMM management server. Also, do not configure any feature to use port 5986 because that port number is preassigned.
- Select whether to create a new library share or use an existing library share on the computer on the Library configuration page. The default library share that VMM creates is MSSCVMMLibrary, and the folder is located at %SYSTEMDRIVE%\ProgramData\Virtual Machine Manager Library Files. ProgramData is a hidden folder, and you cannot remove it. After the VMM management server is installed, you can add library shares and library servers by using the VMM console or the VMM command shell.
- On the Installation summary page, review your selections and then click Install. The Installing features page appears and displays the installation progress.
- On the Setup completed page successfully, click Close to finish the installation.
Closing
During setup, VMM enables the following firewall rules. These rules remain in effect even if you later uninstall VMM.
- Windows Remote Management
- Windows Standards-Based Storage Management
SCVMM toll can add, provision, and manage Hyper-V and VMware virtualization hosts and clusters. In addition, SCVMM can manage VMware ESX servers and its virtual machines in a limited capacity.