If you want to create robust automated workflows in Azure, integrating Azure Logic Apps with Azure Functions can be a valuable solution. A logic app is a PaaS (Platform as a Service) that offers extensive options to create powerful workflows. This service is beneficial if you need a structured series of events to support your Azure-hosted application(s). To craft workflows, you can use a “no-code” method. Azure Logic Apps offers a graphical user interface approach to creating workflows, which bridges the gap between pairing your other Azure applications with your logic app.
Why Integrate?
One of the big reasons to integrate these two services is to help support a systematic end-to-end solution. You can add your essential function(s) to your workflow in a few steps, hence creating a more robust cloud-based solution.
When your workflow process gets triggered, such as an email reaching an inbox, your Azure Function can perform its specific business logic after the trigger fully executes. Then, the workflow can branch-off and perform more actions.
Using Azure Functions in your workflow also allows you to capture the HTTP status code from the resulting function call. If receiving a specific status code, such as an HTTP 500 status code, there can be logic in place to email support personnel to inform them, or the results of the failed function call can be inserted into Azure Storage. There are many possibilities.
Getting Started
When beginning integrating an Azure Function into a logic app, there are a few prerequisites. You will need to create both a logic app and function service in Azure. I will be using the out-of-the-box HTTP trigger Azure Function from Visual Studio, and it will simply return “Hello World” when it receives a request. Once the Azure Function service has been created, and the code deployed to it, the next area of focus is setting up the logic app workflow.
Setting up the Logic App Workflow
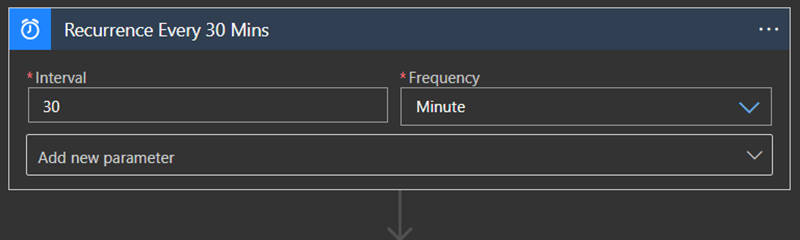
There are two ways to set up a workflow; the first is an infrastructure as code (IaC) approach, and the second is a GUI approach. For this walkthrough, I will use the GUI. The first thing you will need for the logic app is a trigger. This is an event that starts your logic app workflow. Many distinct types of triggers help us carry out many tasks. I will be using the timer trigger for this example.
After you have published your code to your Azure Function, you will be able to add it as an Azure Function action. One thing to note about the Azure Function action is that it takes care of your function’s authentication. So, if your endpoint has a function authorization level assigned, the action will take care of authenticating so you can use the function in your workflow. Now, once the trigger activates, it will call the Azure Function. From there, it is up to the function to handle the request.
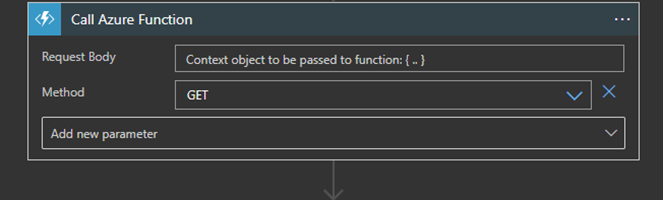
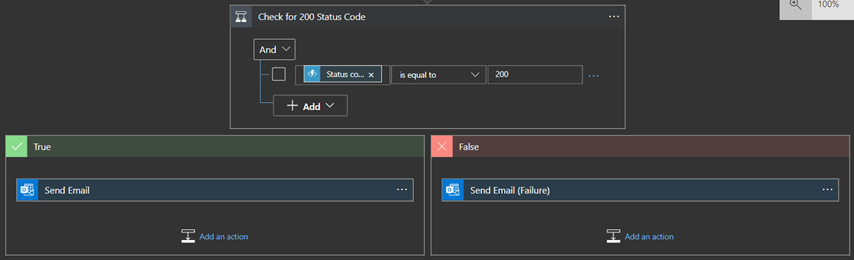
The Azure Function will process the request and fetch the correct data for the rest of the workflow to process. The next step will be to create a condition action. This will run as a conventional if statement. After the Azure Function executes a request, we want to verify if the request was successful or not.
What is neat about using logic apps is that when you use a service, like an Azure Function, it will detect specific properties from the service to use in later actions. For the condition action, we can grab the response status code of the function that just ran. Using that status code, we can create custom logic to look for the necessary code numbers. For this action, we will check for an HTTP 200 status code. When you create a condition, it automatically generates true and false scenarios. From there, you can set up what happens during each scenario.
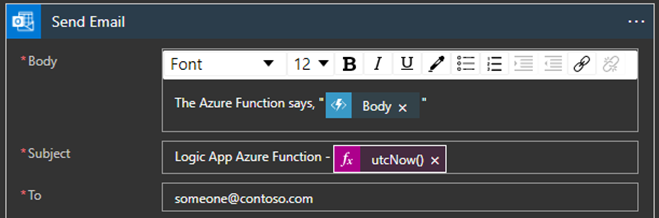
For the following steps, we will set up one of my favorite parts of using a logic app that integrates with Outlook! There are many various tasks to use for Outlook. For this example, we will be using the send email task.
When you set up an Outlook task, you must first log in with your desired Outlook account. This will produce an office365 API connection resource in your resource group. Thus, allowing the logic app workflow to work properly with Outlook!
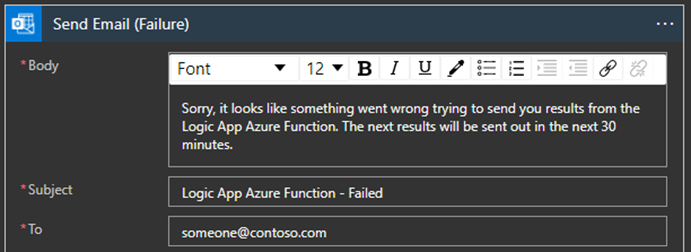
After you log in, you can start using Outlook tasks. For this part of the workflow, we are going to send an email to the recipient. In the body of the email, we will send the response we get from the Azure Function we called in an earlier step. However, if the Azure Function call fails, then we can return a default email message to the recipient.
This concludes the setup for the Azure Logic App workflow that now integrates with an Azure Function. To run your newly created workflow, simply navigate to the “Overview” tab of your logic app resource. From there, click on “Run Trigger.”
Congratulations! Your new workflow is now ready to run.
After the timer interval has passed, you will find a new email in your inbox from the Azure Logic App workflow.
Closing Thoughts
The beauty of using Azure Logic Apps is the customizability that it provides. The possibilities are almost endless. Whether your workflow is simple or complex, you have the tools at your disposal to carry out your systematic end-to-end flow. This post shows you one flavor of logic apps and the type of workflow you can create.