Overnight the world’s workforce has moved into the home office. As a result, online meetings are now the only way we meet. For many organizations, this sudden change has dramatically impacted how their business operates. Staff members were accustomed to collaborating in person. Now they feel disconnected. Sales people who relied on face-to-face interaction to close the deal are suddenly isolated. Visual cues, facial expressions and the non-verbal communication we took for granted is gone. Right now, across the globe, millions of professionals are facing these new communication anxieties.
Microsoft Teams has many features that will help overcome these challenges. Team chats, channels and document collaboration can empower your online meetings. These ten tips will help you ensure that all participants are comfortable with the technology so they can focus on the important part of the meeting – the people and content.
#1 – Set Expectations in the Meeting Invite
The meeting invite is a great opportunity to let people know what to expect by stating the purpose and agenda items. This will make the meeting meaningful and keep everyone on track. Will documents or other visuals be shared? Does your organization endorse the use of web cameras? Will notes or a recording be available for people to refer to after the meeting? Keep the message short but if there is anything you need to point out to ensure people can participate fully, the invite is a good opportunity to do that.
If you’re expecting newcomers, you might include a little extra guidance about accessing the meeting or where questions can be addressed. Although most people will not need this, including it sets a welcoming tone. For example:
New to using Microsoft Teams?
For the best experience:
- Click Join Microsoft Teams Meeting
- You may be prompted to choose how you want to connect – browser or desktop app
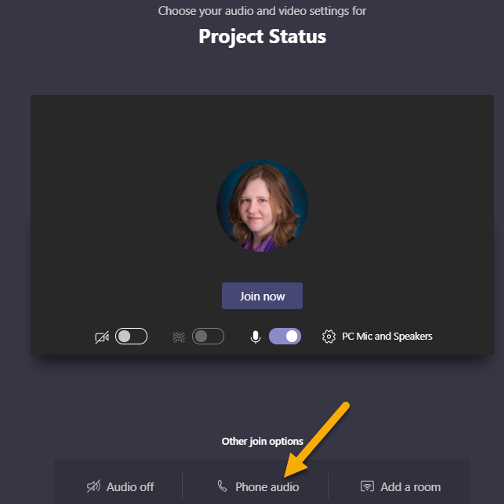
- Select audio option – computer or phone
If you need to join with only audio, you can use the phone number provided, or select another number through Local numbers.
If you’re dialing in, you can press *1 during the meeting to hear menu options.
If you need any help, click on Learn more about Teams or contact me at first.last@email.com
#2 – Review Meeting Controls with Newcomers
If you plan to have people join who are completely new to Teams, take a minute or two to review the meeting controls so people can participate comfortably. If you’re going to invite people to turn on their webcams, this is a great opportunity to illustrate the Start with a Blurred background option (see Tip #5).

- Meeting duration
- Webcam on or off
- Mute or unmute yourself
- Screen sharing
- More options
- Conversations
- Participant list
- Leave meeting
#3 – Mute is Everyone’s Friend
In meetings with more than 5 people, anyone who joins after the meeting has started will join as muted to reduce noise. If you notice disruptive noise from others, you can mute that person or mute all, easily from the participant list.
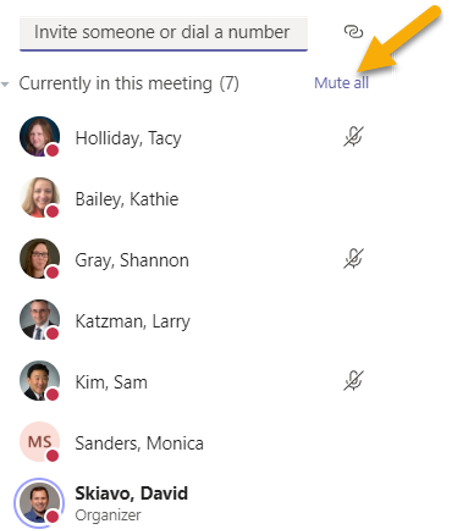
If someone has been muted, they’ll get a notification letting them know. They can unmute themselves using their meeting controls when they need to speak. For those joining by calling in, *6 mute/unmutes.
#4 –Joining from Multiple Devices? Avoid Echoing.
Sometimes, people will join the meeting with their computer and then dial into the meeting with their phone for audio. To avoid an echo, just make sure your computer speaker is muted. There is an option to do this on the join screen prior to entering the meeting. If you forget, just turn off your computer sound.
#5 – “Mute” Any Distracting Backgrounds
If you need to share your webcam but the background could be distracting, you can take advantage of the select Start video with blur in More Options. This blurs the background behind the person for the duration of the camera share.
#6 – Pick What to Share
Don’t want everyone to read your email when you share your desktop? You have multiple choices to share:
- Your entire desktop or screen
- A window or application
- PowerPoint
- Whiteboard
With application sharing, participants will only see the application or window that you choose to share. They will not see any other application or notifications you might receive.
#7 – Let a Coworker Control Your Screen
A coworker can request control when you are sharing your desktop so that he or she can control the screen and cursor. If you choose to share an application, like PowerPoint, rather than your desktop, control would be limited to the shared application. For security reasons, external participants cannot request control when you are sharing your desktop.
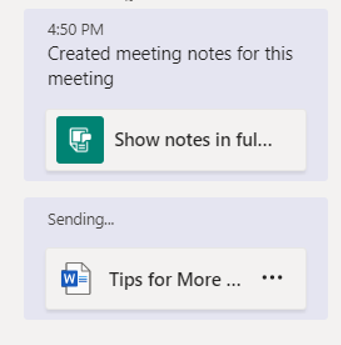
#8 – Take Notes in the Meeting
With Microsoft Teams, taking and sharing meetings notes is easy. Notes can be accessed from More Options and are available before, during, and after the meeting.
#9 – Two ways to collaborate on documents
You can work on files together through a screen share, where one person types and the others talk. Or, you can upload the document to the meeting chat and allow multiple people to work on the document in real-time.
#10 – Take Advantage of the Resources Available
Here are some good articles from the Microsoft Blog on Remote Work and Teams Meetings:
- 9 tips for having the best online meeting experience with Microsoft Teams
- 4 Tips for working from home with Microsoft Teams
- 2 weeks in: what we’ve learned about remote work
Thanks to authors Tacy Holliday, Chris Miller, and Guy Schmidt for their contributions to this blog.