Why Stream?
If you don’t have school-aged children, you might not know that live streaming is the hot thing at the moment. Imagine telling your younger self that you could not only get paid for playing video games but that people would enjoy watching you play games. Honestly, I was born in the wrong era.
Traditionally, the way developers communicated their craft was through the written word; we already type thousands of lines a day, have a WPM of 90, and write extensive documentation. Writing instructional text is a natural progression.
But some ideas are best communicated visually and personally – this is why developers go to conferences, sit in crowded rooms, and stare at a wall of text. However, in the age of COVID-19, in-person meetings have been put on hold indefinitely – so the next best way to recreate the experience is live streaming.
This may sound daunting; most people have a fear of public speaking, and many developers are introverts, compounding the fear. If you’re terrified of speaking to a dozen people, imagine potentially thousands of people watching and listening to you online! But the best way to overcome fear is through familiarity.
Livestreaming is no more difficult than sharing your screen in Microsoft Teams and talking your coworkers through your code. Sure, you could write a multi-page email or extensive documentation, but that lacks the immediacy and leaves it open to misinterpretation. A live stream, with a live audience responding and asking questions, is a great way to communicate ideas.
Getting Started
Content
This is the simplest but sometimes the hardest part – coming up with something to discuss. In your daily grind, it’s easy to talk about what you’re working on with your coworkers, but once you clock out, it can be hard to come up with a topic. This is the curse of every communicator, and it’s up to you to figure out your muse. But if you can figure out a way to talk about what you’re working on for work without giving up any company secrets, then that’s a great place to start.
Audience
Now that you have an idea of what you want to talk about, you have to figure out who you want to talk to! Who’s your audience? It’s simple in a work setting: your office roommate, your pair programming buddy, and your team members. But outside of the 9-5, it can be difficult to find an audience. This is a topic in and of itself, but a great first step is to find dev streamers that you like, then follow in their footsteps and appeal to their kind of audience. Over time, you’ll develop your niche.
Tools
Now that you know what you want to talk about, and who you want to talk to, it’s time to figure out how to bring it together. Each area will be broken down in greater detail in the following section.
- Computer hardware (of course)
- Broadcasting software
- Audio/Video equipment
- Streaming services
- Miscellaneous gear
Computer Hardware
Since we’re specifically talking about live streaming software development-related topics, it follows that having a computer is required. You’ll want a decently capable computer with a moderate CPU, RAM, and GPU. Essentially, if it’s a decent gaming system, then it’ll be a decent devstreaming system. A good starting point would be a Ryzen 3600, 16GB RAM, 2 or more monitors, and an Nvidia RTX GPU*.
* The GTX 1650 Super is also good because it is built on the same Turing engine as the RTX, and it encodes just as well as the RTX 2080TI, so don’t overspend. The other important factor is the number of connected monitors affected by the amount of GPU memory.
Broadcasting Software
I’ve only experimented with a couple of apps, so this isn’t an exhaustive list – do your research as to which one suits you best.
Open Broadcaster Software (OBS) Studio
It’s free, has a lot of features, is cross-platform, and is very popular. This is an excellent app for getting started with streaming and is pretty straightforward. It has a thriving plugin ecosystem. There’s also an alternative version of OBS called StreamLabs OBS (or SLOBS), which streamlines the OBS interface and provides additional functionality.
vMix
vMix is not free, but it has many professional features, which makes it very well suited for professional broadcasts and personal live streaming. It’s got a steeper learning curve than OBS but is much more flexible and customizable. You can try it out free for 60 days, and after that, the basic HD version is just fine for live streaming and costs $60.
How to Choose?
I’d suggest starting with OBS to get acquainted with live streaming, and it’s sufficient for screen sharing and integrating a few cameras. But once you start trying more advanced tricks that are difficult to do in OBS, look into vMix (or other paid apps).
Add Video and Equipment
At a minimum, you’ll need an audio input – no point in a live streaming without one! Hopefully, as we’ve all become remote workers, you’ve been provided with a headset by your company, that’s all you need to get started. The important part is that your voice is clear and intelligible, so if your coworkers can understand you during your daily standups, then you’re good to go.
A camera is not strictly necessary, but recommended – you want your audience to connect with you quickly, and your face on the stream facilitates that. An example would be giving a presentation in a room full of people; they’re focused on you just as much as your content. A webcam can fulfill both video and audio needs, but the webcam microphone will probably pick up a lot of ambient or background noise, so be sure to test all your audio sources to figure out which sounds the best.
If you have a camera, the next most important thing is lighting – make sure you have some strong neutral ambient light sources. If you don’t have a nearby window or are broadcasting at night, you may have to buy some key lights.
As your live streaming journey progresses, you’ll discover a whole new world of AV gear, but now stick to the basics before you start chasing that dragon. A headset and a webcam are sufficient to begin.
Streaming Services
Up to this point, we’ve addressed everything required to produce a live stream – now, we need a service[SK1] to receive and distribute it.
- Twitch.TV – The current popular service for live streamers of all kinds. Good interactivity with your audience. The negatives are that the video and audio quality (bitrate) is limited.
- YouTube.com – YouTube is the gold standard of internet video distribution. There are no limitations on bitrate here. They’ll take as high a quality as you can provide them—a great place to organize and store older streams. Live interaction with your audience is not as good as other services.
- Facebook – Very easy to get started, with good interactivity with your audience, but it can be hard to find an audience outside your immediate circle of friends. Limited bitrate dramatically affects video and audio quality.
- Restream.IO – Restream is a site that receives your stream feed and simultaneously retransmits it to other services, like FB, YT, Twitch, etc. The free tier can handle up to 3 output streams—a great way to increase your reach for free.
Collaboration Apps
Everything that applies to streaming also applies to screen-sharing or teleconference apps! You can stream into applications like Microsoft Teams, Zoom, Slack, and Discord by either dedicating an entire display to the broadcast output and then screen sharing, or adapting the broadcast output as a webcam.
Miscellaneous Gear
These are optional tools that I’ve found useful for improving the ease and quality of a live stream.
HDMI Dummy Plugs
 These little HDMI plugs trick your computer into thinking there’s a real display connected to it, which you can then use as a virtual display for screen captures. Sometimes, two screens aren’t enough to produce a live stream, so I plug one of these in, set the screen capture to the fake display, and composite my applications.
Elgato Stream Deck
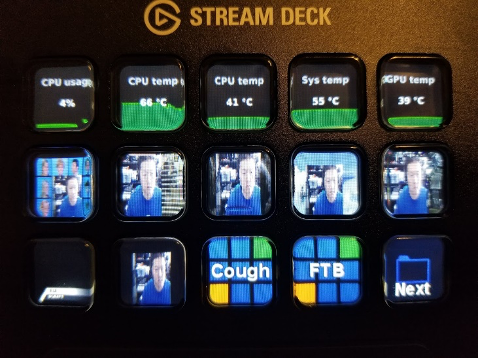
These are great little devices that can be used to control your broadcasting software like OBS or vMix, execute macros, launch apps, etc. Each button is an LCD and can provide visual feedback to the state of your stream. Here’s my layout for when I’m streaming with vMix:
First row: CPU/GPU usage & temps
Second row: vMix inputs
Third row: vMix overlays, cough (hold to mute), Fade To Black (cuts feed)
Webaround Green Screen
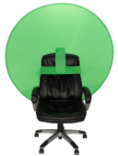 The downside of putting yourself on camera is that you also have to put your background on camera – unless you get a green screen. These green screens by WebAround attach around your chair and provide the utility of a green screen without the messy setup.
Then you go into your broadcasting software, set the chroma key, and now you have a clean image of yourself that you can overlay on top of the screen share.
Producing a Live Stream
Giving a successful presentation is outside the scope of this article, but you can check out a blog from my co-worker, Andrea Pinillos, on top considerations when presenting at a conference. Below are some practical steps to follow when live streaming:
- Clean up your screens, and remove or hide anything that might be a distraction. As a viewer, seeing dozens of unorganized icons on the desktop brings me almost physical pain. Close all apps not needed for streaming or development. Prevent desktop notifications from popping up during the stream.
- If you’re displaying a browser window, have a clean one prepared ahead of time with no bookmarks or tabs.
- Test your broadcasting software ahead of the scheduled broadcast and give yourself enough time to fix any technical issues.
- If you have a smaller audience, take some time at the beginning of the live stream for small talk and connect.
- Switch things up occasionally (visually and aurally), to keep the audience engaged.
- Be mindful of your audience’s time. Avoid doing things that take a long time unless you have content to fill that gap. If possible, just like on a baking show, have a precooked result ready to go.
- When ending the stream, wrap it up coherently, summarizing everything discussed, and the main points you wanted to convey.
- Solicit feedback and adjust accordingly.
Do’s and Don’ts
Lastly, here are some tips as you begin your live streaming journey:
DO: Show your face.
DON’T: Be a slob – check your appearance before you show your face.
DO: Be prepared and have an outline.
DON’T: Have any “dead air” where you’re waiting on something and have nothing exciting going on – have a precooked result and skip right to it.
DO: Place the camera above your screen so that you’re naturally looking at it while developing.
DON’T: Have a distracting background behind you – tidy it up or use a green screen to hide it.
DO: Know how to cut the audio and or video feed if you need to cough or handle an interruption.
DON’T: Multitask – stay focused on the subject matter.
DO: Show your mistakes – nobody’s perfect, and showing how to recover from a mistake is also helpful.
DON’T: Trash other languages, frameworks, etc. Everybody has their own opinions and favorites. In general, avoid negativity.
DO: Have a drink handy – you’ll be talking a lot.
DON’T: Talk endlessly – give yourself and your audience breaks, at least once an hour.
Summary
So why stream? Because you’re most of the way there and you didn’t even know it.
You already have a good foundation of experience for it because you’ve been working from home for a few months. It doesn’t require a lot of specialized hardware, and your employer has most already provided you with the minimum (headset and/or webcam). All the software and services you need to get started are free. There are no technical or financial hurdles to start devstreaming.
But the real benefit of devstreaming is personal growth. By attempting to explain and teach a topic to others, you’ll learn it much more thoroughly – you end up teaching yourself. Every benefit that applies to public speaking also applies to streaming: you’ll learn to overcome stage fright, be more organized in your thought process and speech, and get better at communication – always a plus at work!
Coding is relatively easy – clearly conveying ideas is hard. But it’s a skill that you can master with practice – so get streaming!