


In the realm of cybersecurity, where threats are constantly evolving, finding efficient tools to automate security protection is essential. In this blog post, we will delve into our hands-on experience with ML (Machine Learning) Notebooks in Sentinel and share valuable insights to help you navigate this powerful tool. Specifically, we will focus on the use of MSTICPy (Microsoft Threat Intelligence Security Tools for Python), an open-source Python library developed by Microsoft. MSTICPy equips analysts with a range of tools for data retrieval, analysis, enrichment, and visualization, making it an invaluable asset in the realm of cybersecurity.
Before diving into the training and scoring of machine learning models for security purposes, it is crucial to grasp the functionalities of MSTICPy. This blog post aims to supply a comprehensive understanding of the library.
Getting Started with Jupiter Notebook and MSTICPy
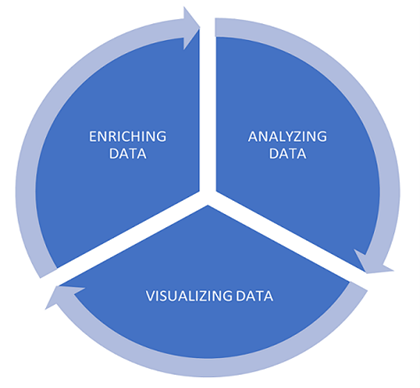
Azure Sentinel offers powerful UI capabilities for visualizing and analyzing data. However, there are instances when security analysts may need deeper investigations correlating Azure Sentinel data to external data providers, such as VirusTotal. This need arises when analysts look to enrich their data with added sources to gain more insights. For example, using an external threat intelligence provider like VirusTotal can supply detailed information about IP (Internet Protocol) addresses in the dataset, while Maxmind GeoLite2 aids in performing Geo Lookup. By enriching and customizing the data, analysts can effectively visualize it to meet their specific requirements.
To help this process, Azure Sentinel ML notebooks supply programmatic access to data and offer an extensive collection of libraries for machine learning, visualization, and data analysis.
Getting Started with Jupiter Notebooks
First let us understand a little bit on Jupyiter notebooks before we dive into MSTICPy.
Notebooks consist of two main components:
- The browser-based interface allows us to write code and view the results after running each code block. Notebooks can be executed from various platforms, including Azure Machine Learning Studio, Visual Studio Code, Jupyter Lab, or directly on your local machine.
- The Kernel handles interpreting and executing the code within the notebook. In case of errors, restarting the Kernel can often resolve issues.
MS Sentinel Jupyter notebooks are seamlessly integrated with Microsoft Sentinel and run on the Azure Machine Learning (AML) platform. To execute any Microsoft Sentinel notebook, an AML workspace is needed. However, for smaller workloads, it is possible to run notebooks locally without an Azure ML workspace using ANACONDA. Additionally, notebooks can also be run within the Azure Synapse Workspace. Configuring an Azure Machine Learning workspace from Microsoft Sentinel is a straightforward process.
To begin using notebooks, refer to the article that guides you through creating an Azure ML workspace and creating new notebooks using existing templates. The main starting points for using notebooks are:
- Getting Started with Azure ML Notebooks and Microsoft Sentinel.
- A Tour of Cybersec notebook features.
Both of the above notebooks use the MSTICPy library.
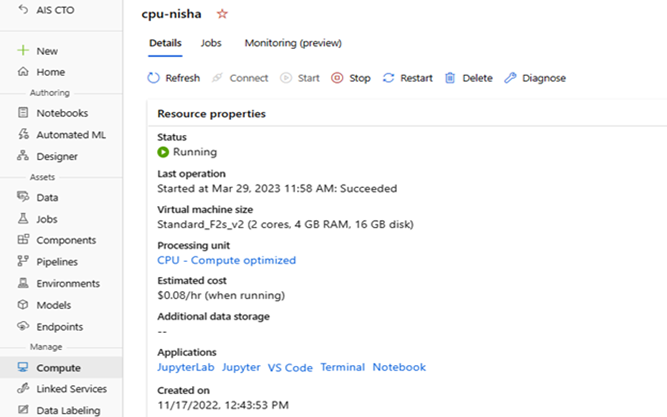
Tips:If multiple people are working in Azure ML Studio environment, then we can create separate compute for each member. Below are the screen shots of compute that we created to run small data load Notebook in single Azure ML workspace.
Getting Started with MSTICPy
This section helps to get fundamental understanding of MSTICPy Python library.
When it comes to performing security analysis using ML Notebooks, the primary package to use is “MSTICPy”. MSTICPy is a comprehensive set of Python tools specifically designed for data acquisition, transformation, and visualization. You may enrich your data using the Machine Learning model and then visualize it using functions from this library. This library reduced the amount of code customers needed to write for Microsoft Sentinel.
It supplies many options to connect to various Data Sources and query the data for analysis. Below is the list of options.
‘MSSentinel’, ‘AzureSentinel’, ‘LogAnalytics’, ‘Kusto’, ‘AzureSecurityCenter’, ‘MSGraph’, ‘SecurityGraph’, ‘MDE (Microsoft Defender for Endpoint)’, ‘MDATP’, ‘LocalData’, ‘Splunk’, ‘OTRF’, ‘Mordor’, ‘ResourceGraph’, ‘Sumologic’, ‘M365D’, ‘Cybereason’, ‘Elastic’
You can run the below command in Notebook to get the lists of available providers.
print(“Below is the list of all providers.”)
print(“————————————————————“)
print(QueryProvider.list_data_environments())
print(“————————————————————“)
Installation and Configuration of MSTICPy
Before starting to use this library, we need to install, import, initialize, and configure it.
To install MSTICPy, ensure that you have Python version 3.8 or later. If you’re working from an Azure ML workspace, Python is already installed and ready to use.
After installing MSTICPy, you can import it into your code and use the help command to access more information about its functionalities.
print(help(MSTICPy))
MSTICPy.search(“Geo”)
When initializing MSTICPy, the following tasks are performed:
- Common packages such as pandas, numpy, and ipywidgets are imported (non-MSTICPy packages).
- Validation of the MSTICPyconfig file is performed.
- Several modules and functions from MSTICPy are imported.
- The version of MSTICPy is checked.
- Initialization of MSTICPy notebook magics and pandas accessors is performed.
- Exception handling in notebooks is enhanced to display friendly MSTICPy exceptions (other exceptions still are unaffected).
Note: In Azure ML and Azure Synapse environments, added initialization and checks are carried out.
For more details about MSTICPy initialization, you can run the help function:
print(help(MSTICPy.init_notebook))
Once we initialize successfully, we can configure the MSTICPyconfig.yaml file.
By default, the custom MSTICPyconfig.yaml is read from current folder directory, but we can also specify an explicit location using an environment variable MSTICPYCONFIG. “If the environment variable MSTICPYCONFIG is set, MSTICPy will use the value of this variable as the path to the config file.” (“MSTICPy Package Configuration — msticpy 2.5.3 documentation”)
If we clone the Notebook from Microsoft Sentinel Portal to Azure Machine leaning workspace, then configuration related to Microsoft Sentinel workspace data get populated automatically.
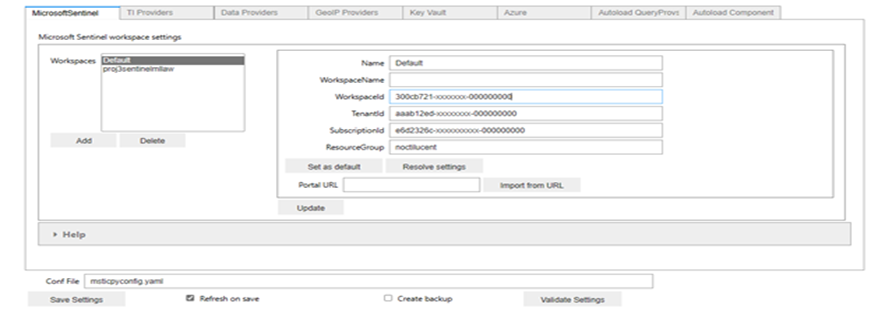
MSTICPyconfig.yaml config file also holds configuration for external data sources connections. You can change or add settings in config file directly by opening it or using the UI. To make the configuration using editor UI, run below code in Notebook. You can store the configuration for multiple MS Sentinel workspaces in a single MSTICPyconfig.yaml file.
Below is the screen shot of MSTICPy configuration editor.
Azure Authentication in MSTICPy
To successfully query data from your Microsoft Sentinel workspace, you need to authenticate the workspace.
Using Azure CLI (Command Line Interface) for authentication is recommended since it caches the credentials, allowing MSTICPy’s Azure functions to obtain credentials from Azure CLI without starting an interactive authentication process every time. This means that if you clone the notebook, you may not need to authenticate it again.
The following code shows the login process using the CLI method, which you can specify during authentication. It’s important to note that Azure CLI does not store your login information; instead, it generates an authentication refresh token that is securely stored by Azure.
!az login –tenant “Tenant ID”
!az account show
When the CLI can open your default browser, it starts the authorization code flow and opens the default browser to load an Azure sign-in page. (“Sign in with Azure CLI — Login and Authentication”)
If the default browser is unavailable or does not open, the CLI will start the device code flow and provide you with below instructions:
- Open a web browser and visit “https://microsoft.com/devicelogin”.
- Enter the provided code in the web page to complete the authentication process.
In case a web browser is not available or does not open, you can force the device code flow with
“az login –use-device-code“.
By following these authentication steps, you will set up the necessary credentials to query data from your Microsoft Sentinel workspace using MSTICPy.
Once we get authenticated, it can connect with log Analytics workspace using the command below.
ws_config = WorkspaceConfig()
query_provider.connect(ws_config, mp_az_auth=[“cli”])
Below are all Azure authentication methods supported by MSTICPy.
- env – Use credentials set in environment variables.
- cli – Use credentials available in a local AzureCLI logon
- msi – Use the MSI (Managed System Identity) credentials of the machine you are running the notebook kernel on
- devicecode – use browser-based device code authentication flow
- vscode – Use credentials from your authenticated VS Code session
- Powershell – Use credentials from an authenticated Azure Powershell session
- clientsecret – Use an Azure AppID and client secret
- certificate – Use client certificate authentication.
- interactive – Interactive browser logon
Querying the Data
When it comes to querying data from Sentinel, the Query Provider plays a crucial role. It enables us to retrieve data from various data sources and supports both predefined templated queries and ad-hoc queries. The data is typically returned as a panda DataFrame from the Query Provider object.
In the case of Sentinel, we can use the Sentinel Query Provider. After connecting to our MS Sentinel workspace, we can list the available built-in query options by using the following command:
query_provider = QueryProvider(“AzureSentinel”)
query_provider.list_queries()
We can also run the help command on Query to get more information.
query_provider.SecurityAlert.list_alerts(‘?’)
Above command gives details on list_alerts query.
Visualizing Data
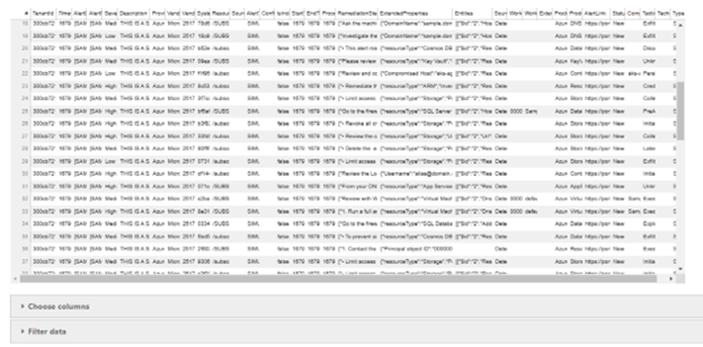
We can use Microsoft Sentinel data provider to query the data from Log Analytics workspace and render using DataViewer.
DataViewer uses the Bokeh DataTable control to supply some basic data manipulation features for viewing pandas DataFrames more easily. (“Data Viewer — msticpy 2.5.3 documentation – Read the Docs”)
Below is the screen shot of DataViewer by running below command.
from msticpy.vis.data_viewer import DataViewer
import pandas as pd
DataViewer (“DataFrame Object”)
Tips & Lessons Learned
- If you encounter the “name query provider is not defined” while running the notebook, you can resolve it by reinitializing the notebook using the following command:
MSTICPy.init_notebook(namespace=globals());
- To use updated packages in your notebook, you may need to restart the kernel. (“you may need to restart the kernel to use updated packages – AI (Artificial Intelligence) Search …”) Restarting the kernel allows the notebook to reload and apply any changes made to the installed packages.
- If you are using notebooks for learning purposes from your test environment, then you may need test data. Please refer to my colleague Selvi Kalaiselvi’s blog for more details on how to generate the test data and to use Sentinel ML notebooks for analyzing Security Incidents.
Key Takeaways
- If you’re interested in utilizing Azure ML notebooks, it is recommended to begin with the “A Tour of Cybersec notebook features” available in the Azure Sentinel notebook templates. This notebook offers code examples on connecting to external data source providers to enhance security data for analysis using MSTICPy. For more detailed information and documentation on MSTICPy, you can refer to the comprehensive resources available at the MSTIC Jupyter and Python Security Tools — msticpy 2.5.3 documentation.
- By using ML Notebooks, security analysts can save time by programmatically accessing external data source APIs (Application Program Interface) to enrich their data, eliminating the need for manual searching.
- By getting the necessary skills and knowledge, senior developers can create notebooks that incorporate various security analysis techniques, data retrieval and enrichment methods, visualization tools, and machine learning models by working with Security Analysts as fusion team approaches. The fusion team approach ensures that the notebooks are tailored to meet the specific needs of the security analysts and are designed to streamline and optimize the security analysis workflow.

