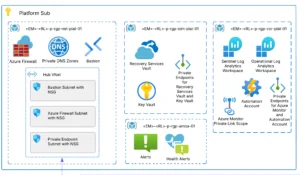
Preparation
We must prepare our Azure to set the correct permissions and prepare the on-premises Hyper-V hosts and VMs for server assessment and migration.
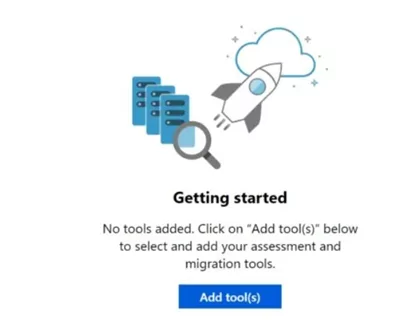
We need to create a new migration project on the access and migrate server section.

Next, we need to add the tools for the migration assessment. Click on the add tools button.
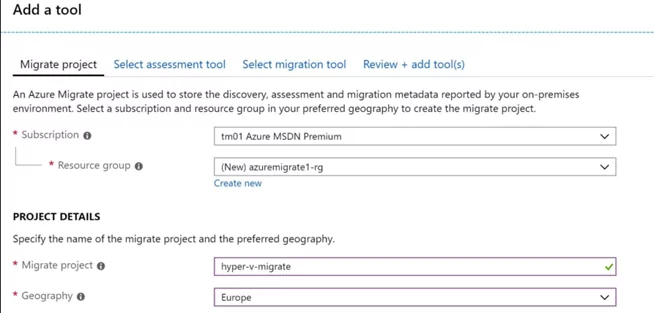
After that, we need to create a new Azure migration project. Enter the details of the subscription, resource group, and project name. Also, we need to create a region where our migration needs to deploy.
WORKLOAD MIGRATION WITH AZURE MIGRATE
Improve your organization's infrastructure and migrate on-prem to Azure with AIS.
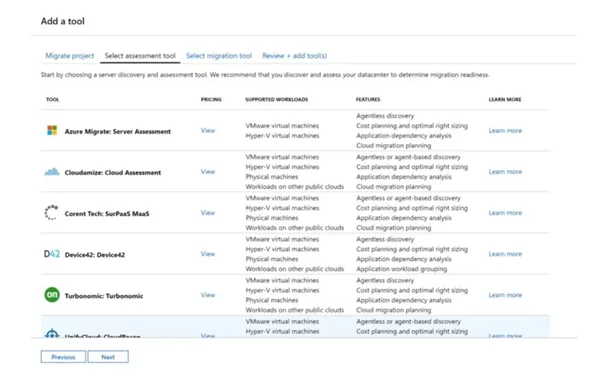
Next, we need to select the assessment tool we want to use. This can be the Microsoft tool or any third-party provider. In this case, we are using the Microsoft assessment tool.
Next, we can select the migration tool we want to use. In this case, we used Microsoft tool one. We can skip this step and select the migration tool after assessing our environment.
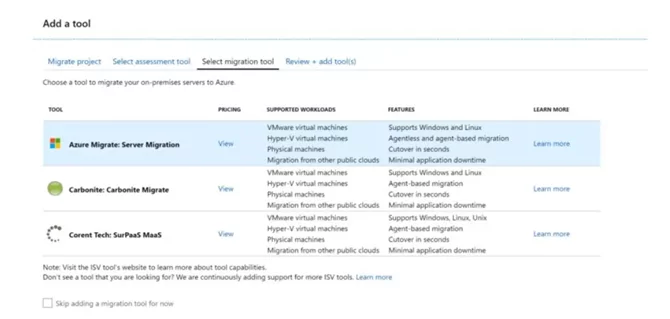
Click on add tool. This will create the Azure migration project with the selected tool.
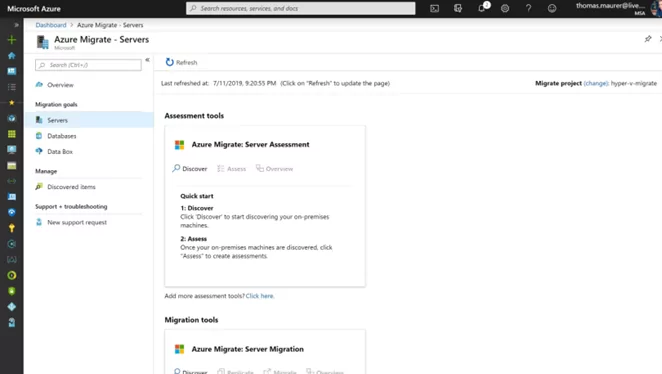
Now we need to start assessing our Hyper-V VMs.
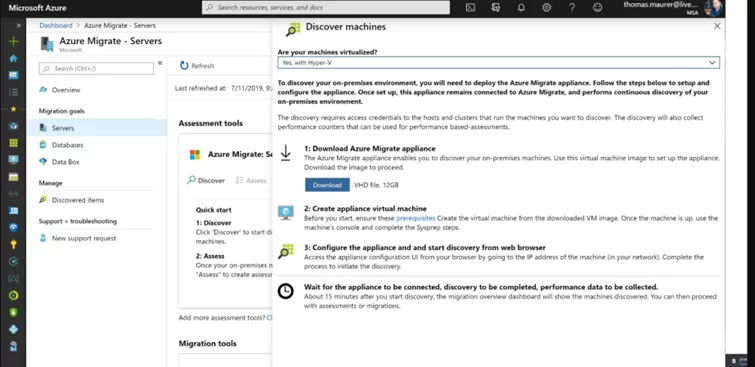
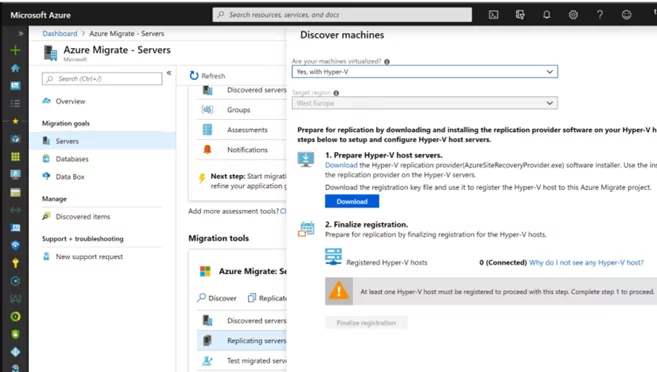
Now that we have completed the Azure migration project setup, we can discover and assess the Hyper-V virtual machines for migration. We need to download the Azure Migrate appliance from the Azure portal. Click on “Discover” and select yes with Hyper-V. This will prompt us to the download link to the VHD file, with that we can create a new virtual machine on your Hyper-V server.
Set Up and Register the Appliance
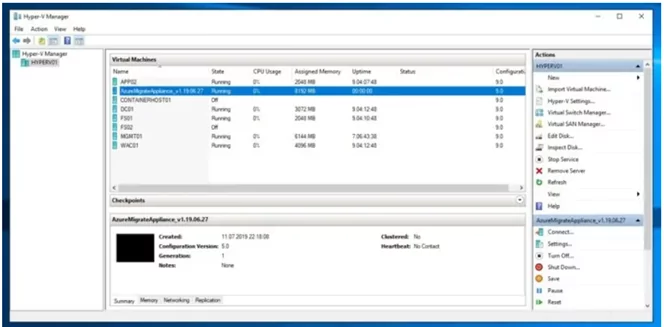
We must import a new Hyper-V using this existing VHD file and set the VM switch. After your virtual appliance machine runs, you can open a browser on a computer that can connect to the appliance VM and open the URL of the appliance web app: https://appliancename-or-IPAddress:44368. Now you can configure the appliance, like setting connection details, time sync, and install updates.
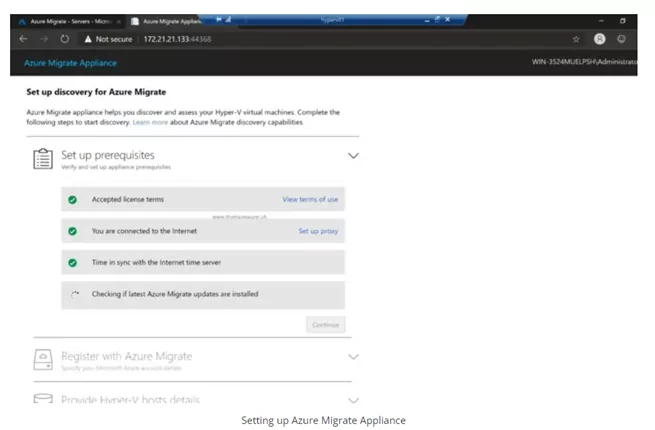
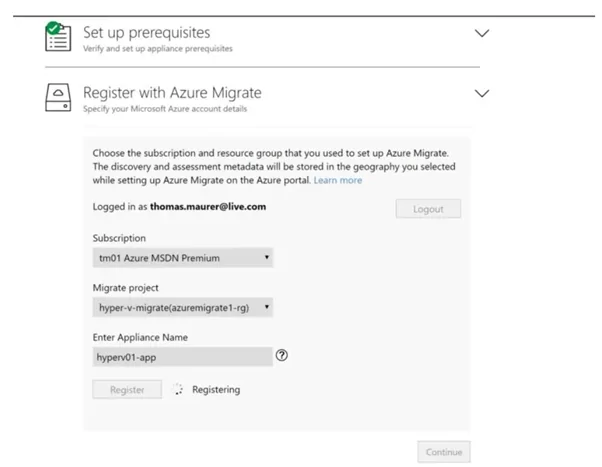
In the next step, we need to register the appliance with Azure Migrate.
Begin Continuous Discovery
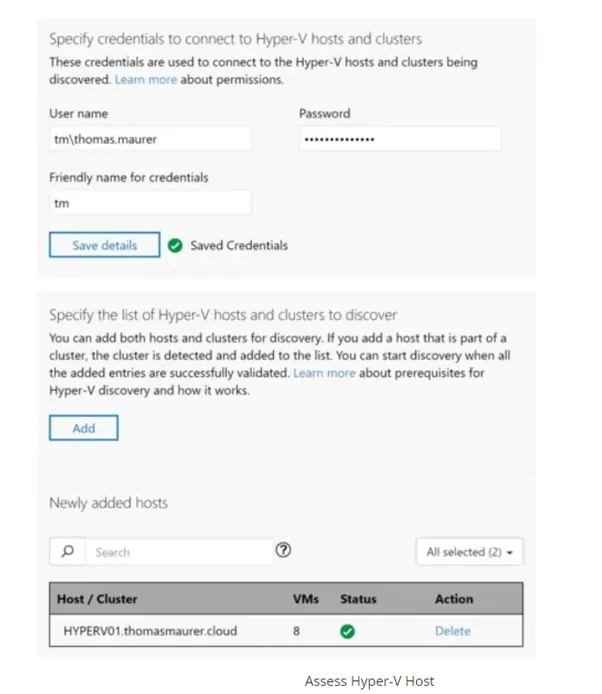
We can now set up and configure continuous discovery by connecting the appliance to Hyper-V hosts or clusters and start VM discovery. The appliance will begin collecting and discovering virtual machines. It can take up to 15 minutes until the discovered VMs appear in the Azure portal. If you want to use performance data in your assessment, we recommend that you create a performance-based assessment after 24 hours or more.
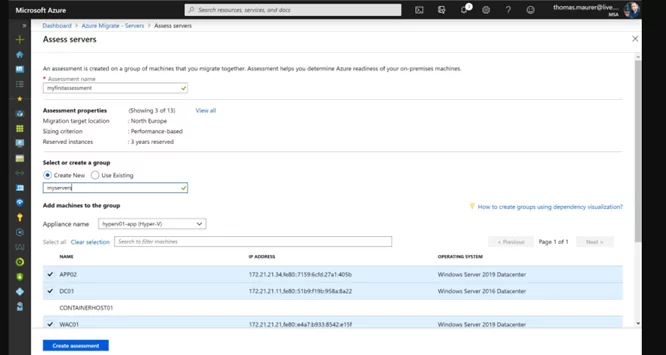
Create and Review the Assessment
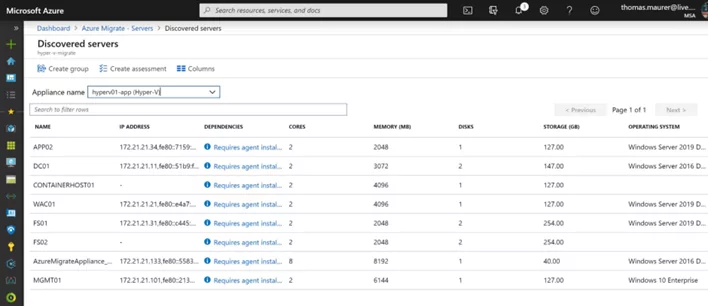
After the servers have been discovered, you can now create a new assessment for the specific virtual machines you want to assess.
After the assessment is complete, you will see a report showing you the Azure readiness and monthly cost estimation for compute and storage.
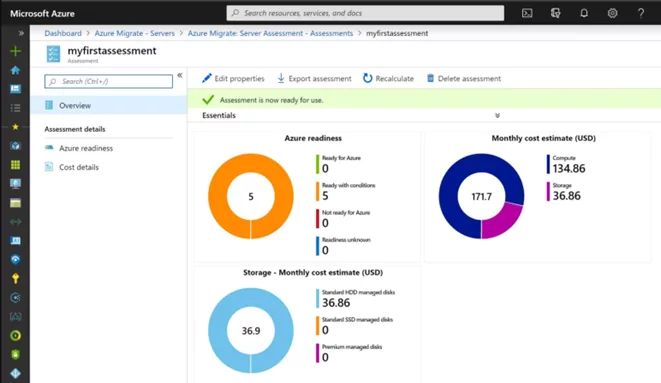
The report will provide you with details info about the readiness and will let you know about the VM status:
- Ready for Azure: Azure Migrate recommends a VM size and cost estimates for VMs in the assessment.
- Ready with conditions: Shows issues and suggested remediation.
- Not ready for Azure: Shows issues and suggested remediation.
- Readiness Unknown: Used when Azure Migrate can’t assess readiness due to data availability issues.
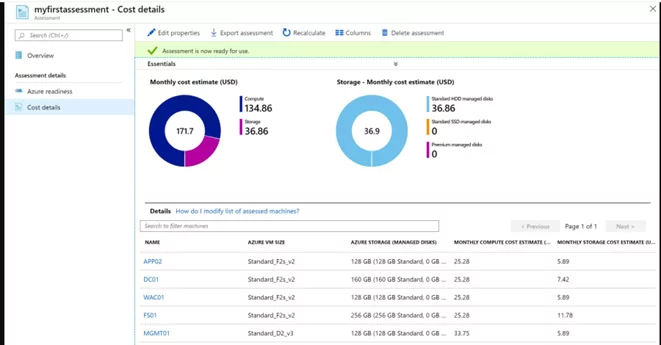
It will also give you more information on the cost of running VMs in Azure:
Cost estimates are based on the size recommendations for a machine and its disks and properties. Create the report after 24 hours or more if you want more accurate performance data.
Estimated monthly costs for compute and storage are shown.
The cost estimation is for running the on-premises VMs as IaaS VMs. Azure Migrate Server Assessment doesn’t consider PaaS or SaaS costs.
Migrate Hyper-V VMs using Azure Migrate
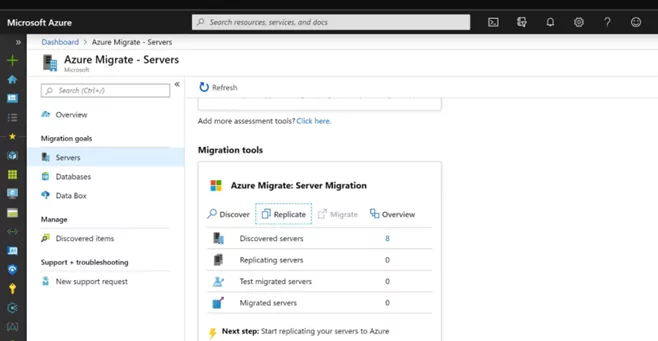
After you have done your assessment and you know which Hyper-V virtual machines you want to migrate, you can now start with the migration process.
The Azure Migrate Server Migration runs a lightweight Hyper-V VM appliance. This is the same VM used to assess the Hyper-V environment (Azure Migrate Server Assessment tool). If you didn’t use the assessment tool and went directly to migration, you will need to download and set up the appliance, like in the assessment process. If you already have that VM from the assessment, you can use the existing virtual machine.
Replicate Hyper-V VMs
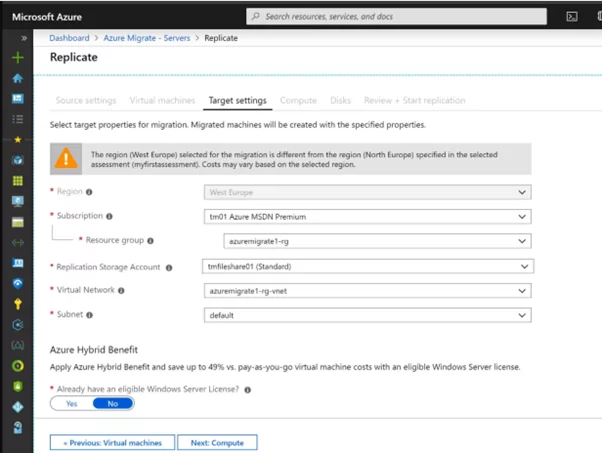
To start the replication, you can now select the virtual machines you want to replicate to Azure. You can choose to apply them directly from the Azure Migrate assessment.

We can configure the target settings like resource group and virtual network in the Azure environment.
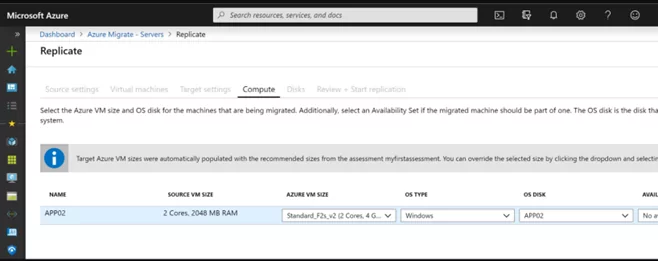
In the compute tab, you can change the VM size, OS disk, availability set, disks, and VM name.
We can start replicating the virtual machines if all the configuration is done. Azure Migrate will automatically provision other Azure resources for the migration, like a Service bus, gateway storage account, log storage account, and key vault. The initial synchronization will take a while, depending on the size of the virtual machines and the available internet bandwidth.
Test and Migrate Hyper-V VMs
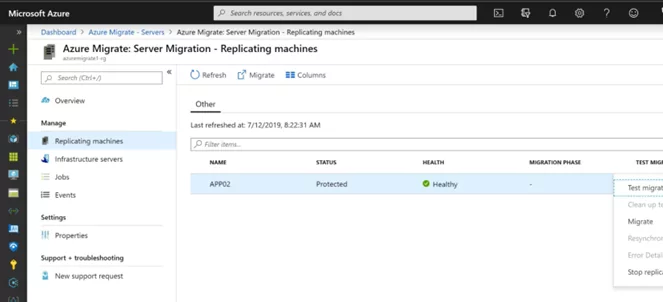
When the virtual machine is replicated, you can now start to migrate it. However, in most cases, you first want to test the virtual machines before you completely migrate them. With Azure Migrate, you can first initiate a test migration to test the VM.
If you click on the virtual machine, you are replicating, and you get more information about the server details, migration status, and replication settings.

We can click on “Replicating servers,” right-click on the machine you want to migrate and click on “Migrate,” or you can click “Migrate” on the server overview page. Azure Migrate will not remove or delete the on-prem Hyper-V virtual machine. But by default, Azure Migrate shuts down the on-premises VM and runs an on-demand replication to synchronize any VM changes since the last replication occurred. This ensures no data loss.
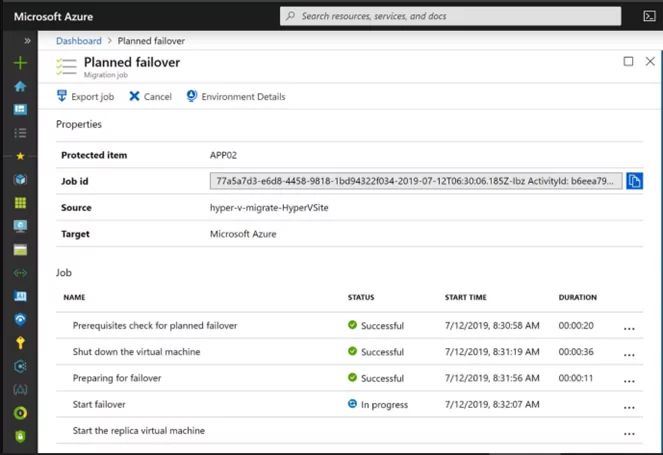
When the job is finished, you can view and manage the VM like any other Azure virtual machine.
Azure Migrate Post-Migration and Cleanup
Complete the migration.
- After the migration is done, right-click the VM > Stop migration. This stops replication for the on-premises machine and cleans up replication state information for the VM.
- Install the Azure VM Windows or Linux agent on the migrated machines. Perform post-migration app tweaks, such as updating database connection strings and web server configurations.
- Perform final application and migration acceptance testing on the migrated application now running in Azure.
- Cut over traffic to the migrated Azure VM instance.
- Remove the on-premises VMs from your local VM inventory.
- Remove the on-premises VMs from local backups.
- Update any internal documentation to show the new location and IP address of the Azure VMs.
Post Migration Best Practices
- Keep data secure by backing up Azure VMs using the Azure Backup service.
- Keep workloads running and continuously available by replicating Azure VMs to a secondary region with Site Recovery.