Microservices are a typical development pattern in the modern era of software development. Unfortunately, it can be challenging to configure and test sprawling applications that utilize dozens of microservices.
For our example, let’s say that you have several teams that are developing the following microservices for a simplified online store application:
- An authentication service, which allows users to log in and other services to verify a user’s authentication token. This service will need to talk to the database.
- A product service, which retrieves information about products from the database.
- A cart service, which allows a user to add or remove products from their cart. This service will need to communicate with the authentication service to verify the user’s credentials.
We will assume that only a single database is used for this application, which contains user data, product data, and cart data. This could also be stored across multiple databases, one for each microservice. We will also need a website, which provides the frontend for the three microservices. Though small, we can already see where configuring an environment for local testing can become burdensome. These services may require different frameworks or runtime environments and a locally deployed database. These services will also need to communicate with each other and the database. We will explore how we can use Docker and Docker Compose to aid in developing this simple application.
Why Use Containers?
Containers help ensure that an application runs as expected on any machine. By using containers, we can help solve the familiar “works on my machine” problem. We isolate the microservices into their environment and can test them independent of local environment configuration. This gives us confidence that our application will behave as expected both for new developers and production deployments.
For this project, we will use Docker, a popular container engine. This gives us access to Docker Compose, a tool that we can use to orchestrate multiple containerized applications together.
Why Use Docker Compose?
Though we can run each Docker container individually, that quickly becomes tedious and difficult to manage. Docker Compose allows us to define a file that defines all of the containers we need to run inside a YAML file and define any environment variables we need to use to run the application. Docker Compose also allows us to communicate easily between multiple containers. Using Docker Compose, we can easily configure a local runtime environment that will include our database, our microservices, and our website applications. We can quickly rebuild any databases, stand up an entire testing environment, and just as quickly tear it down.
It’s important to note that Docker Compose is not meant for production environments. Unlike other tools such as Docker Swarm or Kubernetes, Docker Compose does not provide scaling, monitoring, load balancing, or other management capabilities.
Prerequisites
- Docker
- If using Mac or Windows: Docker Desktop is the best tool for running containers on your machine. Follow the installation instructions in Docker’s documentation.
- If using Linux, follow Docker’s documentation to install Docker Engine on your distribution.
- Docker Compose
- If using Docker Dekstop, this is installed automatically.
- Node.js
- This is optional but will make development easier.
Setup
We will first set up a simple microservice-based application that will follow the following structure:
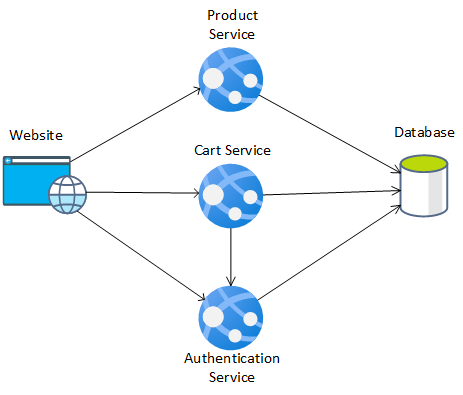
The website will communicate three microservices to the database, while one microservice will communicate with another. We could almost as easily have separate databases for each microservice; similarly, we could have the Cart service also talk to the Product service to retrieve Product data.
For this application, we will use the following technologies:
- Database: MySQL
- API applications: Node.js
- Website: Angular
These technologies are not required. For example, the database could just as easily be another database type, such as PostgreSQL, MongoDB, or CosmosDB.
Directory Configuration
The first thing we should do is create a project folder. For this application, we’ll call it store. Then, we will create folders for each microservice: auth-service, product-service, and cart-service. We’ll also create one for the website and one for the database called DB.
The folder structure should look as follows:
- store
- auth-service
- cart-service
- db
- product-service
- website
Database Setup
To get our application started, we will first configure our database. I will be using the MySQL docker container, version 5. To do this, we should first create our dockerfile. Create the file store/db/Dockerfile and add the following:
FROM mysql:5

ADD . /docker-entrypoint-initdb.d
This will add all files from the store/db folder to our database and executes all *.sql files in alphabetical order.
You can then define each of our tables, and some test data, in a separate file so that your directory looks as follows:
- db
- 001-Products.sql
- 002-AppUsers.sql
- 003-CartItems.sql
- 999-testdata.sql
- Dockerfile
When the MySQL Docker image is executed, it scans the docker-entrypoint-initdb.d directory, and executes them in alphabetical order. This will initialize our database easily and quickly.
You could also define a database for each of our services if you follow a strict microservice pattern where each service has its database. You can do this by creating multiple db folders and putting the Dockerfile in each one.
Note: There exist docker images for various other databases, as well; MySQL is not required. You can view documentation for a few of these options as follows:
API Application Setup
In each of the service folders, we will be creating a simple Node.js application.
In the store/auth-service directory, run the command npm init. Leave all of the default values in the initialization script. Install the following dependencies:
npm i express
npm i cors
npm i mysql@^2.18
Create the file, store/auth-service/index.js. The easiest way to pass arguments to applications in Docker is using environment variables, so we will pass the location, user, password, and name of the database through these environment variables:
var express = require('express');
const mysql = require('mysql');
const cors = require('cors');
const app = express();
const port = 80;
const db_location = process.env.DB_LOCATION;
const db_user = process.env.DB_USER;
const db_password = process.env.DB_PASSWORD;
const db_name  = process.env.DB_NAME;


app.use(express.json());
app.use(cors());

...
As this is not an Express tutorial or credential, I will not provide the authentication service’s implementation details here.
From here, we can continue to develop our authentication service. We can then create a Dockerfile for this application at store/auth-service/Dockerfile. This Dockerfile will use the Node image for Docker.
FROM node:12
WORKDIR /app
COPY package.json package.json
COPY package-lock.json package-lock.json
RUN npm install
COPY . .
CMD [ "node", "index.js" ]
We will also create a .dockerignore file at store/auth-service/.dockerignore with the following, so that our local environment’s node_modules folder and log are not copied to the container:
node_modules
npm-debug.log
We will follow the same steps for the store/product-service folder, and for the store/cart-service folder.
Since the cart-service will communicate with the auth-service, I have also installed the axios library by running npm i axios in store/cart-service, and have included it in store/cart-service/index.js with the line const axios = require('axios');. Also, the cart-service will need the URL of the auth-service, so I have added environment variable AUTH_URL.
With this, store/cart-service/index.js begins as follows:
var express = require('express');
const mysql = require('mysql');
const axios = require('axios');
const cors = require('cors');
const app = express();
const port = 80;
const db_location = process.env.DB_LOCATION;
const db_user = process.env.DB_USER;
const db_password = process.env.DB_PASSWORD;
const db_name = process.env.DB_NAME;
const auth_service_url = process.env.AUTH_URL;

app.use(express.json());
app.use(cors());
Note: As with MySQL, Node.js is not a requirement. There are docker images for various other platforms, as well:
- .NET Core
- Python
- Java (via OpenJDK)
- And many more
Website Setup
We will use Angular for our website, so let’s first initialize our Angular application by running the command npx ng new in the store/website directory. Use all the default values, and then open the file store/website/environments/environment.ts
At this point, we determine which ports we will run our services. Replace the content of the file with the following:
export const environment = {
  production: false,
  auth_url: "http://localhost:30500",
  products_url: "http://localhost:30501",
  cart_url: "http://localhost:30502"
};
This will give us access to the URL of each of the microservices that we have defined previously. We can then create several angular services that read from this environment file and use the built-in Angular HTTP service to access our web services.
(Note: There are numerous ways to supply environment variables such as this to a web application. This is simply one of the easiest ways to get us up and running as quickly as possible.)
We can then create a Dockerfile, similar to the one we made for our microservices, in store/website/Dockerfile:
FROM node:12
WORKDIR /app
COPY package.json package.json
COPY package-lock.json package-lock.json
RUN npm install
COPY . /app
CMD [ "npx", "ng", "serve","--host","0.0.0.0","--poll","2000"]
This will host an Angular development application inside our container that will continuously monitor for changes and be exposed on port 4200, the default Angular development port.
Testing with Docker Compose
Now that our simple database, microservices, and angular application have been developed, we can set up Docker Compose to run all five of these Dockerfiles at once and establish communication between them. To do this, we need to create a docker-compose.yml file in the store directory.
A Starting Point
Our first goal with Docker Compose is to get all five containers running. This is a relatively simple task with docker-compose.
Inside store/docker-compose.yml, use the following code:
version: "3.8"
services:
  sql:
    build: ./db
    command: --default-authentication-plugin=mysql_native_password
    restart: always
    environment:
      - MYSQL_RANDOM_ROOT_PASSWORD=1
      - MYSQL_USER=db_user
      - MYSQL_DATABASE=db
      - MYSQL_PASSWORD=pwd
  auth:
    build: ./auth-service
  product:
    build: ./product-service
  cart:
    build: ./cart-service
  website:
    build: ./website
    ports:
      - '4200:4200'
    volumes:
      - ./website/src:/app/src
What is this doing?
First, we are defining all of our services using the services configuration option inside the YAML file. From there, we give names to each of our five services: sql, auth, product, cart, and website. We point each of these services at our Dockerfiles using build and providing the path to the folder.
By default, no ports are exposed outside of Docker, so we need to let Docker Compose know that we need to expose the port the website’s 4200 port to the local machine’s port 4200 the ports configuration option.
The volumes configuration option specifies a mapping of a local folder to a docker folder. In this case, on the website, we supply the folder ./website/src as a local folder and /app/src as the Docker container folder. This allows us to make changes to the Angular project’s source directory while the Angular server in the container is monitoring for changes, allowing easier development.
The SQL database is configured to use environment variables, as defined by its documentation. We define those environment variables here to give us a consistent (but insecure) database, username, and password.
The restart: always argument will restart the MySQL container if it shuts down unless the container is manually terminated. We can supply additional arguments to a command-line application or override the command with the command configuration option.
Communicating Between Containers
We’re closer now, but we still need to configure docker-compose.yml to allow communication between containers. Earlier on, we defined some environment variables: DB_LOCATION, DB_USER, DB_PASSWORD, DB_NAME, and cart-service AUTH_URL.
When we set up containers with Docker Compose, the hostname of any environment within the Docker Compose runtime environment is the name that we provide in the services, so our five hostnames are sql, auth, product, cart, and website. These allow us to make MySQL calls to sql with an appropriate library and authentication calls to auth with a simple POST. So, using the same format as we did with the sql service, we can provide environment variables to auth, product, and cart:
version: "3.8"
services:
  sql:
    build: ./db
    command: --default-authentication-plugin=mysql_native_password
    restart: always
    environment:
      - MYSQL_RANDOM_ROOT_PASSWORD=1
      - MYSQL_USER=db_user
      - MYSQL_DATABASE=db
      - MYSQL_PASSWORD=pwd
  auth:
    build: ./auth-service
    environment:
      - DB_LOCATION=sql
      - DB_USER=db_user
      - DB_PASSWORD=pwd
      - DB_NAME=db
  product:
    build: ./product-service
    environment:
      - DB_LOCATION=sql
      - DB_USER=db_user
      - DB_PASSWORD=pwd
      - DB_NAME=db
  cart:
    build: ./cart-service
    environment:
      - DB_LOCATION=sql
      - DB_USER=db_user
      - DB_PASSWORD=pwd
      - DB_NAME=db
      - AUTH_URL=http://auth
  website:
    build: ./website
    ports:
      - '4200:4200'
    volumes:
      - ./website/src:/app/src
Notice that the URL of AUTH_URL in the cart service is simply http://auth. This is enough to access the other container from the cart-service application!
Communicating with the Browser
We could try to do the same thing with the Angular website, but we wouldn’t be successful. Since a website runs in the browser and not within the Docker environment, our browser would not be aware of the location of http://auth, http://product, and http://cart.
We will have to expose the ports of our auth-service, product-service, and cart-service, similar to how we expose our website’s ports. Recall that we hosted our Express applications on port 80. We will map those ports to ports 30500, 30501, and 30502, as we configured in the Angular application’s local environment variables:
version: "3.8"
services:
  sql:
    build: ./db
    command: --default-authentication-plugin=mysql_native_password
    restart: always
    environment:
      - MYSQL_RANDOM_ROOT_PASSWORD=1
      - MYSQL_USER=db_user
      - MYSQL_DATABASE=db
      - MYSQL_PASSWORD=pwd
  auth:
    build: ./auth-service
    ports:
      - '30500:80'
    environment:
      - DB_LOCATION=sql
      - DB_USER=db_user
      - DB_PASSWORD=pwd
      - DB_NAME=db
  product:
    build: ./product-service
    ports:
      - '30501:80'
    environment:
      - DB_LOCATION=sql
      - DB_USER=db_user
      - DB_PASSWORD=pwd
      - DB_NAME=db
  cart:
    build: ./cart-service
    ports:
      - '30502:80'
    environment:
      - DB_LOCATION=sql
      - DB_USER=db_user
      - DB_PASSWORD=pwd
      - DB_NAME=db
      - AUTH_URL=http://auth
  website:
    build: ./website
    ports:
      - '4200:4200'
    volumes:
      - ./website/src:/app/src
This is our final docker-compose.yml file. It performs the following tasks:
- Create five containers, one for our database, one for each of our services, and one for our website
- Establish network communication between the containers
- Expose ports for containers that need to communicate with the browser
- Set up source mapping to allow for automatic change polling in the Angular server
Running Docker Compose
Now that we have our docker-compose.yml file running, Docker Compose is very simple. In the store directory, run the command, docker-compose up --detach.
This command will create or recreate each of the containers defined in the docker-compose.yml file and immediately run our containers. You can then access the Angular application at http://localhost:4200 or access any of the three microservices with POST commands in a tool like cURL or Postman at http://localhost:30500; or http://localhost:30501; http://localhost:30502.
When we want our containers to stop, run the command docker-compose down -v. This will both stop and remove all of the containers from your Docker runtime environment and tear down the database, so it has to be recreated. If you do not want the database recreated, omit the -v option; you can run the command docker-compose rm -v to remove the database volume later.
There are many other options available to Docker Compose. For more information, check the docker-compose CLI reference and the Compose file reference on the official Docker website.
Conclusion
Though not intended for production environments, Docker Compose provides a valuable tool for the development of microservices. With appropriate use of Docker and Docker Compose, we can easily port entire development environments to other developers’ machines with minimal local environment configuration, including a local database, microservices, and a website. Once the environment has been configured, a new developer can run a single command and start developing and testing the application immediately.