This blog series is for anyone trying to learn how to use the Power Platform. Readers should know software development fundamentals. It begins by explaining why we would want to create a home inventory system. It then takes the reader over the requirements of the system, including potential future enhancements. It takes time to explain the database model and how it translates into tables in the Microsoft Dataverse. This post concludes with a review of the User Interface mockup.
The blog series assumed the following:
- You have a Power Apps tenant with administrative privileges
- You have knowledge of software development fundamentals
Why Create a Home Inventory?
Several years ago, I started considering the number and value of technical assets I had obtained over the years. I wondered what would happen if I were robbed, had a fire, or some other disaster; and found myself wondering if my insurance would cover all my technical assets? According to Consumer Reports:
“having a list or a visual reminder of your belongings can make a big difference in how much your homeowners’ insurance will pay, and thus how well you’ll recover financially.”
At the time, I purchased Quicken Home Inventory Manager, which was adequate at the time; however, advancements in technology have made it obsolete. I want to use my phone and its many capabilities for data entry instead of walking back-and-forth to the computer. I set out designing my home inventory system using the Power Platform with these things in mind.
Requirements
The requirements of the initial system are straight forward:
- The system should include a phone app for data entry and a web interface for administration
- Phone and Admin Apps should provide the ability to create, update and delete Items
- Columns: Name, Description, Item Type, Manufacturer, Serial Number, Model Number, Location, Date Purchased, and Approx. Value, Image
- Required columns: Name, Model Number, Item Type, Manufacturer, Location, and Image
- Item Type will look up from the Item Types table
- The manufacturer will look up from the Manufacturers table
- Location will look up from the Locations table
- Users should be able to add an Item Image
- Phone and Admin Apps should provide the ability to create Item Types
- Columns: Name
- Required columns: Name
- Phone and Admin Apps should provide the ability to create Manufacturers
- Columns: Name, Support URL, and Support Phone
- Required columns: Name
- Support URL should be validated
- Support Phone should be validated
- Phone and Admin Apps should provide the ability to create Locations
- Columns: Name
- Required columns: Name
- Admin App should provide the ability to create, update and delete Item Types
- Admin App should provide the ability to create, update and delete Locations
- Admin App should provide the ability to create, update and delete Manufacturers
- The system should allow Admins to export the inventory
Future Enhancements
In addition to the requirements, there are some future enhancements or “nice to haves” that I can investigate adding to the system later, for example:
- Bar code Scanner – for items with a bar code, it would be helpful to scan these automatically. This could be for serial numbers, model numbers, or even UPC for the entire item.
- Photo of Receipt – item would be a nice feature to include a picture of the receipt for proof-of-purchase and returns.
- AI – While this is a tall order, it would be neat to take a picture of an item and have it recognized what kind of item it is, perhaps even determine its Item Type.
The Database Model
Using the requirements above, I can derive a simple database model. There is an Item table that contains most of the data. Each Item record may have 0 or more Image records. Each Item will also have a lookup to a Manufacturer (ex. Microsoft, Sony, etc.), a Location (ex. Master Bedroom, Living Room, etc.), and an ItemType (ex. Appliance, Networking, Computer, etc.).
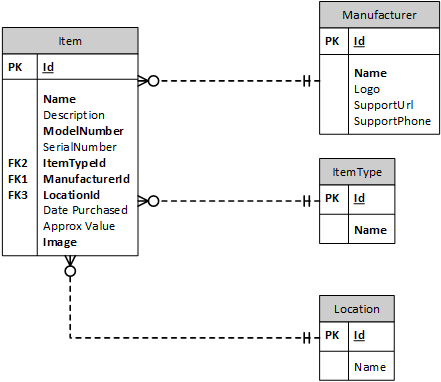
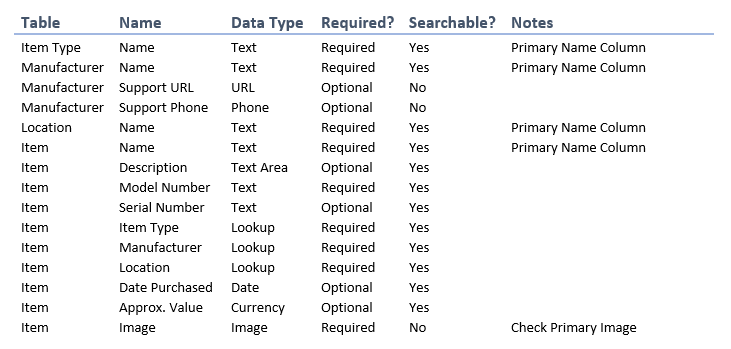
The Dataverse Tables
Using the database model above, I can create custom tables for the system in the Microsoft Dataverse. Due to requirements in the Microsoft Dataverse, I will need to add a Name column to the Image table; I will want to handle this name’s generation when I implement the Item Images part of the application. Below is the resulting data model summary.
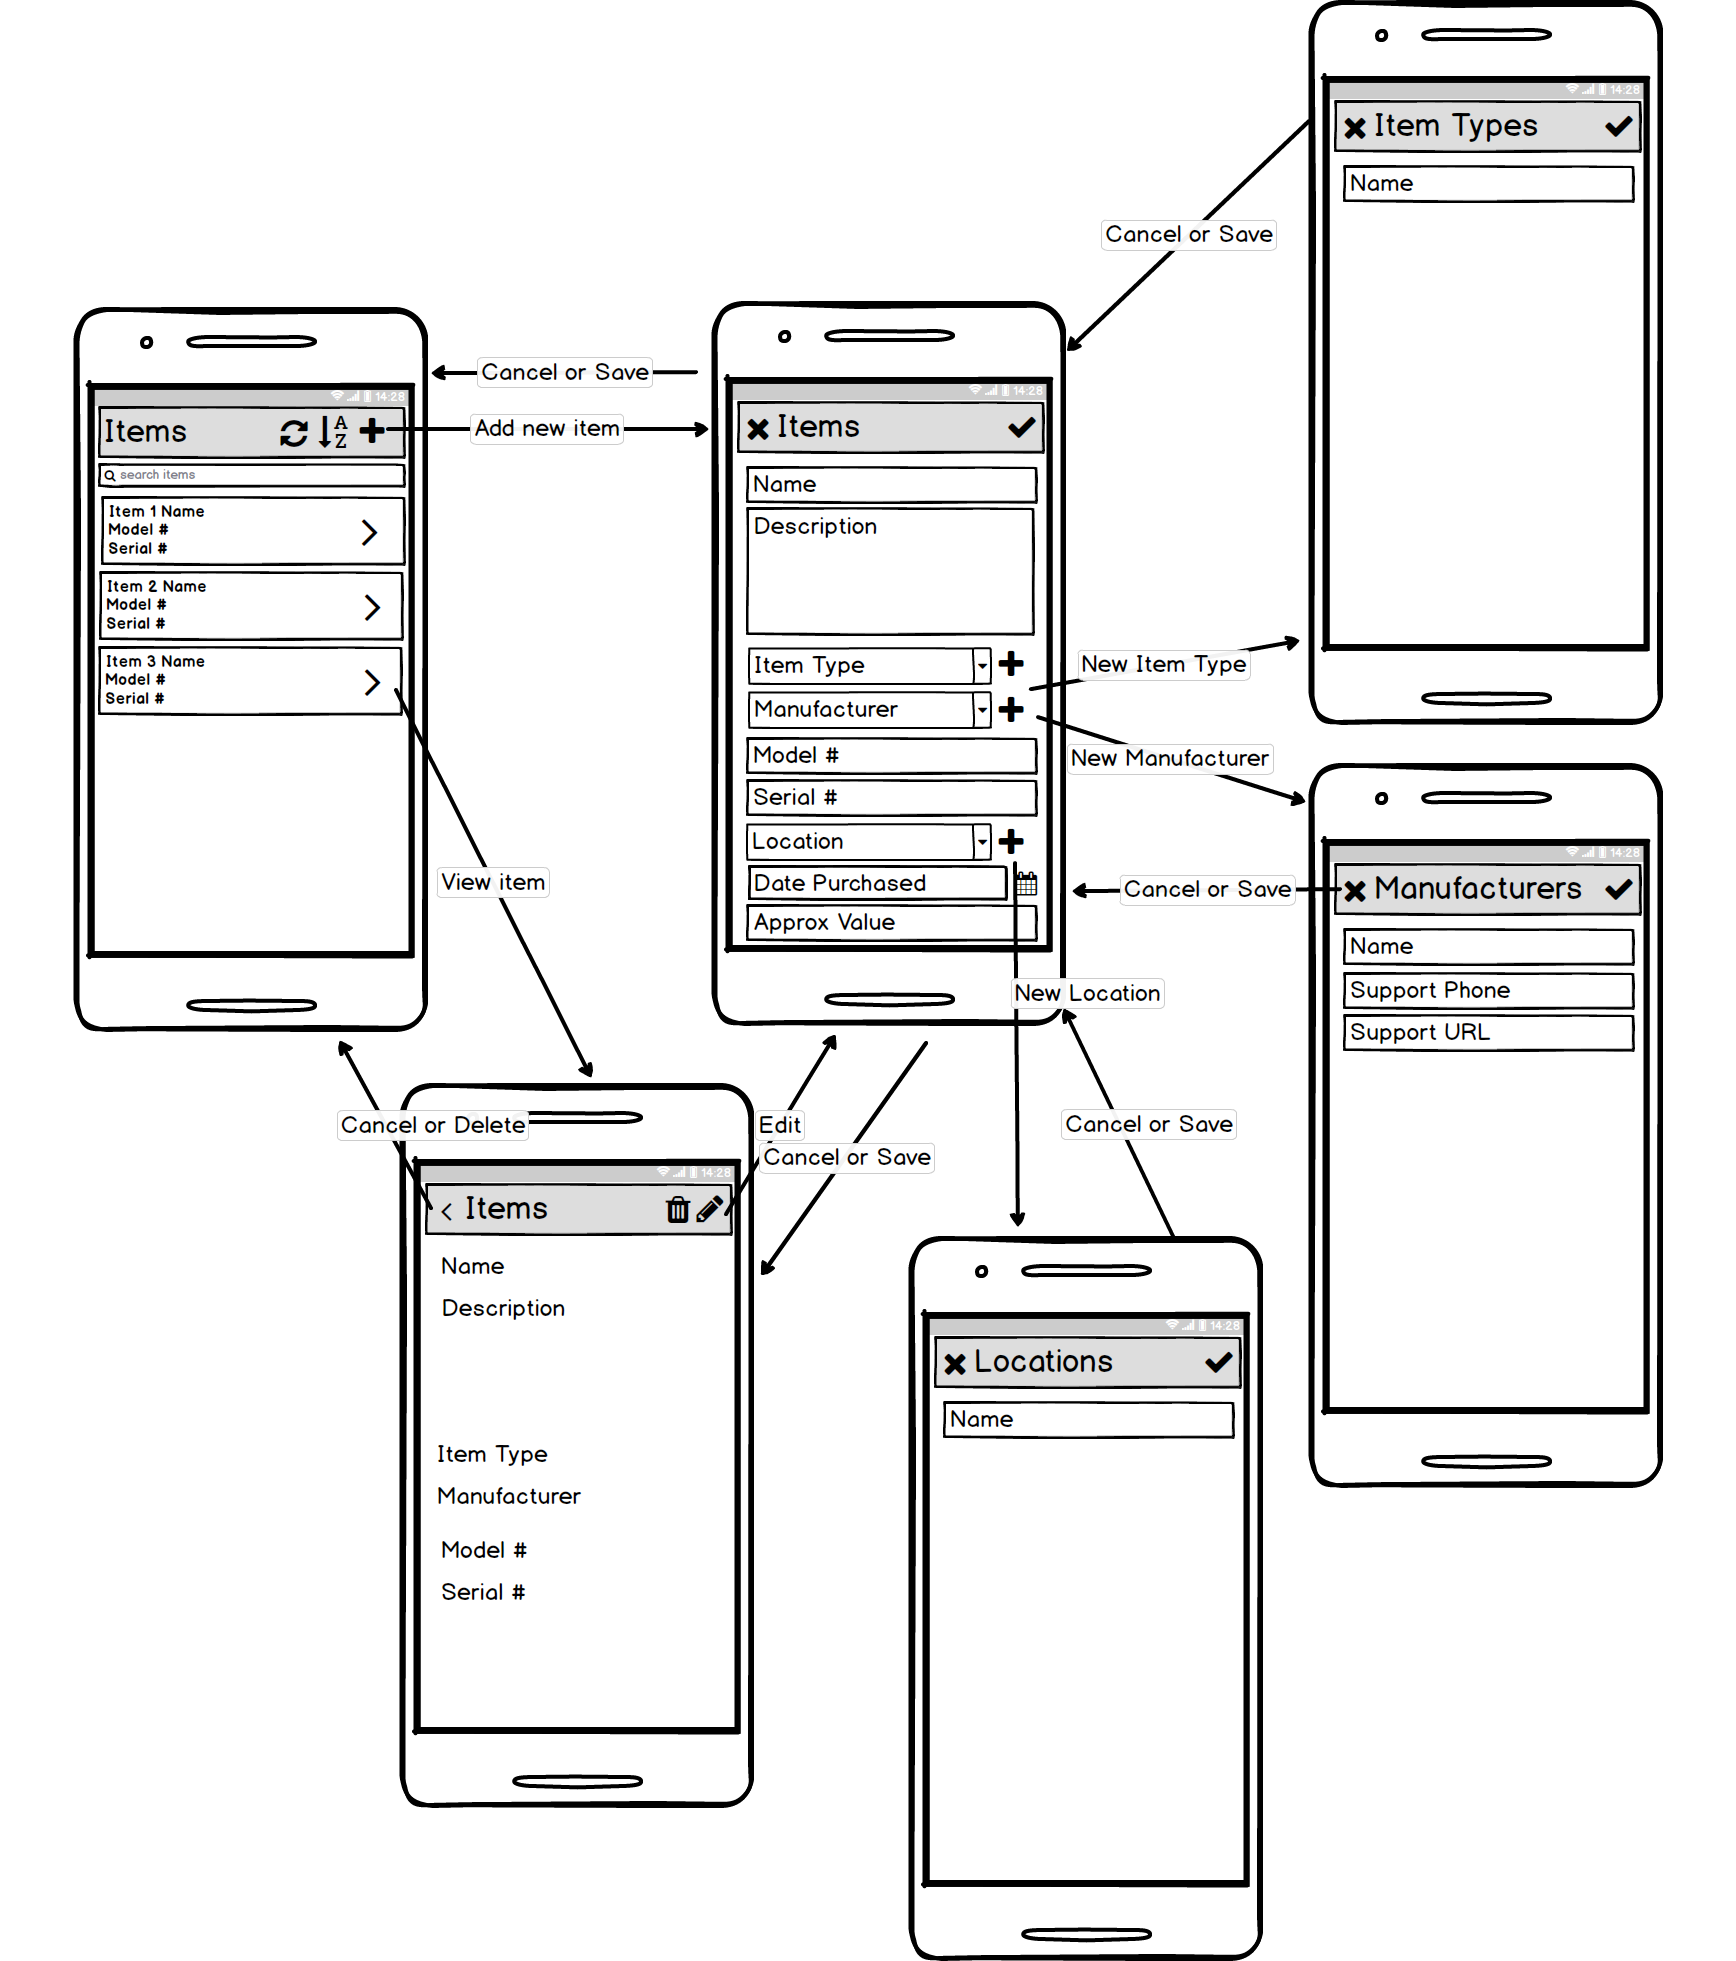
User Interface Mockup
For the user interface, I will begin with the phone app and develop the administration app later. As data gets added to the system, I will do this because I may discover challenges and new ideas. Additionally, the mockup below does not include the Item Image library, as I will cover it in a separate post. The user interface below begins with the Items screen. Here, users can search, sort, and scroll through items in the system. From the Items screen, a user can view or create a new Item. When a user views an item, they can delete it or edit it. If the user creates or edits an item, they use the same screen; they can also create new Item Types and Manufacturers from this screen. On all screens, cancel, save, and delete actions return to the previous screen. You may notice that the Item Image is not included; this is because I will be adding this later in the series when I start using the phone. For now, I am focusing on the base implementation.
Next Steps
With the requirements defined and tables created in the Microsoft Dataverse, I can now work on the User Interface. In part two of the series, I will create all the necessary screens for the phone app and begin data entry.