![]() While it isn’t quite as good as having complete control of your CSS, Dynamics CRM (2015 Online Update 1, and On-Prem 2016) now offers a feature called Themes. Themes enable the organization to customize their CRM Web interface to some degree, although we still don’t have complete control of the styling.
While it isn’t quite as good as having complete control of your CSS, Dynamics CRM (2015 Online Update 1, and On-Prem 2016) now offers a feature called Themes. Themes enable the organization to customize their CRM Web interface to some degree, although we still don’t have complete control of the styling.
There are plenty of good blogs on Dynamics CRM themes, but I’ve yet to find one that includes good tips on determining the hex values for the colors you need. This blog will help you determine these values, including using a color picker to pull a color’s hex value from an image.
Getting Started
First navigate to Settings → Customizations and, if you have the correct permissions, you should see the Themes feature.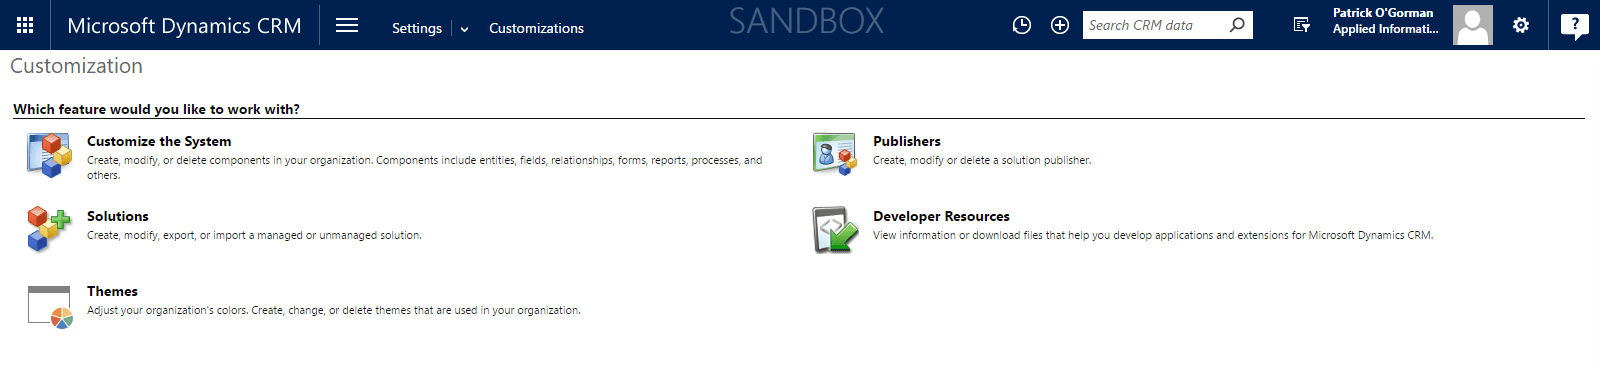
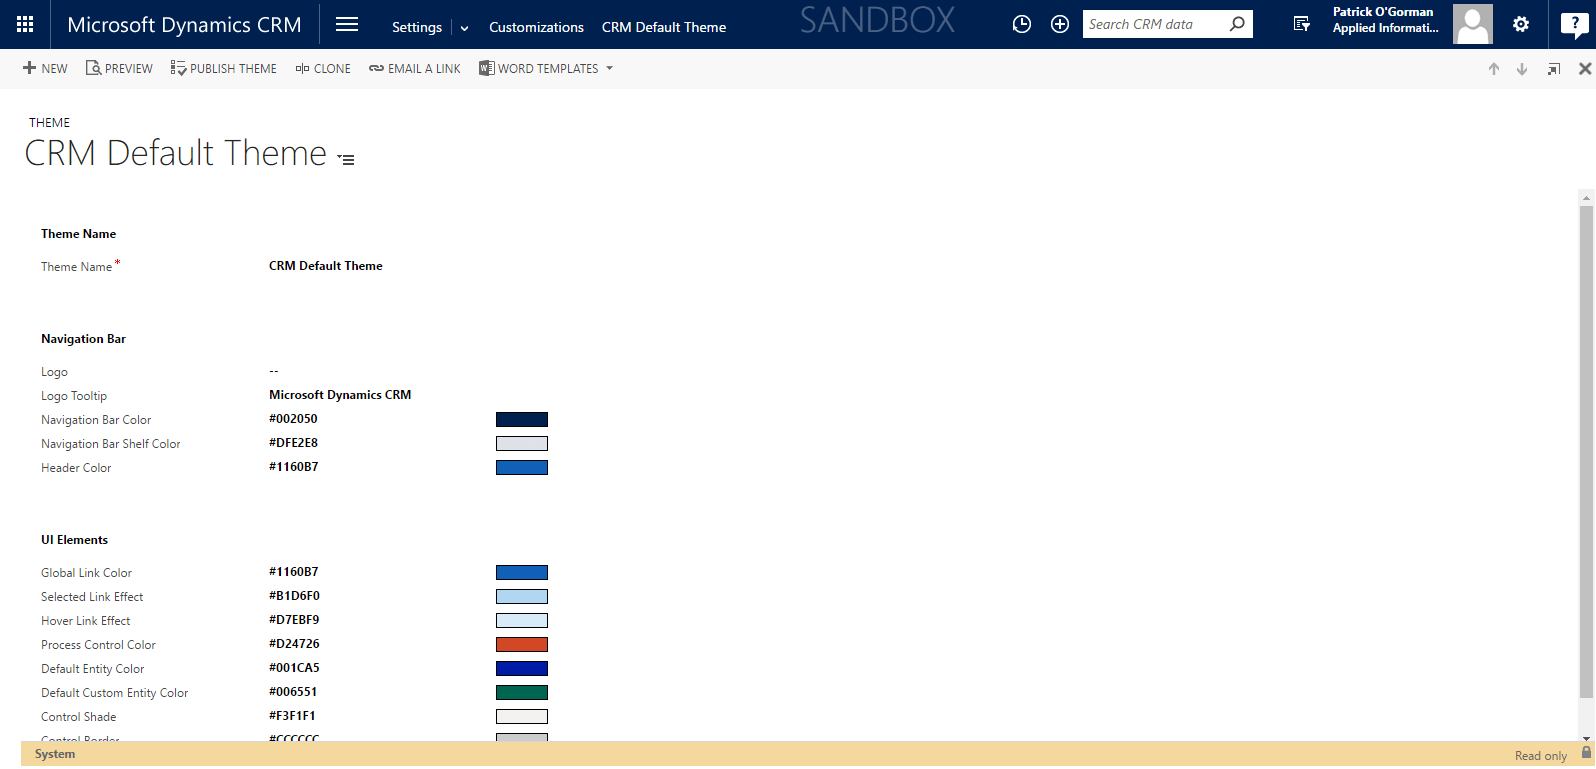
Click on Themes, and you’ll be taken to a view that lists the themes you have installed on the system. If this is your first theme, chances are you’ll only see the CRM Default Theme in the view. You cannot change the default theme, but to ensure you don’t mess up the entire look of your site, you can always clone it and tweak the clone. That’s what we’ll do here.

Open the CRM Default Theme by clicking on it. In the next view, you will see a “CLONE” button. Click the clone button and the default theme will be cloned and you’ll be able to tweak this new theme and publish it. If you do not clone the default theme, and instead start from scratch, all of your color values will default to black. Give your new, cloned theme a meaningful name.
Okay, so as of now we really haven’t done anything you probably haven’t seen in other blogs. Well, our next step still won’t be much different since we’re going to go ahead and place our company logo in the header. Click on the — next to Logo under Navigation Bar. This will display a web resource dialog where you can select an existing web resource, or create a new one and upload a new file. That’s the route we’ll take.
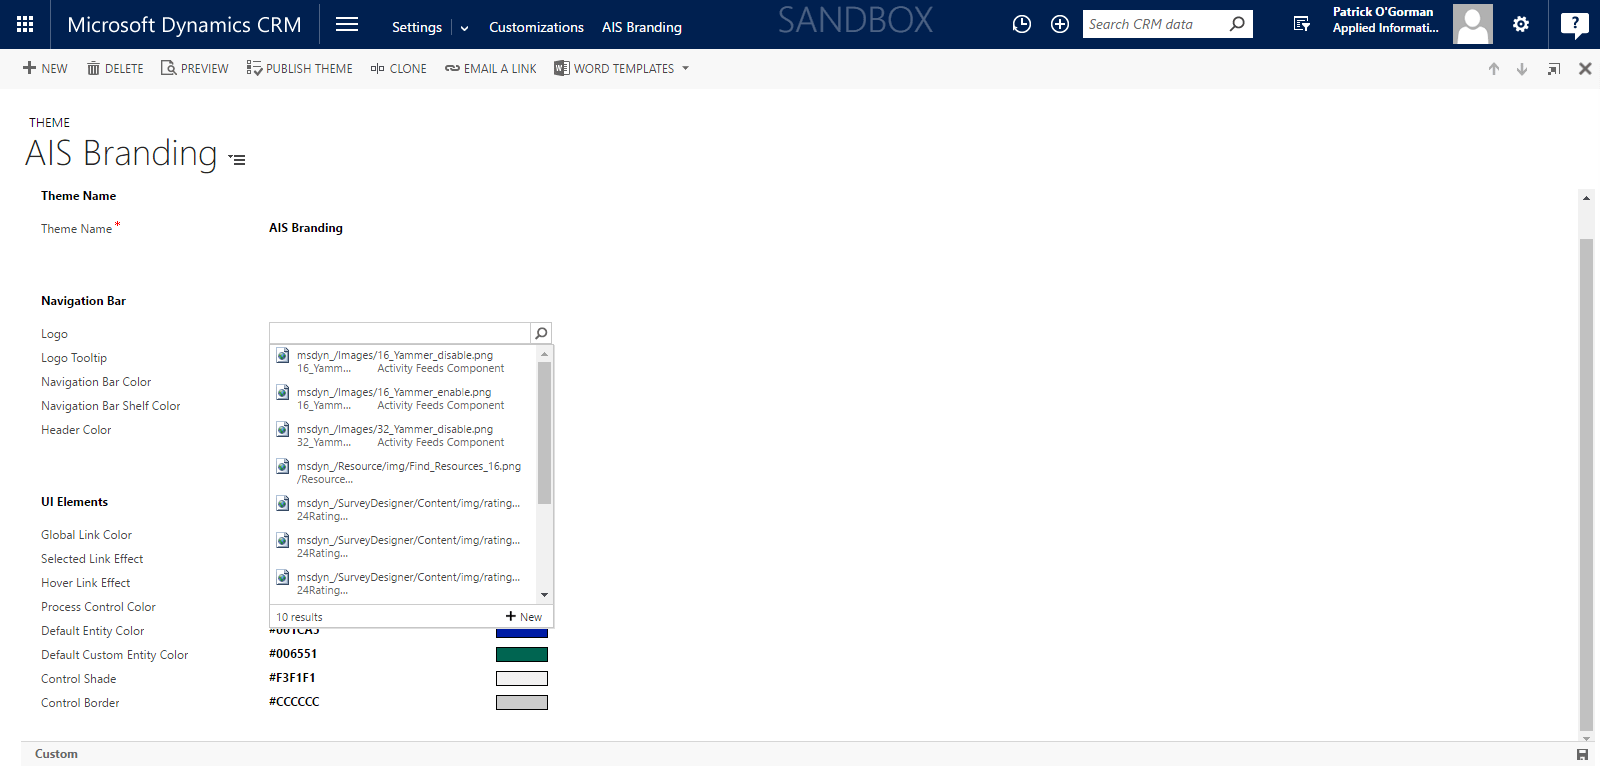
Click the magnifying glass next to the Logo input box, then click the +New link at the bottom. In the Web resource dialog that pops up, click the Choose File button near the bottom and find your image. You’ll also want to give it a name, and set the type as required. I recommend giving it a display-friendly name as well.
 Before we move on, a note about adding a custom logo to the header area. It can be tricky! Sometimes you have to play with the sizing of your image, and upload it several times, before you get it just right. And I’m not even sure getting it ‘just right’ is even possible, but I digress.
Picking your Colors
This is where I find people need the most help. If you aren’t a graphics designer, or even a developer, you may not know how to go about getting the correct hex values for those colors. Companies will often have marketing/branding materials that provide those values for CSS purposes, but it’s hit or miss as to whether you’ll get hex or RGB values.
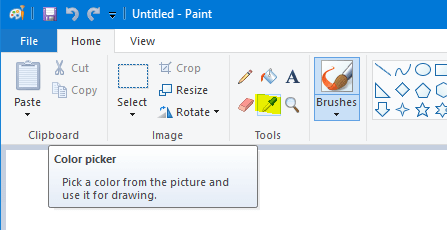
Here I’ll show you a little trick that you can do using software you most likely already have on your machine, Paint! I’m assuming here that you’re able to get a company logo, or pull up something that has your company colors on it, e.g. company website, marketing materials, etc. If you have an image file, great…you’re one step ahead. If not, you’ll want to get a screenshot of where you want to pull your colors from, and save it as an image. Ultimately you want to be able to load this image in Paint.
Once you load this image in Paint, you can select the color picker in the Tools section of the main ribbon. It is directly under the paint can, in between the magnifying glass and eraser.
 Click the color in the image with your color picker and you should see “Color 1” update with this new color. Color 1 is in the ribbon next to Color 2 and the panel of other colors. Click the “Edit colors” ribbon button and you’ll see a dialog that contains the RGB (red, green and blue) values that you’ll need for our next step.
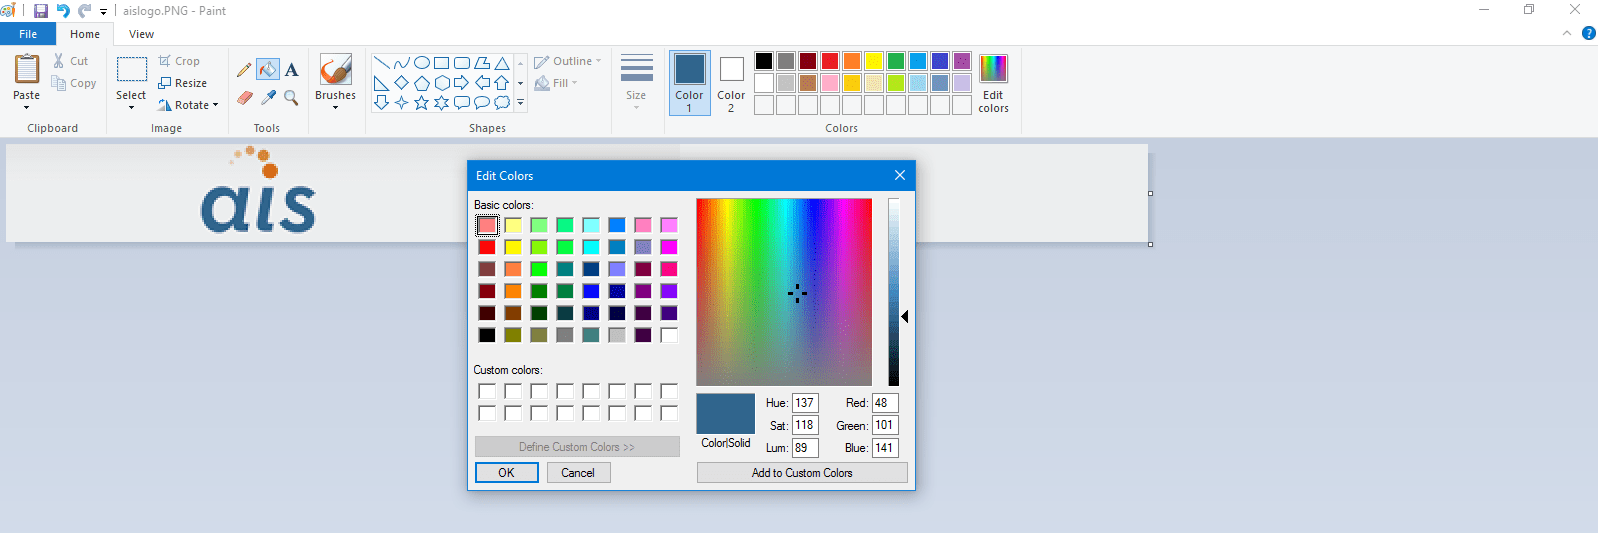
Now you’ll want to navigate to a website that I like to use when figuring out the correct values for my CSS. The RGB Color Calculator! Plug the RGB values from Paint into the RGB inputs on the color calculator and hit enter. The page’s background color, and more importantly the 6-digit hex code, should update with the value you need. Copy and paste this value into the input box for the UI Element you want to update. Repeat this process for any other colors you want to include in your theme, and remember, you must publish your theme in order for it to take effect.

In the following screen shots you’ll see how I was able to obtain the correct hex values for our company’s blue and orange. I’ve updated a few of the UI Elements in the theme so you can see how themes can help enhance your CRM user interface. There are other ways to obtain the hex value, including using the RGB values and the Windows calculator, but I find this way superior because it not only lets me see my color choice on the page, I can then adjust this color using the controls on the color calculator, e.g. increasing the hue or saturation.
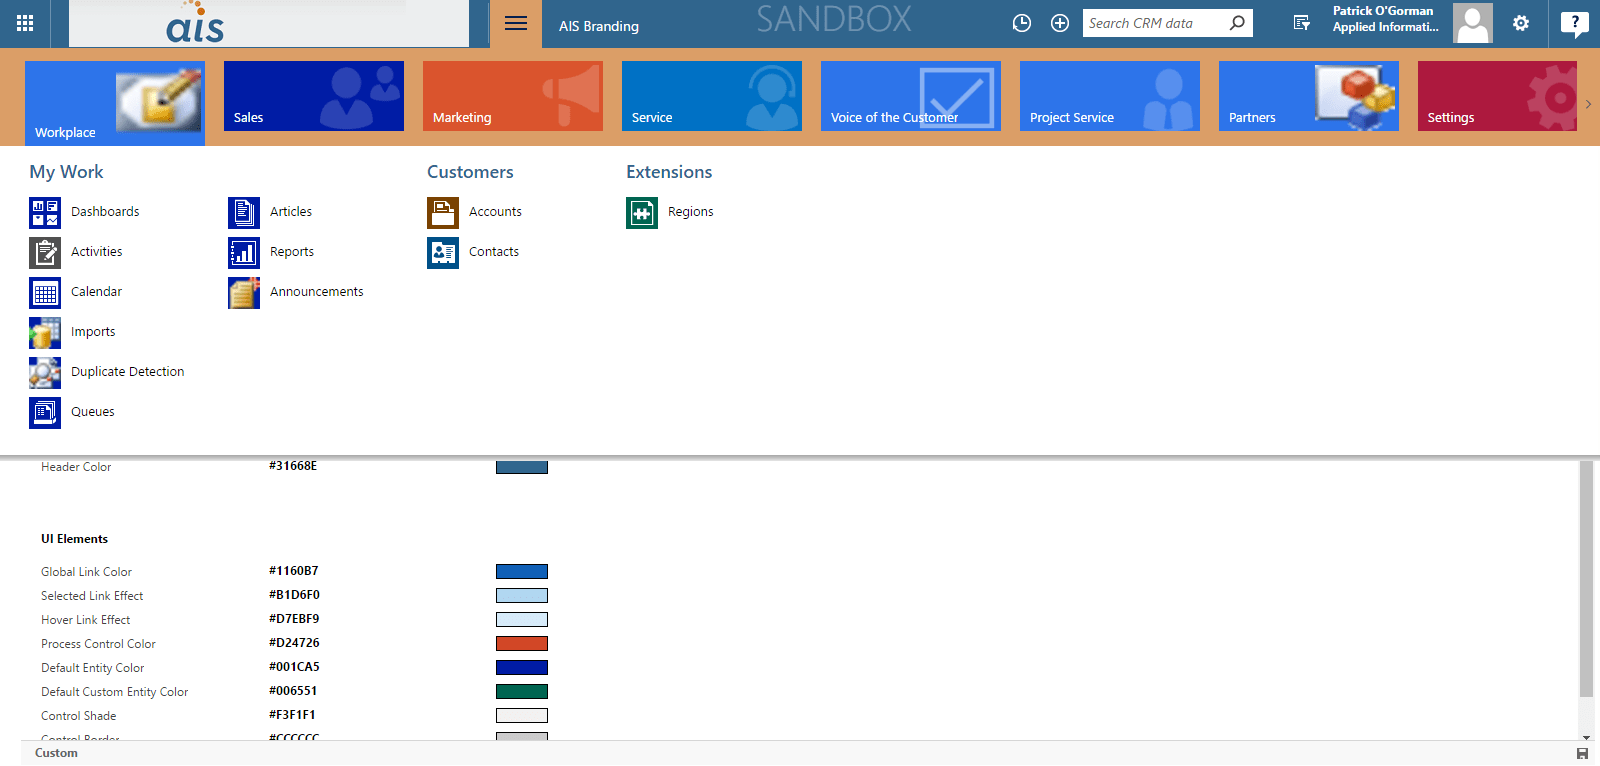

There are plenty of good blogs out there on what the different UI Elements in the list affect. There are also various recommendations on how to set these, e.g. making sure you have contrasting colors in the appropriate areas. All that said, there are fewer that actually lay out how to obtain the hex values you’ll need for your selected colors, and how to tweak those colors with respect to shading, etc. I hope this blog has been of some assistance. For additional information, check out Microsoft’s Technet article on themes.