![]() So you want to design an app for Windows 8, huh? Moving from designing traditional web pages to apps can be a tough transition, but as designers we need to constantly push and recreate ourselves so that we can stay in touch with the latest technology and trends. So to help, I have some “getting started” tips I want to share.
So you want to design an app for Windows 8, huh? Moving from designing traditional web pages to apps can be a tough transition, but as designers we need to constantly push and recreate ourselves so that we can stay in touch with the latest technology and trends. So to help, I have some “getting started” tips I want to share.
First, read through Microsoft’s lengthy guidelines for Windows 8 Apps. Make sure you familiarize yourself with the terminology Microsoft uses for the Windows 8 system like hub pages, live tiles and badges. Don’t worry about memorizing everything in the document, just keep it handy and refer to it when you come to that section.
You will need the following screens for wireframes/design comps:
- Start Tile
- Splash Screen
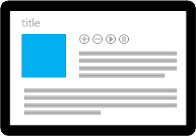
- Hub Page
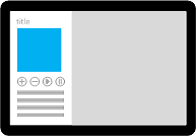
- Section Page
- Detail Page
- Charms
- Top App Bar
- Landscape View
- Portrait View
- Fill View (requires 1366×768 minimum resolution)
- Snap View (requires 1366×768 minimum resolution)
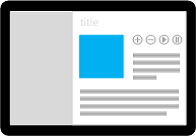
A start tile is the image that will appear on the start screen when a user downloads your app. Each app must have a square start tile, but there is also an option to have a wide tile. You may want to consider a wide tile if your logo is wider or you want to display more information on your start tile other than your logo. You will need to make your tile four different sizes for scaling purposes. You can find the dimensions of the tiles on Microsoft’s website.
Will it be a live tile? Live tiles provide new and interesting information to the user on a regular basis. So instead of having a static tile with just your logo, you could have a notification on the tile. An example would be a news tile that is running the latest headlines. It may flip back and forth between a photo and a snippet of the story.
Do you need badges? Badges can be a number or glyph that are notifications in the bottom right. An example would be showing “12” to show that you have 12 new emails.
Splash Screens are pretty straight forward. They are the screen your user will see while the app is loading.
Most Windows apps work off a hierarchical design for navigation:
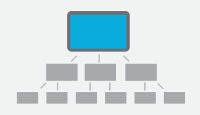
The hub pages are going to be the first point of entry for your users, also known as a landing page. I like to think of a hub page as window shopping. It is an overview of what is in the app. Section pages are the second level in the app and detail pages (obviously) contain all the fine details. Not all apps need section or detail pages.
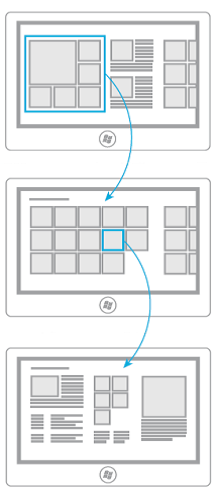
You will also need to consider the different views in which a user can browse the app. The full view takes up the whole screen on the tablet. In Windows 8, users can run two apps on the screen at the same time. This is possible to view with the snap and fill views. Snap views are only 320 pixels wide, so you may need to move some content around to balance the look. Keep only the necessary content. The fill view takes up the remainder of the screen when another app is in the snap view. Fill views will not have as big of an impact on your content as snap views. Snapped and fill views are only available on displays with a horizontal resolution of 1366 relative pixels or greater.
 |
 |
 |
To accomplish these different views you will need to use a fluid layout rather than static. Another thing to keep in mind is that the user will be scrolling horizontally for some apps. When we design traditional web pages we were taught that most web sites have fixed layouts and scroll vertically. Look at your app in portrait view. Although it is not necessary, it is a good idea to have the content rotate if you can to accommodate the user.
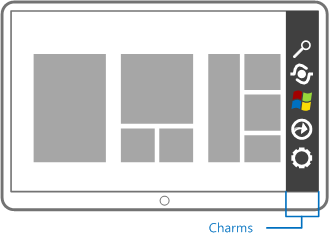
Charms are a set of buttons in every app that pop out from the right side. A big thing to pay attention to here is the share charm. Will your app need to share information with other services such as Facebook or Twitter? If so, that typically belongs in the charms bar.
After you get a sense of how Windows 8 Apps flow, you can begin your standard design process. I typically follow these steps:
- Identify the primary and secondary goals of the app
- Identify the audience
- Gather requirements
- Create mood boards. Go out and explore different design elements and see what other apps do
- Wireframes
- Design comps
Speaking of design, the trend in 2013 is simple and clean. Buttons and pictures are going back to a square look and removing rounded corners. We are also seeing less gradients (or at least more subtle ones), and no more shiny design elements. A lot of people are referring to this as “flat” design but I don’t think that’s exactly true. We are still seeing a lot of play with depth and dimension and that will not be going away for a while. It is more like a merger between 3D illusions and solid colors. Microsoft has done a great job of picking up on this with their Windows 8 look and feel!
So that’s a basic way to start designing a Windows 8 App. During this whole process you should always refer back to the goals of the app and the Windows 8 User Experience Style Guide as well as Microsoft’s website. This will help when questions arise about why you put certain things in certain spots. Your wireframes and design should always make it easy for the user to obtain the primary goals.
For wireframing, here are some templates specifically for Windows 8 Apps that I recommend:
- Microsoft provided PhotoShop template
- A PowerPoint template provided by Andreas Wolf
Also, in PowerPoint you can use storyboarding shapes for Windows 8. Just be sure to change your PowerPoint to a 16:9 ratio. You can do this by going to the Design tab and then clicking on Slide Size.
Entering into the “app” territory can be scary and overwhelming but as designers we need to get used to it. The world of technology is changing every day and we have to move forward with it. There are so many resolutions, view states and operating systems that we have to accommodate and it can become very tedious very quick. Just remember, the user is the most important person in your story and focus on them. Good luck and happy designing!
(All images courtesy of Microsoft)