The term “Single Page Application” or SPA has emerged in recent years to describe a web or mobile application that focuses on improving the user experience by delivering all the functionality for an application without screen refreshes or unnecessary round trips to the server. It does this by initially loading the screen with HTML, CSS and JavaScript, enabling rich client-side interaction. It then uses unobtrusive, asynchronous calls to the server when the page needs updating. Updates can be seamlessly propagated to elements on the screen while the user interacts with the application. By allowing real-time interaction with the application and its data on the screen, the user has the equivalent of a desktop application experience.
While simple in concept, the mix of technologies used to create a SPA is actually quite complicated. Building a SPA typically requires using a diverse set of technologies including:
- HTML and CSS for presentation.
- JavaScript and JQuery for client-side interaction.
- Knockout, Angular, Ember, Backbone and other libraries and frameworks for maintaining client-side models of the data needed.
- Ajax, JQuery and other libraries like BreezeJS, JayData and Firebase to enable retrieval of data
- SignalR, web sockets and other reactive and push technologies.
- Node.js, Web API, ASP.NET, PHP, Ruby on Rails and other server side frameworks.
- Java, C# and other programming languages for server-side components.
- MongoDB, SQL Server, MySQL and other databases.
Combining these technologies to deliver a SPA has led to complicated and hard-to-maintain applications. Teams of developers who divide the work of building a SPA into their areas of technical expertise often find themselves stepping on each other’s toes – creating conflicts when a unified approach is essential.
Meteor is a new JavaScript application framework that promises to reduce these burdens. In the words of one of its creators, it is “designed to be fun for developers”. It does so by offering a unified stack of technologies all based on JavaScript to deliver a complete application from user presentation on the frontend to the server and database on the backend. At the same time, it incorporates push technologies that enable real-time updates from server to client.
Meteor enables “isomorphic” JavaScript, which means the same script can run on both the client and server. It therefore eliminates the need for duplicate application logic between the two. This approach also offers the practical benefit of enabling SPA’s to be built by developers who do not have to master a multitude of technologies. They can instead concentrate on using JavaScript at all levels of the application and avoid (as much as possible) the context and language switching that is typically involved in building a SPA.
At this stage, Meteor is in pre-release (version 0.8.0). Its initial release is expected in the first half of 2014. The specific technologies used by Meteor include:
- JavaScript on the client that uses Spacebars (inspired by Handlebars) as the default template language. Updates to these templates are driven by a reactive templating engine called Blaze. (Other template languages may also be used.)
- Node.js on the server for delivering content to the client.
- MongoDB on the server for maintaining data. Meteor also has “Mini-Mongo” on the client for real time updates and periodic synchronization with the server. (Support for other databases is coming in the future.)
- Web sockets and Meteor’s own DDP protocol for real time pub/sub communication between the server and the client. If the browser does not support web sockets, Meteor falls back to using XHR with Socks.js.
This combination enables some impressive functionality – such as real-time bidirectional updates on the screen without writing any of the plumbing code to do that. However, the best way to understand what Meteor is about is to use it.
Getting started with Meteor is straightforward. For this article, we’ll use the Windows version found at https://github.com/sdarnell/meteor/wiki/Windows . While this version is not officially part of Meteor, Windows support is on the road map for future releases. Click on the installer that you find on that page. Once the installer completes, open a command prompt and navigate to the directory it creates in your AppData local folder – %AppData%\Local\.meteor.
Run the following command:
meteor create myapp
You’ll then be prompted to run your app using the following commands
cd myapp
meteor
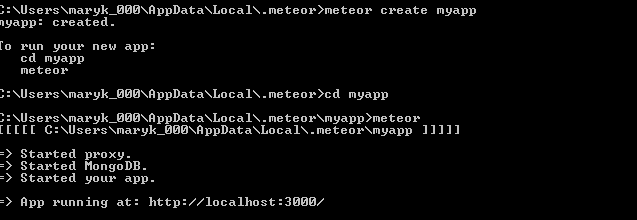
Bingo! Your app is up and running! Notice you did not have to do a separate install of Mongo or Node.
Open a browser and navigate to the following link http://localhost:3000/ and you’ll see the following:
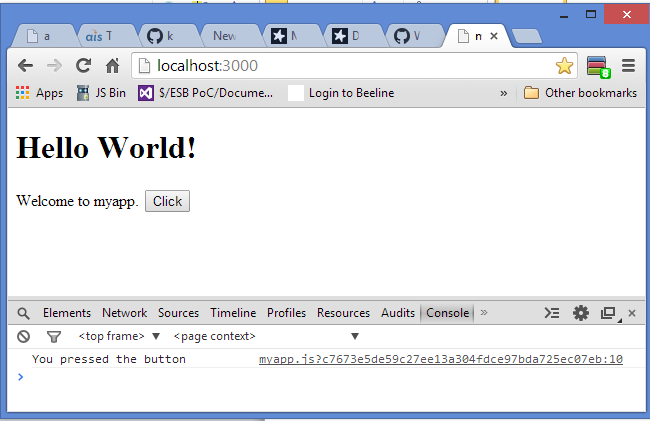
If you open a console in the developer tools in Chrome or IE and click on the button you’ll see a message echoed back to you.
There you have it. You are running a Meteor application including Node and Mongo. You can even execute another command to deploy your application to a server maintained by Meteor.
Take a look at the files for the Hello World! application located in the directory for your application. You will see one html file containing a Spacebar template:
<div>
<head>
  <title>myapp</title>
</head>

<body>
  {{> hello}}
</body>

<template name="hello">
  <h1>Hello World!</h1>
  {{greeting}}
  <input type="button" value="Click" />
</template>
</div>
And one JavaScript file:
if (Meteor.isClient) {
  Template.hello.greeting = function () {
    return "Welcome to myapp.";
  };

  Template.hello.events({
    'click input': function () {
      // template data, if any, is available in 'this'
      if (typeof console !== 'undefined')
        console.log("You pressed the button");
    }
  });
}

if (Meteor.isServer) {
  Meteor.startup(function () {
    // code to run on server at startup
  });
}
The entire application is using a single JavaScript file. This is the starting point for understanding the “isomorphic” nature of Meteor. Any script in this file will run on both the client and the server. This is possible because JavaScript is running in both environments. However, it is also possible to specify in which environment the script should run using the “Meteor.isServer” and “Meteor.isClient” properties. Meteor reads these properties and executes the script in the proper environment. In this case, the script setting the greeting on the screen and mapping the “click input” event to a function that logs a message is handled on the client side.
For more complex applications, you can break up your JavaScript files and move them into client and server directories to set their execution environment. It is also possible to add security that prevents exposure of sensitive scripts and data in the client.
When developing with Meteor, the entire application stack is on your local computer. Any changes you make are updated in real time. If you go back to the html page for this application and change the message from “Hello World!” to “Hello Meteor!”, you’ll immediately see the change in the browser without having to refresh the page. These real time updates are a powerful way that Meteor improves the developer experience. They eliminate the need to re-launch the application as you work, and runtime errors surface immediately.
Let’s take the Hello World sample a few steps further to show the ease with which a Meteor app can incorporate database saves and do real time updates on the screen.
At the command prompt, enter the following:
meteor create myrosegarden
You’ll then be prompted to run your app using the following commands.
cd myrosegarden
meteor
Navigate to the directory for your new application and modify the html file to the following:
<head>
  <title>My Rose Garden</title>
</head>

<body>
    <h1>My Rose Garden</h1>
  {{> roseList}}
</body>

<template name="roseList">
  {{#each roses}}
  <ul>
     {{> roseInfo}}
  </ul>
    {{else}}
    No roses yet.
    {{/each}}
</template>
<template name="roseInfo">
     <li>
         {{name}}
     </li>
</template>
The template loops over a list of roses and displays their names in a list.
Then modify the JavaScript file as follows:
Roses = new Meteor.Collection("roses");

if(Meteor.isClient) {
  Template.roseList.roses = function () {
    return Roses.find({}, {sort: {likes: -1, name: 1}});
  };
}
The first line in the JavaScript file creates a Mongo collection. This collection lives on both the client side and the server side. Meteor has a client side instance of Mongo (called “Mini Mongo”) that will manage the database updates in a way that frees the developer from having to write the plumbing code to get the data into MongoDB on the server.
Save your work and you will see the message “no roses yet” display on your screen. Notice you did not have to refresh the browser. Next open a console in your browser and type:
Roses.insert({ name: “Knockout” });
You’ll see “Knockout” appear in the list. Keep typing these insert statements (which are in normal Mongo syntax) and more names will be added to the list. Open a second browser window and you’ll see the same list which has been persisted in the Mongo database being pushed to that screen.
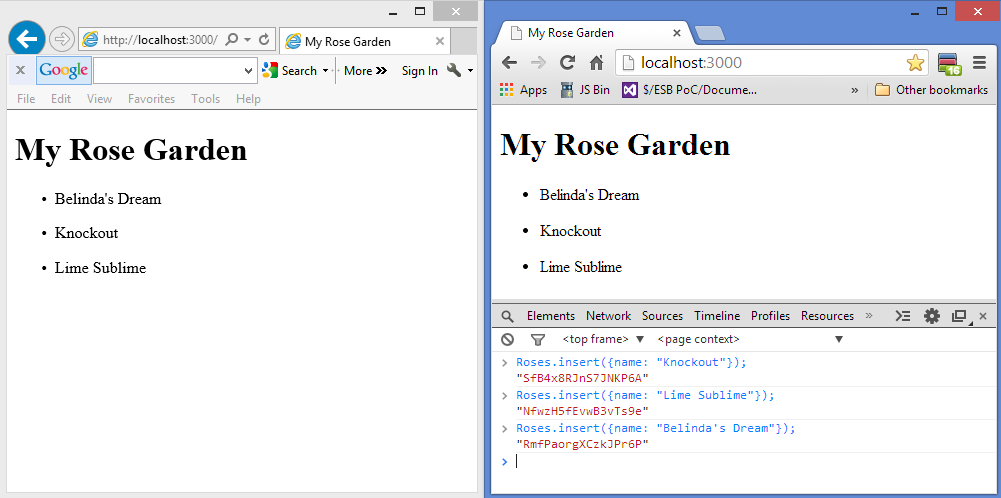
This is happening even though all you’re doing is typing Mongo commands into the client side console. Meteor handles this for you without the need for you to write asynchronous calls to update the database and refresh the page. Notice also that the names are sorted alphabetically. This sort is driven by the Mongo cursor and does not require separate script to be written.
Let’s finish our excursion into Meteor by adding an input field and button that will allow us to add a rose through the user interface. Update the html page to add a form:
<head>
    <title>My Rose Garden</title>
</head>

<body>
<h1>My Rose Garden</h1>
{{> roseList}}
{{> roseForm}}
</body>

<template name="roseList">
    {{#each roses}}
    <ul>
        {{> roseInfo}}
    </ul>
    {{else}}
    No roses yet.
    {{/each}}
</template>
<template name="roseInfo">
    <li>
        {{name}}
    </li>
</template>
<template name="roseForm">
    <fieldset>
        <legend>Add New Rose</legend>
        <form>
            <div>
                <label>
                    Name:
                    <input id="name" />
                </label>
            </div>
             <div>
                <input type="submit" value="Add Rose" />
            </div>
        </form>
    </fieldset>
</template>
Add an event mapping handler to the JavaScript file:
Roses = new Meteor.Collection("roses");

if(Meteor.isClient) {
    Template.roseList.roses = function () {
        return Roses.find({}, {sort: { name: 1}});
    };

    // Handle roseForm events
    Template.roseForm.events = {
        'submit': function (e, tmpl) {
            // Don't postback
            e.preventDefault();

            // create the new rose
            var newRose = {
                name: tmpl.find("#name").value
            };

            // add the rose to the db
            Roses.insert(newRose);
        }
    };
}
Notice that the event handler is calling a client-side method “Roses.insert”. Meteor does all the work of getting the data to the server.
Meteor responds to more than updates on the page. It responds to any change made in the Mongo database, whether initiated on the page or outside of it. To demonstrate I am using a tool called RoboMongo to enter an insert of another rose directly into Mongo:
As you can see, the screen immediately updates the list with this newly inserted rose.
From this brief glimpse, I hope it will be clear that MeteorJS simplifies the creation of SPAs and makes this work much more enjoyable!
Here’s my GitHub repository:
https://github.com/kevinhennessy/meteorjs
References:
- The Meteor website: www.meteor.com
- Meteor for Windows: https://github.com/sdarnell/meteor/wiki/Windows
- Stephen Walther’s blog post on Meteor: http://stephenwalther.com/archive/2013/03/18/an-introduction-to-meteor
- John Sonmez’s Pluralsight course: http://pluralsight.com/training/Courses/TableOfContents/meteorjs-fundamentals-single-page-apps
- http://www.javaworld.com/article/2080842/java-app-dev/meteor-aims-to-make-javascript-programming-fun-again.html
- http://nerds.airbnb.com/isomorphic-javascript-future-web-apps/
- You can download RoboMongo at http://robomongo.org/ and learn more at https://www.guru99.com/installation-configuration-mongodb.html