![]() We’ve reached the end of this series. In part one, we discussed the basics of PowerShell. Part two showed some of the ways to interact with SharePoint via PowerShell. Today we’ll look at parts of a script I compiled to build out a SharePoint 2013 development virtual machine.
We’ve reached the end of this series. In part one, we discussed the basics of PowerShell. Part two showed some of the ways to interact with SharePoint via PowerShell. Today we’ll look at parts of a script I compiled to build out a SharePoint 2013 development virtual machine.
Environment and Build Notes
I want to start off with some notes about the assumptions I took and the configuration I used. First, this VM is running in Hyper-V on Windows 8 and uses Windows Server 2012 which was installed through the GUI. (I’ll try to figure out PowerShell remoting and Hyper-V at a later date, but that wasn’t in the cards for this post.) Second, I’ve configured two virtual networks, one internal with a static IP and one external with a dynamic IP. I configured those through the GUI as well. However, almost everything else has been built using PowerShell. While we’ll only highlight some of the script in this post, you can find the full script at my CodePlex Project: Useful PowerShell Cmdlets.
File Structure
There are nine files as part of this build out. BuildFunctions contains all of the functions that do the heavy lifting. SP13Config is a list of variables that you’ll want to configure accordingly. By default, the domain will be Contoso.Com and the file folder will be at C:\Scripts. You will need to provide the Windows Product Key.
Next, there are five “Start-Phase#” scripts. At this time, it’s the only way I have to run scripts on restart. I’ve tried to restart in the same file, but it hasn’t worked for me. I’ll try to update this later when I can figure it out. Until then, the first three need to be run while logged in as the Administrator as they include Domain and Enterprise Admin access. The final two should be run as the Install account.
Then there are two files that aren’t PowerShell: The first is the SPConfig.xml file that provides configuration information for the setup executable. Be sure to provide the product key inside this file. Also, there is the Users.csv that contains the service accounts and a few user accounts.
Windows Configuration
I really wanted to focus on the Windows and SQL configuration of this project. Other than the functions I provided in the first part of this series (change time zone, rename the machine, and disabling IE Enhanced Security, and registering Windows), additional configuration now includes disabling Windows Firewall and installing and configuring the server as a Domain Controller. Both of these prove to be very simple with improved PowerShell support in Windows Server 2012.
Promoting the VM to a Domain Controller can now be done in four commands and without the help of a configuration file, like it was in prior versions of Windows Server.

As you can see in Figure 1, Add-WindowsFeature will install the bits needed, including the common management tools used when administering the domain. That also provides the ActiveDirectory module that is imported after the installation. I created a SecureString variable to store the Domain Password. Then the Install-ADDSForest creates a new forest with a new domain. I call the reboot later; that’s why I set it to not reboot on completion.
Windows Firewall must be turned off for these development environments and while the GUI isn’t a long process, it’s hard to argue with the ease of just two commands to perform the same function. First, the NetSecurity module must be imported. Then I set all firewall profiles to “false.”

SQL Configuration
SQL Installation is actually still done with an executable and several parameters or an INI file. In this project, I use the parameters. I hard-coded the values so if you need more functionality like Reporting, Analysis, and/or Integration Services, you’ll need to modify the function, but it installs a default instance with the necessary components for SharePoint. In the following image, the ExePath variable is the full path to the setup file on the virtual DVD drive. The first parameter “/q” means that it will install silently (no windows or progress bars). The rest of the parameters are the various settings required, from features to admin accounts.

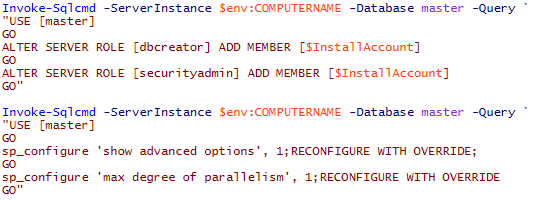
In the Install-SharePointRereqs function, I used Invoke-Sqlcmd to execute T-SQL from PowerShell. This has to be one of the best things I’ve learned during this project. I’ve always hated how long it took for SQL Server Management Studio to load up just to set roles on the Install account and Max Degree of Parallelism. This function and the cmdlet resolve that. I may use this for more than just VM build outs in the future when dealing with short, one-off SQL statements.
SharePoint Configuration
While this blog series is about PowerShell for SharePoint Developers, I really didn’t want to focus too heavily on the install and configuration of SharePoint as that has been already covered by several other great bloggers. There’s even a CodePlex project called SPAutoInstaller that provides a robust PowerShell solution. I have included the commands needed to get SharePoint installed and configured, but I used other community members’ blogs to build mine (references are noted below). I plan to update my CodePlex project to understand this part deeper and provide a stronger solution.
That said, I have a few notes on this section. First, many of the service applications use the same commands as they did in SharePoint Server 2010. Enterprise Search and User Profile are different, though, and there are several new service applications, such as Machine Translation and App Management. These are also represented in this script.
Finally, PowerShell provides the opportunity to create not just the service application databases without auto-generated GUID names, but the Central Admin Content database as well. While it doesn’t matter if the GUID is attached to the name, it just looks cleaner in Management Studio.
Conclusion
This has been an interesting learning experience for me and I hope it has been for all of you as well. As I mentioned in my first post, I took on this project, and the speaking session at SharePoint Saturday Austin, to force myself to learn more about PowerShell. I know I’m now far more comfortable with the foundation of it from both a general and SharePoint perspective. I even see more use for PowerShell in development projects to augment my C# solutions.
References
I leaned on some great authors for some of these scripts. First, I followed the Critical Path Training SharePoint 2013 Development VM document. Sign up for a free site membership to get access to this document. Next, SharePoint Solutions’ post provided the commands for most of the new Service Applications such as Machine Translation and the Application Management services. I constantly check Todd Klindt’s blog for SharePoint administration and this time he provided the Central Administration and Config database script as well as the Search Service script.