![]() Are you working on a REST API and using the new Web API to implement it? You’ve written an ApiController subclass or two? Let’s say you’ve created a new subclass of ApiController called OrderController. WebAPI provides your OrderController with out-of-the-box support for the following URLs:
Are you working on a REST API and using the new Web API to implement it? You’ve written an ApiController subclass or two? Let’s say you’ve created a new subclass of ApiController called OrderController. WebAPI provides your OrderController with out-of-the-box support for the following URLs:
| HTTP Verb | URL | Description |
|---|---|---|
| GET | /api/order | Returns all orders |
| GET | /api/order/3 | Returns details order #3 |
| POST | /api/order | Create new order |
| PUT | /api/order/3 | Update order #3 |
| DELETE | /api/order/3 | Delete order #3 |
The above is considered verb-based routing. The URLs above only contain the controller name and an optional id. So the Web API uses the HTTP verb of the request to determine the action method to execute in your ApiController subclass.
Your Goal
Now what if you want to add some custom actions to your ApiController subclass? For example:
| HTTP Verb | URL | Description |
|---|---|---|
| GET | api/order/3/vendors | Returns all vendors involved with providing items to complete order #3 |
| PUT | /api/order/3/expedite | Expedites order #3, but can only be executed by managers in customer service dept. |
| PUT | /api/order/3/reject | Rejects order #3, but can only be executed by managers in customer service dept. |
It turns out that adding those custom actions is hard, very hard. But keep reading. There is an easy way.
The Problem and Existing Solutions
We need to be able to mix verb-based routing and action-name based routing in our controller subclass. If you start a search for possible solutions, you will find a bug report in the public Web API tracker along with an issue in the Web API user voice, both of which say it isn’t immediately possible.
If you read those issues along with an associated forum post, the solutions mentioned range from writing a custom IRouteHandler, custom IHttpControllerSelector or custom IHttpActionSelector. All of those options are a bit complicated, just to add a simple custom action to your existing controller.
I’m going to show you a much simpler solution. But if you want to use a custom action selector to solve this problem, there is great blog post you should read.
The Simpler Way
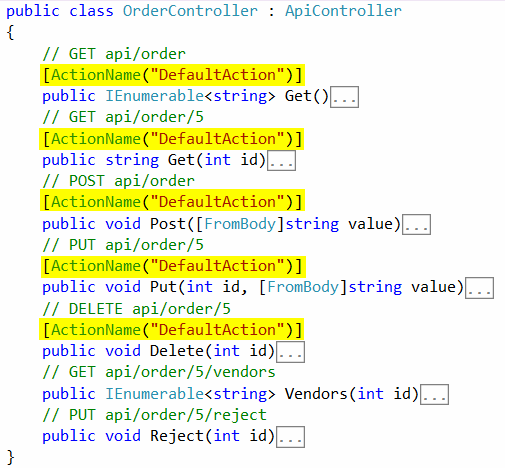
Let’s take a look at the Order Controller before we add any custom actions: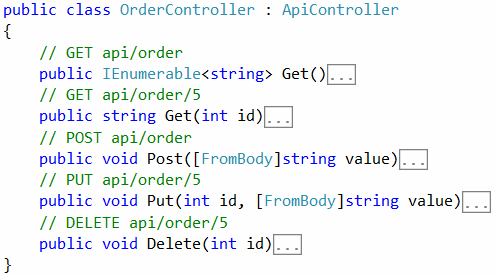
Now let’s see what we’d like the new Vendors and Reject action to look like on the Order Controller: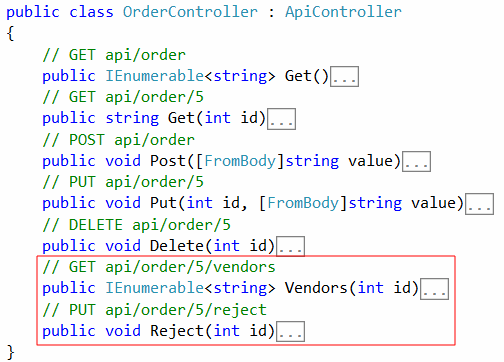
If you take the above code, compile and run it, you will not be able to execute either of the new actions.
Like ASP.NET MVC, the first step when debugging Web API routes and actions is to look at the Route Configuration. Below is the default route configuration found in App_Start/WebApiConfig.cs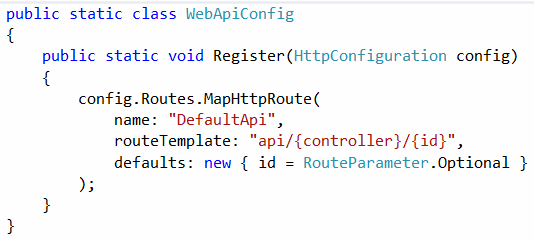
As you can see, the routeTemplate argument does not include “{action}” which means the action variable will never be set. The action selector has to pick an action method without the action variable, so of course it never executes our new actions.
We need to update the routeTemplate to indicate where in the URL to find the {action} variable So, we change the routeTemplate to: “api/{controller}/{id}/{action}“. But, now {action} is required for all URLs. We can’t require {action} for all URLs, it needs to be optional for /api/order/3
There are two ways to make {action} optional. The first method is using the defaults arguments and setting action to RouteParameter.Optional. This method of making {action} optional won’t work for us, it will result in an ambiguous actions error. We need to use the second method, which is hard-coding a default value if {action} isn’t provided in the URL.
The updated route config is shown below: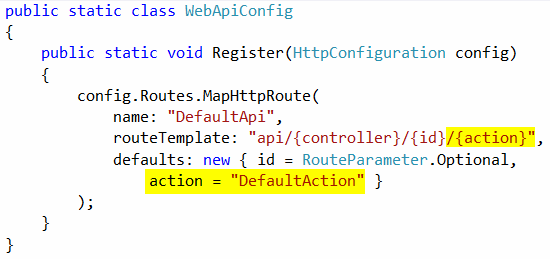
If you compile and run the web application, you will find that all of the original routes return an error message of: No action was found on the controller ‘Order’ that matches the name ‘DefaultAction’. We are going to skip testing of the new Vendors and Reject routes for the moment.
How we can name those original routes to have a name of ‘DefaultAction’? It turns out WebAPI supports the ActionNameAttribute from MVC. So, let’s add [ActionName(“DefaultAction”)] to all of the original methods in the Order Controller.If you compile, run and test you will notice that all of the original actions are working again.
So, back to the Vendors and Reject actions. If you test these two actions, you will get a 405 Method Not Authorized error. If you read the Web API Action Selection documentation, you will see that it filters actions based upon the HTTP verbs the action supports and the HTTP verb of the incoming request. One way to specify what verbs the action supports is starting the action method with certain words. If the method starts with ‘Put’ it supports the PUT verb. If it starts with ‘Delete’ it supports the ‘DELETE’ verb. So that explains why the original actions starting working again once we added the ActionNameAttribute.
Let’s fix the Reject action. We add [ActionName(“Reject”)] attribute to the method and then start the method name with the word ‘Put’ and now it’s working.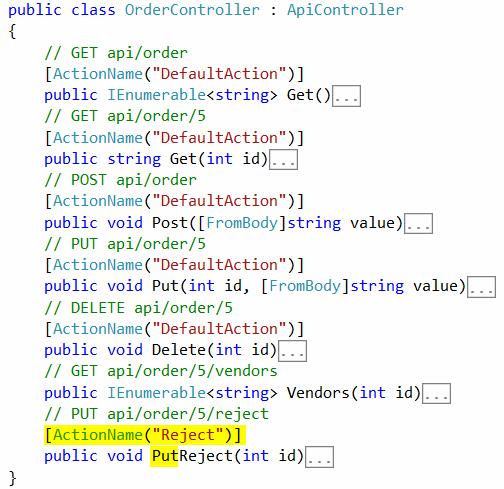
The other way to specify what verbs the action supports is by adding additional attributes to the method. Adding the HttpPostAttribute indicates the method supports POST. Adding the HttpDeleteAttribute indicates the method supports DELETE. So, let’s fix the Vendors action. We simply add the [HttpGet] attribute and now that’s working.

To be clear, you can apply either technique to any of the action methods in the Controller. It’s just a matter of preference.
So there you have it. Both verb-based routing and action-based routing working in the same controller. No nuget packages. No custom controller selector and no custom action selector.
You can find the final OrderController.cs and the WebApiConfig.cs containing the required route configuration in my webapi-routing-sample project on GitHub.
Have fun coding!