Given the widespread use of the Android operating system running on today’s mobile platforms, Android development has become an excellent choice for enhancing a developer’s skill set. Fortunately for the seasoned .NET developer, learning Android development is not a huge stretch. While there are several avenues for .NET developers looking to break into the world of Android application development, currently the most popular options are made possible by utilizing any of the following technologies:
- Xamarin platform
- PhoneGap framework
- Native Android development via Java
The Xamarin platform provides the ability for .NET developers to harness their C# knowledge, create cross-platform (iOS, Android and Windows) applications, reuse existing code and perform development within Visual Studio. The greatest advantage of utilizing the Xamarin platform is a reduced time to market while supporting multiple platforms. However, due to the additional Xamarin runtime contained within the final application, the footprint tends to be larger — this could be an issue, especially for some Android devices.
The PhoneGap framework is another option for writing Android applications. The PhoneGap framework is a client-side web application comprised of HTML5 pages using CSS and JavaScript. While it’s possible to utilize Visual Studio to code and test the application, ultimately the code will need to be packaged into a real Android application. This will require an IDE such as Eclipse or JetBrains’s IntelliJ IDEA. The PhoneGap Build service may also be used to accomplish the application packaging. While the PhoneGap approach will provide multiple platform support, the application type should be given consideration because the PhoneGap framework relies on JavaScript, which may have performance limitations compared with native Java Android applications.
While Xamarin and PhoneGap certainly have their merits for creating Android applications, native Android development via Java provides an opportunity to take advantage of a device’s full feature set with fast execution, all wrapped in a smaller package for more rapid downloads. For a complete discussion of the various mobile platforms’ benefits/drawbacks, please read Eric Svendsen’s excellent article where he provides plenty of depth on the issue. For now, the remaining content of this post will be to provide valuable insight for .NET developers looking to expand their language set by utilizing native Java for Android development.Prerequisites
Prior to any development activities, the first requirement is to set up a proper development environment. The Android development environment is comprised of three primary components:
- Java Development Kit (JDK): Provides the Java runtime and development libraries
- Android Software Development Kit (SDK): Provides all of the necessary tools and libraries specific to building applications for the Android platform
- An Integrated Development Environment (IDE) for Java: Provides an editor, debugger and build tools for compiling and building the application
The JDK should be the first component installed. At the time of this writing, the Android SDK specifies that JDK 6 be used for Android development. While JDK 7 should work just fine, it’s probably wise for beginning Android developers to adhere to the specified JDK 6. Following the installation of the JDK, the Android SDK should be installed. While the Android SDK setup provides a suggested installation directory, it’s a great idea to modify it to a more accessible location. During development activities, it may be necessary to access the tools provided within the SDK. As the SDK installer nears completion, it offers an opportunity to launch the SDK Manager. Be sure to launch the SDK Manager from the final page of the wizard.

After launching the SDK Manager, complete the installation by installing additional platforms and/or SDK tools as recommended by the SDK Manager. Platforms and tools can be added later by utilizing the SDK Manager which will be accessible from Android SDK installation directory or from the menu bar on whichever IDE is chosen in the next step.
Finally, it’s time to choose an IDE for developing Android applications. Currently, the three most popular options for native Android IDEs are:
Historically, Eclipse has been the official IDE for Android Development. In addition to the core Eclipse IDE, the Android Development Tools (ADT) Eclipse Plugin will also be required. The plugin adds Android-specific development tools and project templates.
JetBrain’s IntelliJ IDEA is a commercially available IDE, as well as a free version known as the Community Edition. For .NET developers, the IntelliJ IDEA Community Edition will likely provide a better user experience than Eclipse where ease of use is concerned. Similar to Visual Studio, IntelliJ IDEA provides familiar code completion, code analysis and integration with version control systems.
At the Google I/O 2013 conference it was announced that Android Studio is now the official IDE for Android development. Based on IntelliJ IDEA and similar to Eclipse with the ADT Plugin, Android Studio provides a very comprehensive development environment for creating Android applications. In addition to the features found in IntelliJ and the Eclipse ADT Plugin, developers will also find Gradle-based build support, refactoring specific to Android, Lint tools, template-based wizards, a rich user interface(UI) editor for layout design, and many more Android specific features. Because Android Studio is based upon IntelliJ IDEA and includes many additional features, it is most likely the optimal IDE for .NET developers accustomed to using Visual Studio. Like the IntelliJ IDEA Community Edition, Android Studio is also free.
As of the time of this writing, Android Studio is currently available as an early access preview. Hence, there may be the possibility of incomplete features and/or bugs encountered during the use of the product, but generally it seems to be quite stable. Due to its rich feature set for Android application development, Android Studio will be used in the remainder of this article.
Creating a Android Studio Project
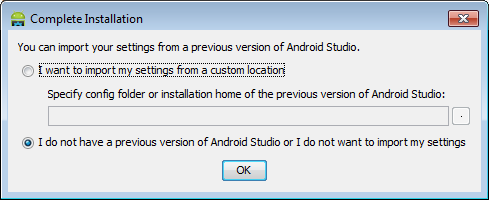
Now that the required software components have been installed, it’s time to create an Android project. Launch Android Studio from the Windows Start menu. After a series of popup status messages, Android Studio displays a dialog to complete installation. Choose the second option since this is the first time running Android Studio.
After selecting OK, the “Welcome to Android Studio” dialog window will display.
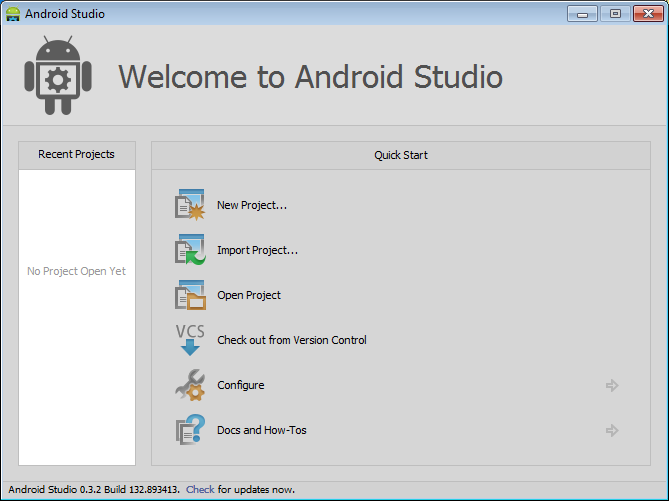
Among the choices for projects, select New Project. This will cause a New Project dialog window to display. Rename the Application Name to “MyFirstApplication.” You’ll notice that all the other name and location text fields are also simultaneously modified to match the application name. Deselect the “Create custom launcher icon” checkbox, but be sure the “Create Activity” checkbox is still selected. Select the Next button and the “New Project” Activity dialog will display. Leave the default selection of “Blank Activity” and select the Next button. The “New Project” Activity and Layout names and Navigation type fields will display. Change the Activity name to “SampleActivity” and the Layout name to “activity_sample.” Select the Finish button. At this point, a series of status messages will display as Android Studio creates the project. Once project completion is finished, the Android Studio IDE will display.
Exploring Android Studio
Similar to Visual Studio projects, Android projects have a default location where files are stored. Whereas Visual Studio defaults to C:\Users\(username)\Documents\Visual Studio 2010\Projects, Android uses a default of C:\Users\(username)\AndroidStudioProjects. However, just like Visual Studio, the location of the project files can be modified in Android Studio at project creation.
With the project now created, we’ll explore the Android Studio UI and see how it relates to the familiar Visual Studio IDE. While the precise naming of the various views may differ, the window contents as well as many debugging tools are quite similar to those available in Visual Studio. Though the platforms may differ, the process of building and debugging applications are generally the same.
- Project Window: Analogous to the Solution Explorer in Visual Studio. Allows for the browsing of project files and referenced libraries.
- Editor Window: User configurable editor tabbed window with configurable colored-syntax and code completion.
- Android Window: Similar to the Output window in Visual Studio. Displays logging messages and other application runtime data.
- Terminal Window: Analogous to the Visual Studio Command window.
- Toolbar: Similar to Visual Studio allowing for a customized set of commands for editing, running, debugging, access to SDK tools, etc.
Android Project Structure
Android applications may contain several of the following key components:
- Layout: Defines the visual structure of the user interface. The layout may be declared programmatically at runtime or statically via UI elements in XML.
- Activity: Provides the user interface for a single screen. Each activity is provided a window for rendering it’s user interface.
- Service: Can perform long-running operations via background tasks.
- Broadcast Receiver: Similar to an event, broadcast receivers respond to system-wide announcements.
- Content Provider: Manage and expose a shared set of application data which may be consumed by other applications.
- Intent: Messages which are used to activate activities, services and broadcast receivers.
The layout is defined in structured XML that’s very similar to XAML in .NET. The declaration of the XML UI elements follows the naming and structure of corresponding classes and methods. The XML element names correspond to classes and the XML attributes correspond to methods. The Activity, Service, Broadcast Receiver, Content Provider and Intent components are represented by Java classes. Inheritance plays a key role regarding Activities, Services, Broadcast Receivers and Content Providers. In Java this is made possible by the keyword “extends.” For example, the following are basically C# and Java equivalents, respectively:
public class SampleActivity : Activity {...}
public class SampleActivity extends Activity {...}
Android Manifest File
Every Android application has a manifest file. The purpose of the manifest file is to provide information that the system must have before it can execute any of the application’s code. The manifest file essentially describes what the application can do and how it does it. The manifest file must be named AndroidManifest.xml and stored in the root directory.
Understanding the Sample Application
Because of the simplicity of our sample project, the only components from the list above that are included in the sample project are an Activity and Layout. The UI elements can be observed by opening the activity_sample.xml file located within the \MyFirstApplicationProject\MyFirstApplication\src\main\res\layout\ folder. Within the XML the only UI element is a TextView which is used for displaying the “Hello world!” text. It’s layout_width and layout_height are both set to “wrap_content” meaning the size of the textview will only be what’s required to hold the contents.
The contents of the SampleActivity.java can be observed by navigating to the \MyFirstApplicationProject\MyFirstApplication\src\main\java\com\example\myfirstapplication\ folder and selecting the SampleActivity.java file. While this particular Activity class does very little, there are two items of interest. First, as previously mentioned about Activity classes, the SampleActivity class is a subclass of Activity.
public class SampleActivity extends Activity {...}
Second, there are two overridden methods within the Activity class as noted by the @Override keyword.
protected void onCreate(Bundle savedInstanceState)
public boolean onCreateOptionsMenu(Menu menu)
While the second method plays no part in this simplistic example, the first method is executed when the activity is created.
Using an Android Virtual Device
Launching the Sample application is as simple as selecting Run “MyFirstApplication” from the Android Studio Run menu. Since this is the first time running the application, Android Studio will display a dialog for selecting the device to run the application.
Since this is a new installation of Android Studio there are no Android Virtual Devices (AVDs) defined. Select the ellipsus button to the right of the Android virtual device dropdown. The Android Virtual Device Manager will display.
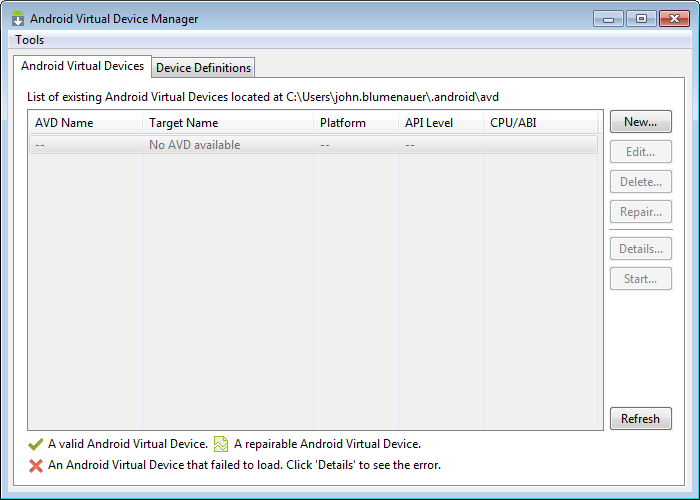
Select the “New” button to define a virtual device. The Create new Android Virtual Device dialog will display. Name the AVD “MyAvd.” Also, select a device definition and a Target platform. When developing Android applications on Windows, be sure the RAM setting is 512 or lower.

Select OK to save the AVD.
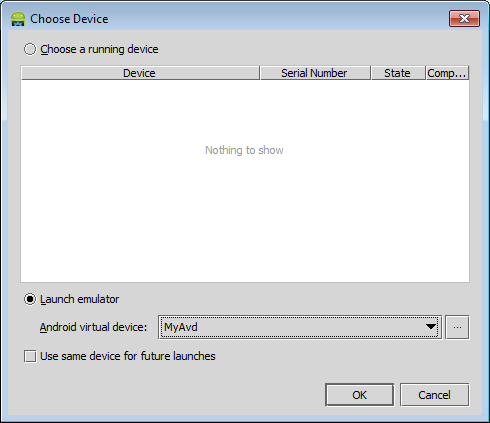
The newly created AVD should now be selected in the dropdown. Select “Launch emulator” and select OK.” At this point, the emulator will launch. The first time the emulator launches it may take quite a long time — just be patient.Once the emulator launches with the virtual device, the Sample application will display on the screen. Sometimes it may be necessary to unlock the virtual device in order to view the application.
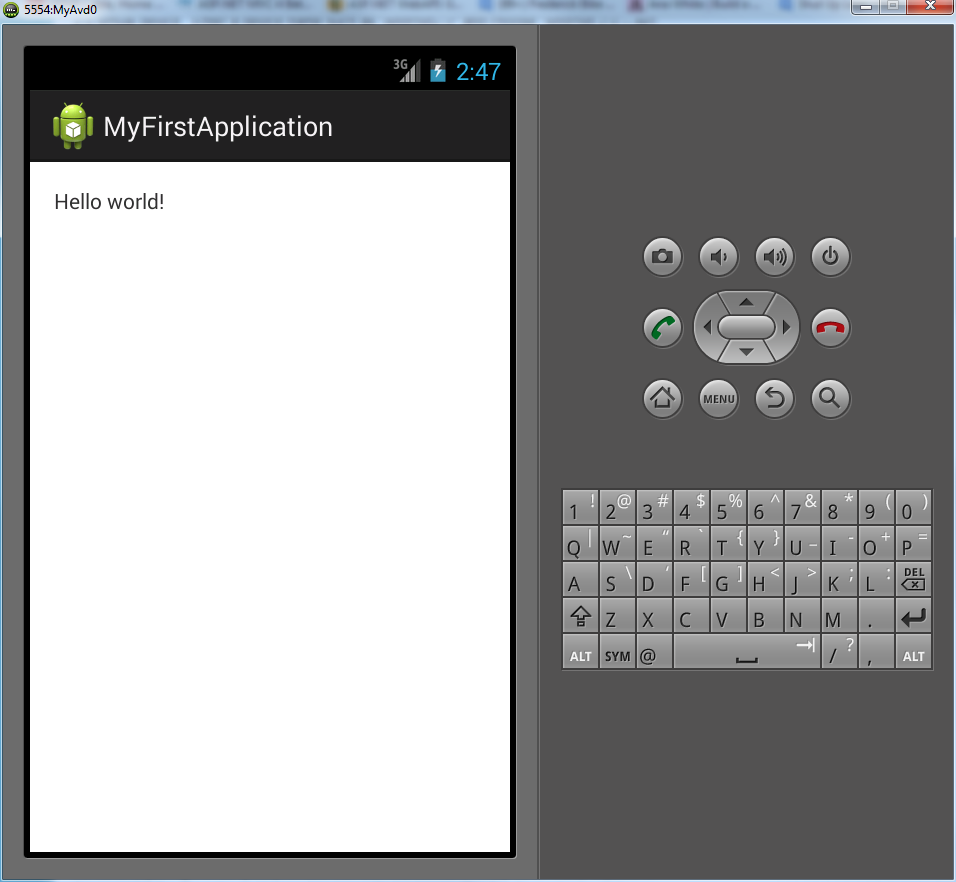
The on-screen emulator buttons may be used to interact with the application or the underlying Android platform of the virtual device. There is no need to close the emulator before running the Sample application again. Any subsequent changes made to the application will be viewable in the emulator by selecting Run within Android Studio.
Wrap-up
The purpose of this article is to get a .NET developer up and running using Android Studio. Hopefully, the overview provided details for getting started on writing native Android applications. While the language, libraries and IDE may differ from what’s found in .NET, there should be enough similarities for a seasoned .NET developer to quickly become productive on the Android platform.