![]() How many times have you been tasked with building a UI at runtime? I know I’ve had to do it plenty of times. This can often be a time consuming and tedious process. Check the data type, decide what kind of control to use, add that control to some placeholder, rinse and repeat.
How many times have you been tasked with building a UI at runtime? I know I’ve had to do it plenty of times. This can often be a time consuming and tedious process. Check the data type, decide what kind of control to use, add that control to some placeholder, rinse and repeat.
I was recently given a task that would take selected search results, compare the items selected, and then present the user with a UI of all fields common across the selected items. Pretty straightforward…and potentially lots of code.
Being new to SharePoint development, little did I know that there was a hidden gem (they tell me there are more) that would aid me in my endeavor.
Enter the FieldRenderingControl property. What is that, you ask? This property gets the field type control that is used to render the field in Display, Edit and New forms, as well as in data form Web Parts, or pages that use field controls. I know that was a mouthful, but in short: FieldRenderingControl allows you to use the SharePoint controls that your customers are accustomed to seeing in a SharePoint UI.
There’s even one for mobile controls, named…wait for it…FieldRenderingMobileControl. What I want to do in this post is to walk you through a little bit of what I did to pull this off. So it’s time to go a little deeper and look under the hood for a bit.
Finding Common Fields Across Multiple SharePoint Lists
Now remember, I needed to find the fields that were shared across all of the selected lists in my search results. I won’t be discussing the custom action that’s behind all of that in this post, but instead I’ll focus purely on how the UI will be generated.
In my stated task, I am not dealing with a specific SharePoint list nor am I confined to a specific site collection. As my starting point, all I have is a URL from each of my selected search results and will have to go and get what I need. I start by populating a few collections from these URLs. I’ll need a collection to hold SharePoint Lists (selectedLists), SharePoint List Items (selectedListItems) and one to hold the fields (fieldsToUpdate) that I want to add to my form.
After that I just loop through each of my list items and find the common fields, across all of the lists. I handle this by incrementing a counter each time I find the field in one of my selected lists. If my counter equals the number of lists in selectedLists, then I add that field to fieldsToUpdate. As you look at the code sample in Figure 1, note that I’m also checking to make sure that we do not render hidden or read-only fields. You’ll probably want to do this as well, in pretty much any scenario. If you want to render all of the fields, or if you are dealing with a specific list, this becomes even simpler.

Figure 1: Finding Common Fields
Dynamically Rendering SharePoint Controls
To know what field type we are dealing with, I use the previously mentioned FieldRenderingControl. In my case, I was tasked with handling the Taxonomy field type, which needs to be treated a little differently, and I wanted to display any DateTime fields as dates only. To address the differences of each of these field types, I just used a switch statement to allow me to “individualize” each of the field types. After getting the field type, it is just a matter of adding the control to a placeholder, as you would any other time.
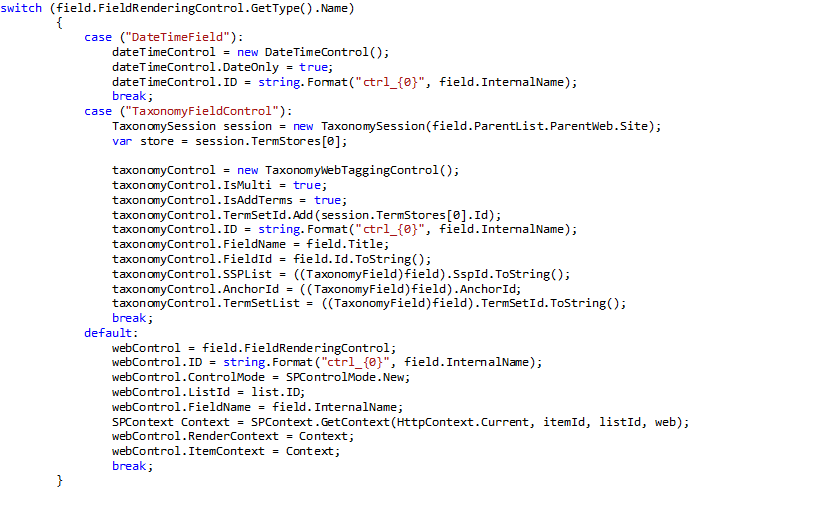
Figure 2: Rendering the Control
The result is a pretty nice UI, complete with controls that are rendered exactly as you would see them in and out-of-the-box SharePoint UI. This provides a consistent look and feel between your custom pages as well as SharePoint-generated UI.
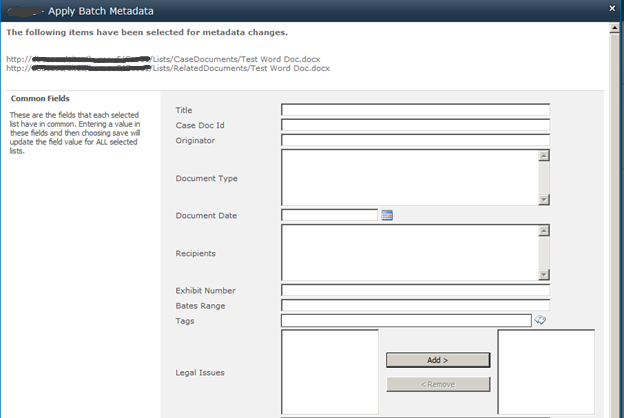
Figure 3: The Generated UI
Extracting the Values From the Dynamic Controls
The last thing I’ll do is quickly show you how to get the values from these dynamic controls. In the save button’s click event, I iterate through the fieldsToUpdate collection and find the corresponding control by matching on the field’s InternalName property.
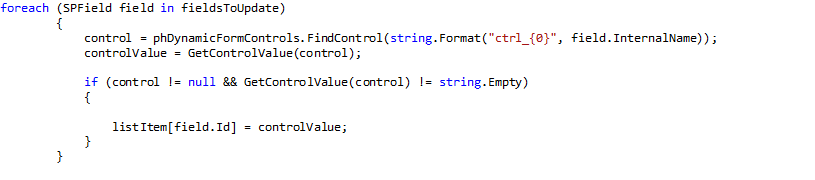
Figure 4: Finding the Control
I then pass the control to a function that checks the control type and returns the appropriately formatted value. Lastly, we assign the returned value to the field and then call the Item.Update() method to save our changes.
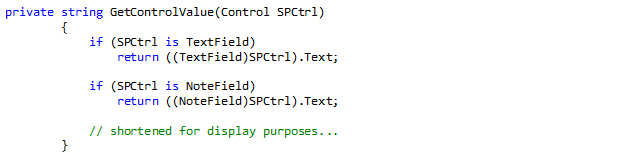
Figure 5: Getting the Control’s Value
Conclusion
While I could have done this the “old fashioned” way, the FieldRenderingControl really made life a lot easier. Instead of mountains of code to deal with building controls, specific to a data type, I was able to populate a few properties and allow SharePoint to do the heavy lifting for me. So the next time you find yourself needing to build a custom SharePoint UI, remember this little shortcut and save yourself some keystrokes.