![]() The standard configuration of FAST Search for SharePoint does not always yield the most relevant results. This is often the case when developing SharePoint applications composed of custom content types and documents. The FAST Search for SharePoint 2010 default rank profile applies a -4000 point boost (or 4000 point penalty) to list items, thus drastically reducing their relevance in search. One can verify this by executing the following commands from a FAST PowerShell console:
The standard configuration of FAST Search for SharePoint does not always yield the most relevant results. This is often the case when developing SharePoint applications composed of custom content types and documents. The FAST Search for SharePoint 2010 default rank profile applies a -4000 point boost (or 4000 point penalty) to list items, thus drastically reducing their relevance in search. One can verify this by executing the following commands from a FAST PowerShell console:
$rp = Get-FASTSearchMetadataRankProfile -name default

$rp.GetManagedPropertyBoosts()
Executing the above commands in my environment produces this:

The impact of this configuration is often undesired in custom SharePoint solutions, where content types derived from Item (0x01) typically contain crucial information, or provide links to other related items. In these scenarios, some types of list items should appear at the top of search results. Fortunately, FAST Search for SharePoint offers a means of accomplishing this goal.
Before diving into the implementation details, here is an overview of the steps necessary to rank search results by content type:
- Create a custom Managed Property to capture Content Type information
- Execute a Full Crawl
- Create the Search Scope
- Adjust the Search Scope’s Filter
- Configure the Core Search Results web part
This method is not the only way to tune search relevance in SharePoint 2010.The process I’ll describe involves developing a custom search scope, but it is also possible to adjust the full-text index and rank profiles directly. MSDN provides additional information on these features for optimizing FAST Search for SharePoint 2010.
Create Managed Property for Content Type
The first step to implementing this capability is creating a retrievable managed property containing content type information. While SharePoint has a managed property named ContentType, this property is not retrievable, meaning it cannot be used in search queries. In order to implement this capability, I use the XRANK operator of FAST Query Language (FQL) to alter the rank points of individual hits dynamically contingent upon their ContentType value. This requires a retrievable managed property containing this information.
To create a custom managed property, first navigate to the Managed Properties page. Do this by selecting Application Management -> Manage Service Applications within Central Administration. From here, select the FAST Search Query Service Application and click “Manage” from the Operations group in the ribbon. Finally, click FAST Search Administration -> Managed properties links.
Next, create a custom retrievable managed property by clicking the Add Managed Property link. I used the settings as shown.
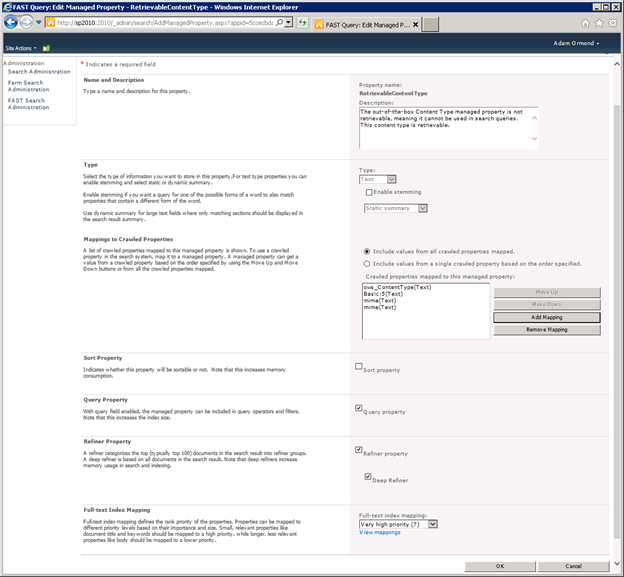
In order to locate the “Basic:5(Text)” property, search for “5” and it should be the first item. To locate the “mime(Text)” properties, search for “mime” and two items should select both items; one mime property is within the “Format Information” category and the other is within the “Enterprise Crawler” category.
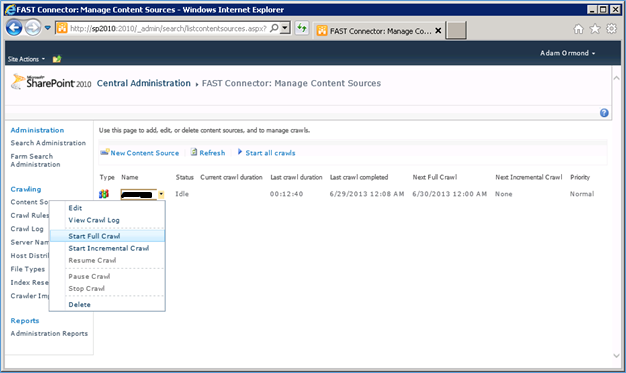
Execute a Full Crawl
After creating the retrievable managed property, a full crawl must be executed. The newly created property will remain empty until this occurs. To do this, navigate to the Manage Content Sources page by selecting Application Management -> Manage Service Applications -> FAST Search Connector Service Application -> Content Sources from within Central Administration. Using the context menu for each appropriate content source, start a full crawl.
Create the Search Scope
Once the full crawl has completed, it is now time to create a custom search scope. Custom search scopes can be created at either the Web Application level or Site Collection level. The correct choice depends upon the design of your custom SharePoint solution. In this example, I’ll describe how to create a custom search scope at the Web Application level.
To create the custom search scope at the Web Application level, return to the FAST Query Search Service management page in Central Administration and click the “Scopes” link in the left navigation panel. From here, use the “New Scope” link and name it appropriately. I have named mine “RankByContentType.” Next add one or more rules, such as folder path.
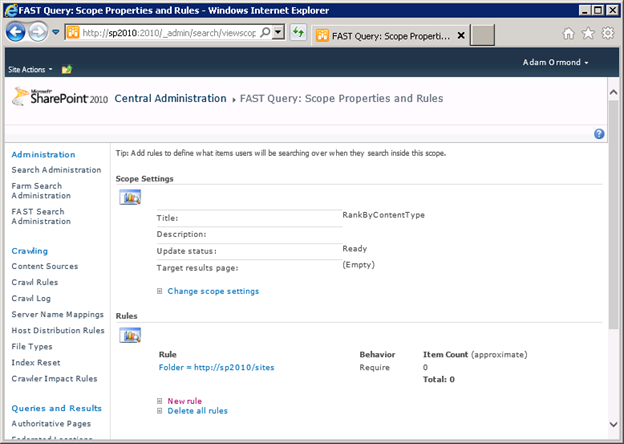
It is also possible to create a custom search scope using FAST PowerShell cmdlets. MSDN provides further details on creating and viewing search scopes.
Adjust the Search Scope’s Filter
Now that a new custom search scope exists, we need to adjust the Filter property. This is done in order to leverage the XRANK operator from FAST Query Language. Before altering the existing property, record the existing value by executing the following commands in a SharePoint 2010 PowerShell console:
$scope = Get-SPEnterpriseSearchQueryScope -identity “RankByContentType” -SearchApplication “FAST Query”
$scope.Filter
The SearchApplication parameter must reference the name of the FAST Query Search Service Application, which is “FAST Query” in my environment. After executing these commands, you should see the rules you defined previously reflected in the value of the Filter property.
For my custom scope, the Filter property contains a simple query: path:starts-with(“https://sp2010”). To achieve the desired search result rankings, hits returned by this query whose content type is “My Custom Content Type” must have their rank increased by at least 4,000 points. In this example, the boost has been set to 10,000 points to ensure appropriate items are at the top of the search results list. This is done by executing the following commands in the same PowerShell console:
$scope.Filter = 'xrank(path:starts-with("https://sp2010"), retrievablecontenttype:"My Custom Content Type", boost=10000, boostall=yes)'

$scope.Update()

- RankByContentType Scope Filter
After executing the above commands, you will need to wait 15 minutes for the search scope to be updated.
Configure Default Search Scope
To see the effects of this configuration, the final step is to configure the Core Search Results web part properties in your custom application’s search results page. One way to navigate to the search results page is to a search within your custom application. Next, edit the properties of the Core Search Results web part on the page, setting the Scope property within the Location Properties group. In this example, it would be set to “RankByContentType.” That’s it! Your configuration should now be visible in all future queries that target this results page.