


I am currently working as a development operation engineer at a client that maintains a large and complex infrastructure with an even more complicated development workflow. Cloud infrastructure had already been provisioned, and several development cycles had been completed when I joined the team a couple of years ago. As a result, I came into an environment that had already established a development workflow, with barely any infrastructure as code (IaC) practices in place.
What is unique about this client is that it maintains six separate web applications, each designated for a different area in the United States; the backends for each application vary from application to application, but the front ends are mostly similar. To avoid a maintenance nightmare, we use code from one repo to deploy the main UI of all six applications; the same code is deployed to each application but configured to run differently through a master configuration file. Each web application is compromised of several sub-applications, each with its codebase.
One of my responsibilities is to spin up and maintain application stacks for new development teams that are working on a specific feature for this client. That feature may or may not be utilized by all six web applications. For this team to develop rapidly, they need a stable testing environment, equipped with continuous delivery, to do their work.
This “application stack” is comprised of:
- 1 Azure App Service Plan
- 1 App Service (up to 6)
- 1 Redis Cache
- 1 Storage Account
These are Microsoft Azure constructs and are not essential to understand in the context of this post. Keep in mind that 6 separate applications utilize a set of shared resources.
Since the DevOps team at this particular client is small, we were only able to create a script to deploy an application stack for a specific development effort, but we did not get the chance to implement any strategies around maintaining these stacks once they were deployed. As a result, we are applying configurations that need to be applied across the 25-30 application stacks that we maintain has turned out to be a logistical nightmare.
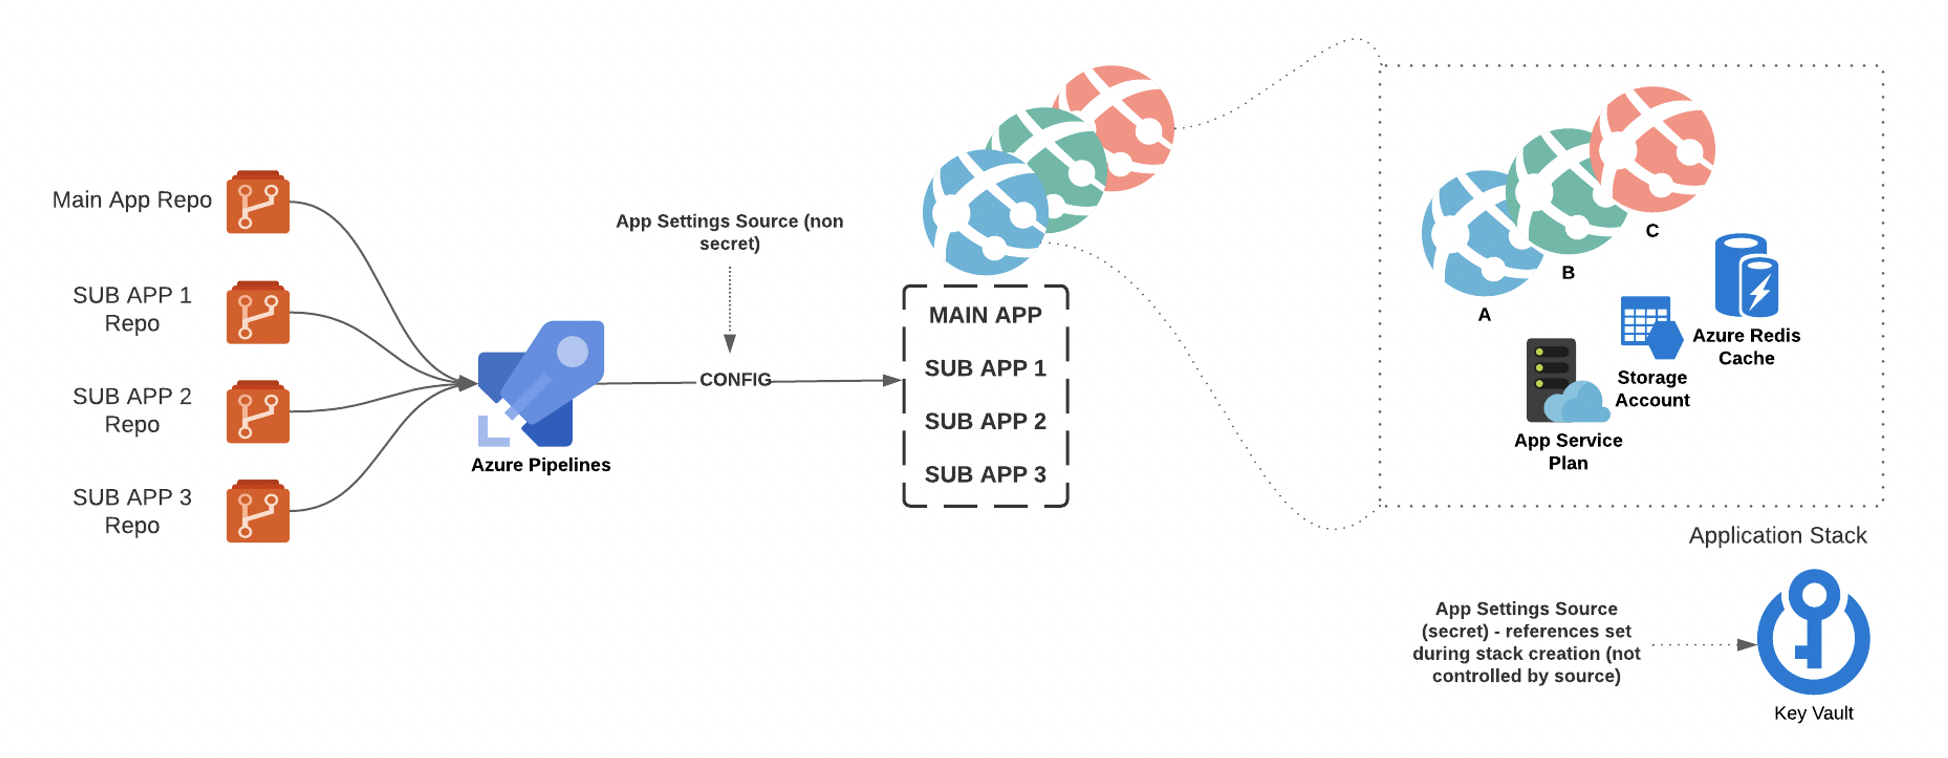 The diagram above represents a high-level overview of a single application stack that we need to maintain; the diagram is scaled down from 6 applications to 3 applications for clarity.
The current script we use to provision application stacks does the following:
- Creates all Azure resources
- Performs KeyVault configuration
- Enabled managed identity on all app services
- Adds access policy to the key vault for all app services
- Adds key vault references for secret app settings on all app services
- Creates 1 Azure DevOps release pipeline to deploy code to all app services; this is done by cloning a base template for a release pipeline that exists before the script is run.
The Problem
Although the deployment script that is currently in use saves time, it falls short on a few things:
If we want to make configuration changes across all the application stacks, we would have to make edits to the deployment script and rerun it on each application stack. This process is entirely too manual and can be improved.
- If we want to change the mechanics of how the underlying deployment pipeline functions across all the application stacks, we have to make edits on each deployment pipeline that is tied to a given application stack. This is too tedious and leaves lots of room for error; we initially mitigated some of this by utilizing Azure DevOps task groups.
- Configuration drift is widely prevalent; because we do not have an easy way to maintain all of the application environments across the board, minor configuration changes during development are difficult to track and often fail to propagate to our main application stacks.
- The Solution: TEMPLATE YOUR LIFE
Azure YAML Templates
This client is relatively young in terms of their cloud journey, especially with Azure and Azure DevOps. They currently rely heavily on Release Pipeline User Interface within Azure DevOps to deploy code to their applications. In recent years, Azure has been subtly urging teams to utilize multi-stage YAML templates instead of the Release Pipeline User Interface to adopt an “infrastructure as code” mindset to the continuous delivery process. With this mindset, there is no difference between “Build” pipelines and “Release” pipelines; the only construct is a pipeline where you can perform any task (build, test, deploy, etc.).
I encourage you to read more about Azure DevOps YAML templates. I’ve included some relevant links below:
– Azure DevOps YAML Templates
– Azure DevOps Multistage YAML UI Experience
– YAML Schema
Given the problem statement above, there is a large need to develop a framework and process around maintaining the cloud infrastructure and its respective continuous delivery process that is easy to manage and propagate changes through.
This is where Azure DevOps YAML templates become useful.
All you need to create a pipeline in Azure DevOps is a YAML file. This YAML file can exist in any code repository. Once this file is imported into a code repository, you can use the Azure DevOps UI to create a pipeline from this file. While you can run the pipeline from the Azure DevOps UI, the pipeline’s changes will be maintained and version within the YAML file itself, just like you would with any application code.
This YAML file can inherit and reference another YAML file that exists in other code repositories.
Template Repository
I am currently developing a code repository that will contain:
- Azure ARM templates to version app service configurations (including virtual/sub applications)
- Deployment script to deploy ARM templates mentioned above
- Azure DevOps YAML files that will function as “release pipelines”:
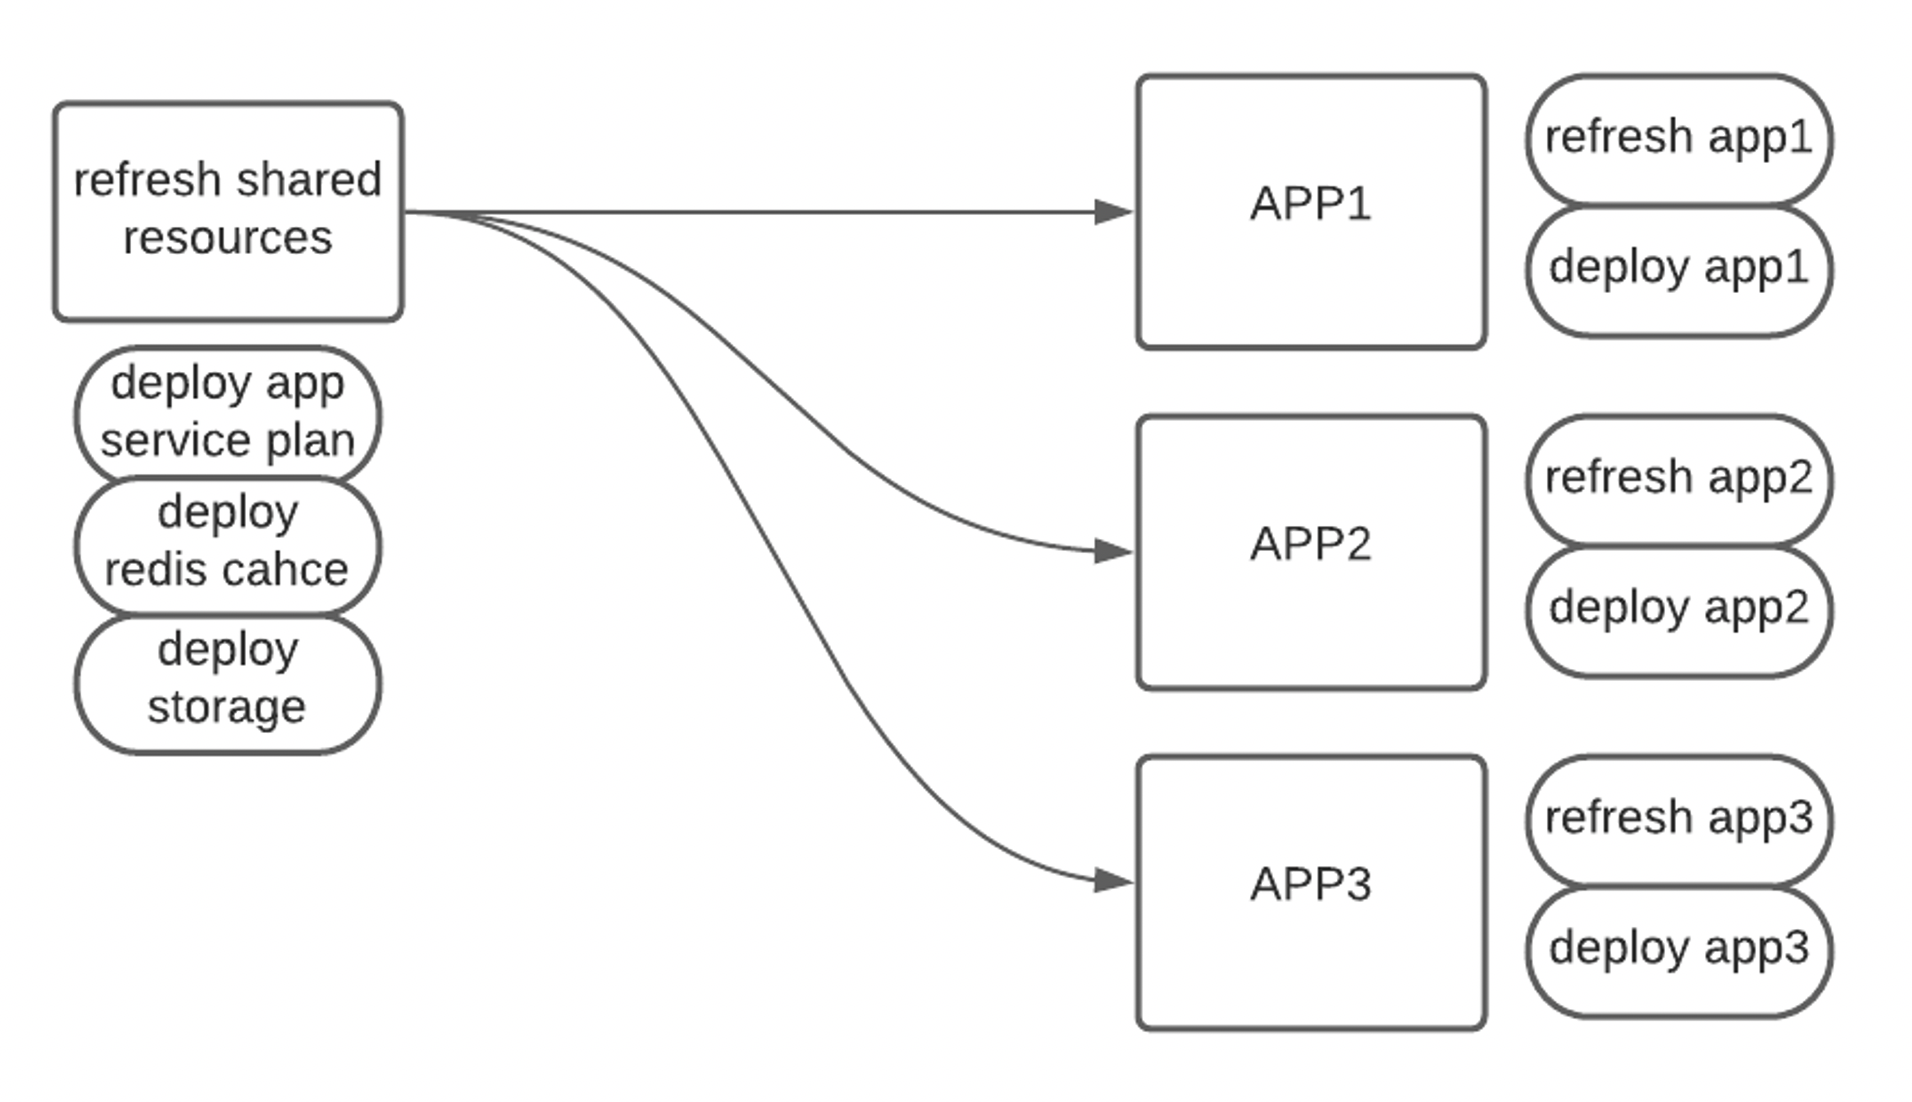
- Create / Refresh shared resources
- Create / Refresh app services
- Deploy code to app services
When a new workstream or development effort begins, all they need to do is create a simple YAML file that extends from the main (release.yaml) template file in the repo mentioned above (see azurepipeline.yaml below). Once that is done, the first time the development team pushes code to a specified branch, they will be equipped with a new environment with their code changes.
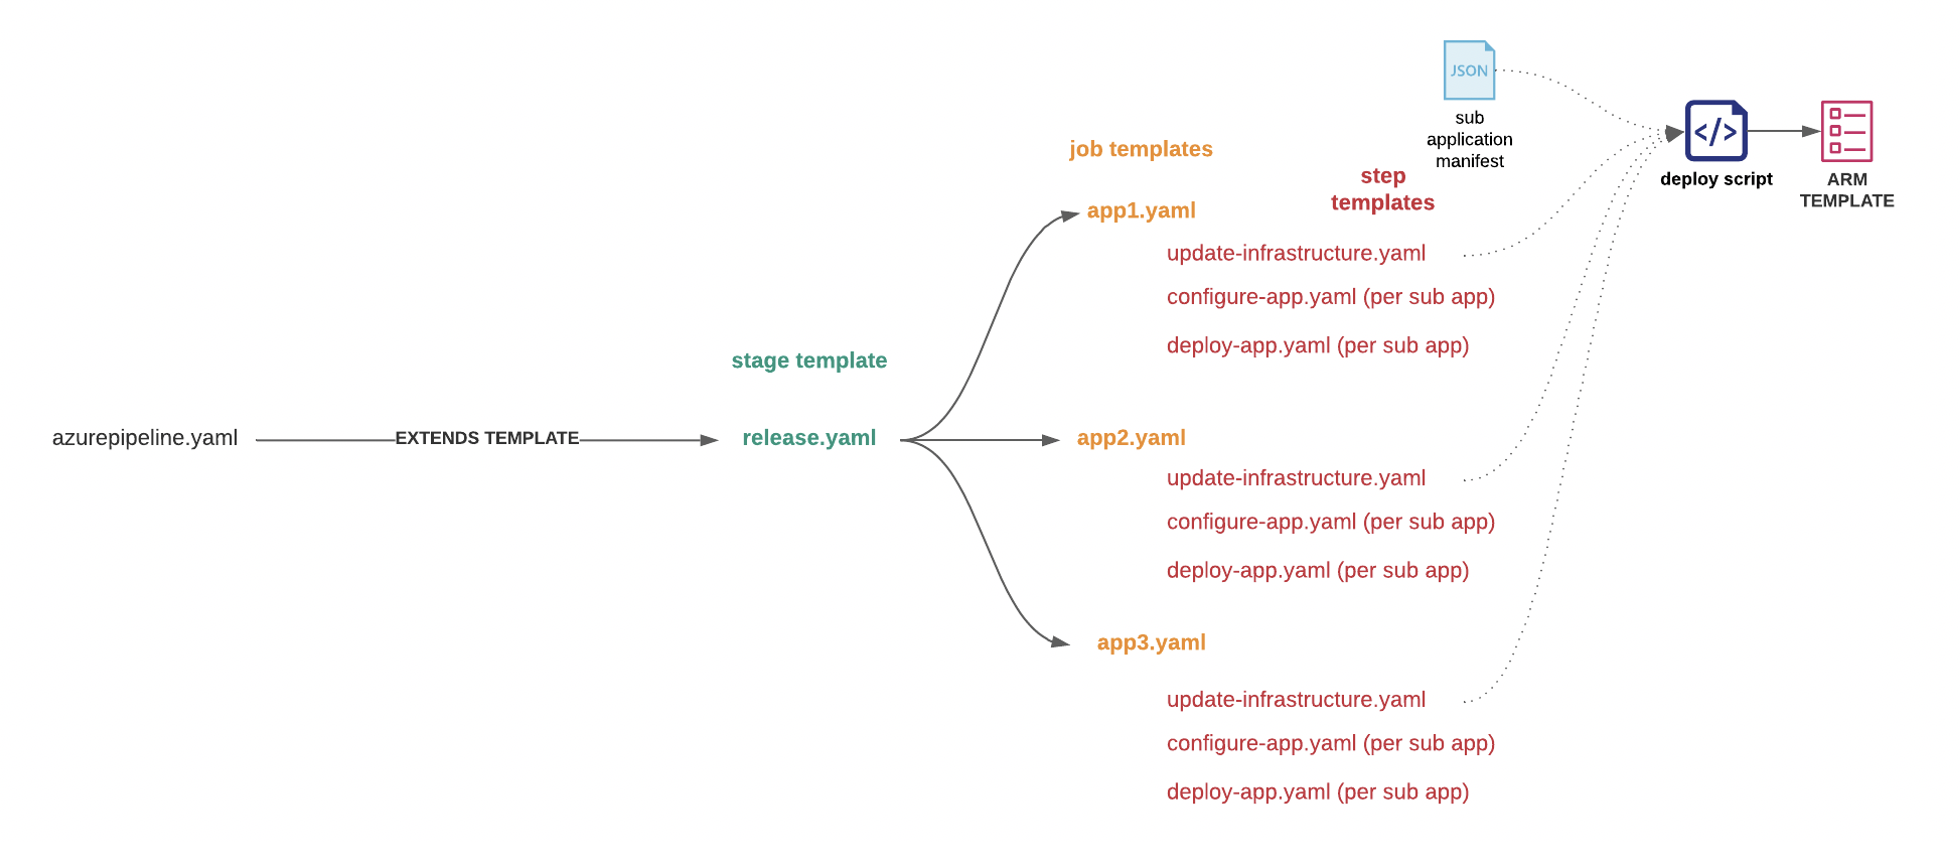
The diagram above represents the hierarchy of the templates in the code repository mentioned above. You can see there are only 7 YAML template files to maintain. The azurepipeline.yaml file inherits these template files. This helps address the challenge mentioned above related to the daunting task of maintaining 25+ release pipelines; changes made to any of the template files will propagate to any azurepipeline.yaml files that inherit from the release.yaml file.
The idea is that we can import the azurepipeline.yaml file that can be into any repo or branch. This file is relatively simple:
azurepipeline.yaml
# run on schedule instead of utilizing ci triggers
name: $(Date:yyyyMMdd)$(Rev:.r)
trigger:
- none
  # pipeline artifact list (previously source artifacts in release pipeline)
extends:
  template: release.yaml@templates
The release.yaml file that the azurepipeline.yaml file extends from looks similar to the one below:
release.yaml
resources:
  # script and template reference
  repositories:
    - repository: templates
      type: git
      name: template-repo
  pipelines:
    - pipeline: main
      project: ExampleProject
      source: YAML\main
      branch: stage
    - pipeline: subapp1
      project: ExampleProject
      source: YAML\subapp1
      branch: stage
    - pipeline: subapp2
      project: ExampleProject
      source: YAML\subapp2
      branch: stage
stages:
- stage: SHARED
  dependsOn: []
  displayName: refresh shared resources
  jobs:
  - job: refresh_shared_resources
    pool:
      vmImage: 'ubuntu-latest'
    steps:
      - template: templates/update-infrastructure.yaml@templates
        parameters:
          sharedOnly: true
- stage: APP1
  dependsOn: ['SHARED']
  variables:
  - template: templates/appvars.yaml@templates
    parameters:
      appName: 'app1'
  displayName: app1
  jobs:
  - job: REFRESH_APP1
    pool:
      vmImage: 'ubuntu-latest'
    steps:
      - template: templates/update-infrastructure.yaml@templates
        parameters:
          sharedOnly: true
          appName: app1
  - template: templates/app1.yaml@templates
App stages are created for each app (not shown).
The app template files referenced by the release.yaml file looks similar to the file below:
appl.yaml
jobs:
- deployment: app1
  dependsOn: REFRESH_APP1
  displayName: "DEPLOY APP1"
  environment: stage
  pool:
    vmImage: windows-latest
  strategy:
    runOnce:
      deploy:
        steps:
        - checkout: self
        - template: configure-app.yaml@templates
        - template: deploy-app.yaml@templates
          parameters:
            isVirtualApp: false
            appName: 'ui'
        - template: deploy-app.yaml@templates
          parameters:
            isVirtualApp: true
            appName: 'subapp1'
        - template: deploy-app.yaml@templates
          parameters:
            isVirtualApp: true
            appName: 'subapp2'
Take note of the different steps that are used to deploy an application. It comprises a configuration step and a deployment step for each sub-application that utilizes the same azure YAML template file with different parameters.
The release.yaml file results in a multi-stage YAML pipeline that looks like the one below:
Resources
The resource section of the template defines what resources your pipeline will use; this is analogous to the artifact section in the release pipeline UI view. You can only have the resources section declared once in your series of templates for a given pipeline. In the example above, it is defined in the release.yaml file, the template that other templates will extend from.
In this example, the resource section references the template repository itself and other build pipelines that produce code artifacts that we will need to deploy to our applications.
Defining the resources section in the base template (release.yaml) allows us to be abstract the choice of artifact sources away from the end-user. This is advantageous if we want to add more sub-applications to our release pipeline; we would only need to change the release resources section.yaml file (changes will propagate to all inherited/extended pipelines).
At the client I work with; this is problematic. In the solution above, all pipelines that extend from release.yaml (that contains the resources section) is limited to only use the specific artifacts AND the branches they are set to pull from, as defined in the base template (release.yaml). We consistently have project teams that need sub-application artifacts from specific branches that their development work exists on. To solve this, we moved the resources section into the extended template (azurepipeline.yaml). However, this isn’t optimal because we would still need to update every comprehensive template if we wanted to add to the resources section across all application stacks.
As far as I know, there is no way to use pipeline variables or template expressions to determine what resource artifacts are needed dynamically. Keep the resources section in the base template and override them within the extended templates.
Dynamic Insertion
Currently, we must maintain a manifest that describes the relationship between each application and its respective sub-applications. For example, app1 could have sub-applications subapp1 and subapp2, and app2 could have sub-applications subapp1 and subapp3 (or any combination of sub-applications). We utilize a JSON file that defines the mappings between application and sub-application. This JSON file is parsed in the deployment script to ensure the correct sub-applications exist before code deployment; in Azure, the sub-application must live before you push code to it. As a result, we also need to maintain sub-applications in each of the different YAML step templates for each application. At this point, I am unaware of an elegant way to iterate over an Azure DevOps pipeline variable to create steps dynamically.
Variable Templates
Template expressions can be applied to variables. This was extremely useful in the context of the solution I was trying to solve. For example, each stage in the pipeline described above is for a particular application with a distinct name. This name is used to determine several properties for its respective pipeline stage. For example, the app1 pipeline stage uses the site name/url app1.azurewebsites.net. The app2 stage uses the site name/url app2.azurewebsites.net. You can see both site names follow the same naming convention. This is a great use case for a variable template.
Here is the variable template I used:
appvars.yaml
parameters:
  appName: ""
  deployToSlot: false
variables:
  siteName: "$(tier)-$(region)-$(app)-${{parameters.appName}}"
  ${{ if eq(parameters.deployToSlot, true) }}:
    corsOrigin:"https://${{parameters.appName}}-$(slotName).azurewebsites.net"
  ${{ if eq(parameters.deployToSlot, false) }}:
    corsOrigin: “https://${{parameters.appName}}.azurewebsites.net"
  appName: ${{parameters.appName}}
  template: "$(System.DefaultWorkingDirectory)/arm_templates/azuredeploy.json"
  virtualApps: "$(System.DefaultWorkingDirectory)/manifest.json"
You can see that I’ve included a parameters section that takes in appName as a parameter. You can see it in the release.yaml file, this parameter is being applied with:
variables:
  - template: templates/appvars.yaml@templates
    parameters:
      appName: 'app1'
This allows us to cut down on repeated code by using an extendable template for the variables needed for each deployment stage. It is essential to understand how variables and parameters work in Azure pipelines and the different ways they can be expressed in your YAML.
Check out these resources:
YAML Variables Documentation
YAML Parameters Documentation
Developer Community Forum Post
Conclusion
Development operation decisions should be considered in architecture design. In the scenario described above, the architecture I inherited did not foster the most efficient development and deployment workflow. For example, the decision to have sub-applications exist on an individual app service instead of assigning them to their app services. This limited us to deploy the individual applications in series, as you are limited to run one deployment at a time to give app service.
Infrastructure as code implemented in the continuous integration and delivery process can be equally as important as implementing it for your existing infrastructure.
Suppose you are working on a project that requires a complicated development lifecycle with multiple teams needing distinct environments. In this case, it becomes increasingly important to formulate a strategy around maintaining the various environments. Environment creation and code deployment should be as automated as possible. Applying configurations across all environments should be an easy task.

