 In an earlier blog I gave an overview of the Microsoft Bot Framework. Today we’ll take a look at the developer experience, building a starter bot, and integrating LUIS.
Let’s Build a Bot!
Let’s build a simple bot to test drive some of the features of the Bot Framework and LUIS.
We’ll design a LUIS model with two intents:
- Greet
- Sign up for an email notification service
If the user indicates they want to sign up, we’ll collect:
- Email address
- Zip code
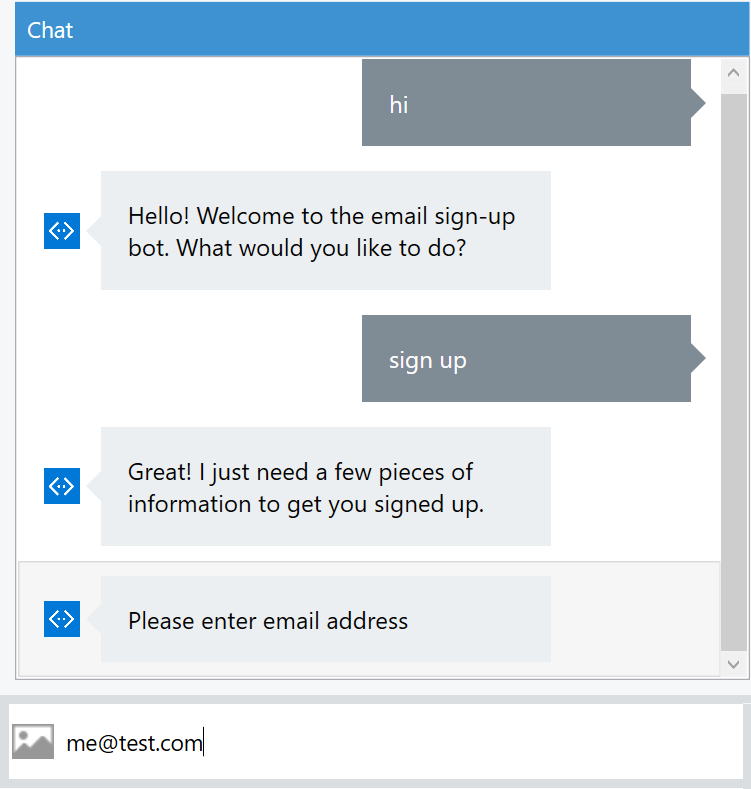
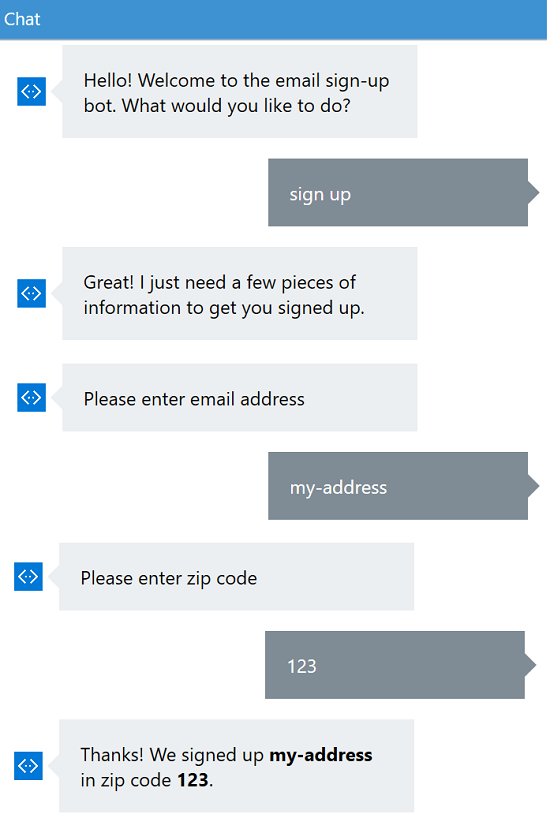
Here’s an example conversation:
For this article we’ll use the C# version of the SDK. To get started:
- Follow the instructions to add the Bot Application Template to Visual Studio 2015 (if you don’t have Visual Studio you can download the free community edition).
- After creating a new Bot Application project, add the Microsoft.Bot.Builder NuGet package to the project per the SDK instructions.
- Install the Bot Framework Emulator tool, which lets you test your bot locally without having to deploy or register it.
This post will just go over the highlights of implementing the bot; you can find the full code sample on GitHub.
Building the LUIS App
Next we’ll create a new LUIS App and start building our model for this application (you’ll need to sign up with a Microsoft Account if you haven’t already). The model is comprised of the entities, intents and seed phrases used by LUIS to parse natural language for your bot.
Entities
We’ll add two Entities: EmailAddress and ZipCode. These will help us to train LUIS to provide these values to us if the user includes them in their message to our bot. LUIS also has a list of pre-built entities that you can use if you find one that fits your needs.
Intent: SignUp
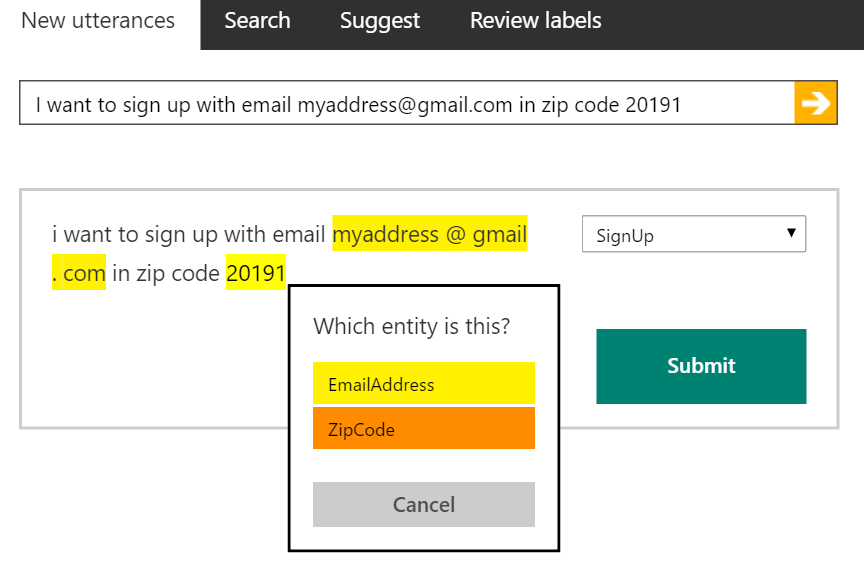
Now let’s add our first Intent: SignUp. For our first sample utterance we’ll include an email and zip code, for example:
“I want to sign up with email myaddress@gmail.com in zip code 20191”.
Next, we’ll highlight the email address in the utterance and select EmailAddress as the entity, and highlight the zip code and select ZipCode as the entity. Now we are ready to submit the utterance.
To improve the training of our LUIS app, we’ll want to keep adding utterances that we might expect from users and identifying any Entities. So try adding phrases like:
“Sign me up with my.address@hotmail.com”
“Sign up for zip 10065”
“Sign up”
“Signup”
Make sure to identify any entities in the utterance and select SignUp as the Intent before submitting (if you make a mistake you can make changes on the “Review labels” tab).
Intent: Greet
This is just a simple intent so we can be friendly if the user tries to greet us. Add the Intent and associate a few sample utterances like “hello” and “hi.”
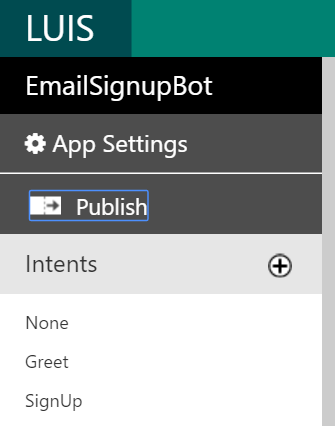
Publish the LUIS App
Finally, publish your LUIS app using the Publish link:
Implementing the Bot
Let’s go back to our bot C# project in Visual Studio. First, we’ll add a dialog class derived from LuisDialog to integrate with our LUIS app, and add with simple handlers for our Greet intent and the built-in fallback None.
    [LuisModel("00000000-0000-0000-0000-000000000000", "00000000000000000000000000000000")]
    [Serializable]
    public class EmailSignupDialog : LuisDialog<object>
    {
        [LuisIntent("")]
        public async Task None(IDialogContext context, LuisResult result)
        {
            await context.PostAsync("Sorry, I didn't understand.");
            context.Wait(MessageReceived);
        }

        [LuisIntent("Greet")]
        public async Task Greet(IDialogContext context, LuisResult result)
        {
            await context.PostAsync("Hello! Welcome to the email sign-up bot. What would you like to do?");
            context.Wait(MessageReceived);
        }
    }
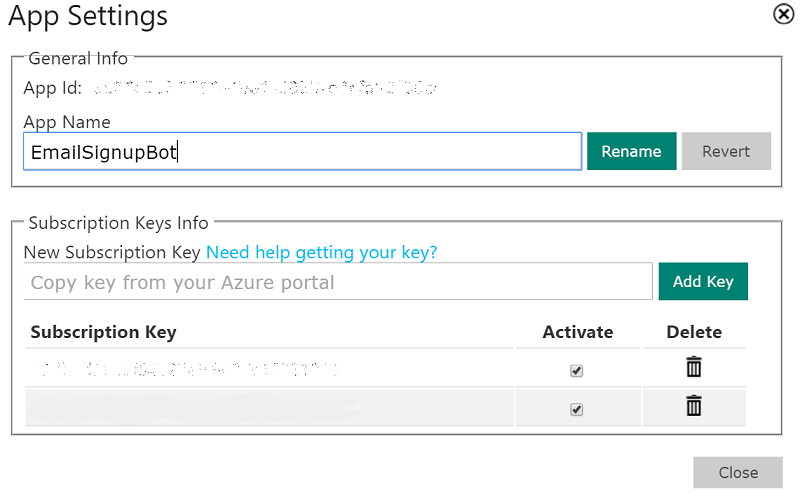
Important: Replace the values in the LuisModel attribute with your LUIS model identifier and key. To get these, from the LUIS site:
- Select your application, then click “App Settings”.
- The App Id is your model identifier, and you can use the first subscription key in the list.
Note that we also need to make the class Serializable, so that any state our dialog keeps can be saved by the Bot Framework and passed back to us with each incoming message.
Now we need to wire up the MessagesController for the web API to use our new dialog as the default message handler:
    public async Task<HttpResponseMessage> Post([FromBody]Activity activity)
    {
        if (activity.Type == ActivityTypes.Message)
        {
            await Conversation.SendAsync(activity, () => new EmailSignupDialog());
        }
        else
        {
            HandleSystemMessage(activity);
        }
        return new HttpResponseMessage(HttpStatusCode.Accepted);
    }
Next, we’ll build a simple FormFlow to collect the email address and zip code. To get started with a FormFlow, all you need to do is:
- Create a class with the properties you want to collect.
- Use the FormBuilder class to create a form instance.
It can be as basic as this:
    [Serializable]
    public class SignupForm
    {
        public string EmailAddress { get; set; }
        public string ZipCode { get; set; }

        public static IForm<SignupForm> BuildForm()
        {
            return new FormBuilder<SignupForm>()
                .Field(nameof(EmailAddress))
                .Field(nameof(ZipCode))
                .Build();
        }
    }
Now back to our EmailSignupDialog, where we’ll wire up our SignUp intent with a method that calls our form:
    [LuisIntent("SignUp")]
    public async Task SignUp(IDialogContext context, LuisResult result)
    {
        await context.PostAsync("Great! I just need a few pieces of information to get you signed up.");

        var form = new FormDialog<SignupForm>(
            new SignupForm(),
            SignupForm.BuildForm,
            FormOptions.PromptInStart,
            result.Entities);

        context.Call<SignupForm>(form, SignUpComplete);
    }

    private async Task SignUpComplete(IDialogContext context, IAwaitable<SignupForm> result)
    {
        SignupForm form = null;
        try
        {
            form = await result;
        }
        catch (OperationCanceledException)
        {
        }

        if (form == null)
        {
            await context.PostAsync("You canceled the form.");
        }
        else
        {
            // Here we could call our signup service to complete the sign-up

            var message = $"Thanks! We signed up {form.EmailAddress} in zip code {form.ZipCode}.";
            await context.PostAsync(message);
        }

        context.Wait(MessageReceived);
    }
The SignUpComplete handler is called when the form is either canceled or completed. This is where we would call our application’s sign-up service to actually register the sign up.
Now let’s run our app locally and try a conversation using the Bot Framework Emulator:
Pre-filling the Form with LUIS Entities
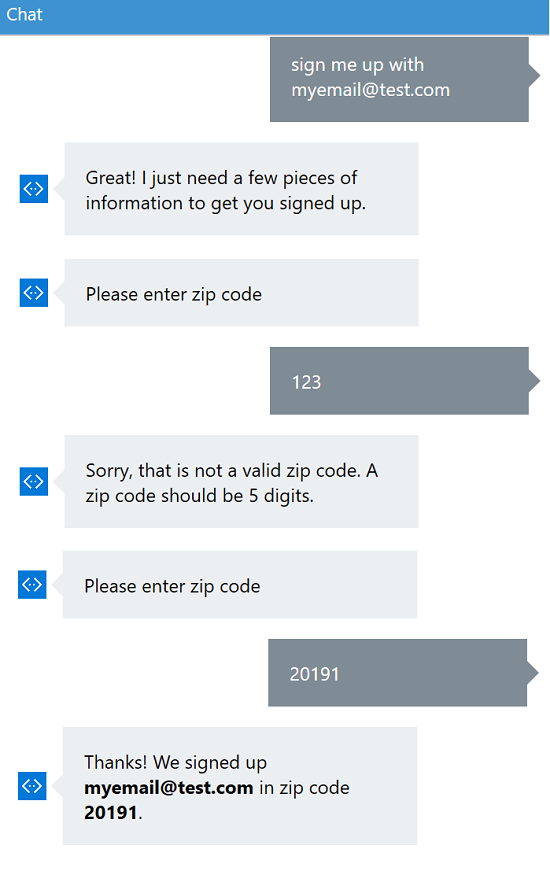
When creating the SignupForm dialog in our SignUp() method, we passed the the result.Entities collection. This enables some magic: since the property names in our SignupForm class match the Entity names we configured in LUIS, the form builder will automatically set any values in the form that match the entities parsed by LUIS. Then the form flow does not need to ask the user that question. Here’s an example of LUIS parsing the email address for us in the first message, meaning the form only needs to collect the zip code:

Adding Validation
Well, it’s a start – but already, there are problems. For one, the bot accepted invalid values for both the email address and zip code. And since LUIS tokenizes entity responses, the recognized email entity had spaces around the punctuation: “myemail @ test . com”.
Let’s fix that.
When building your FormFlow you can specify a validation delegate for each field. Here’s an example implementation of one:
    private static ValidateAsyncDelegate<SignupForm> ZipValidator = async (state, response) =>
    {
        var result = new ValidateResult { IsValid = true, Value = response };
        var zip = (response as string).Trim();
        if (!Regex.IsMatch(zip, ZipRegExPattern))
        {
            result.Feedback = "Sorry, that is not a valid zip code. A zip code should be 5 digits.";
            result.IsValid = false;
        }

        return await Task.FromResult(result);
    };
Then we specify them in our form builder like so:
    public static IForm<SignupForm> BuildForm()
    {
        return new FormBuilder<SignupForm>()
            .Field(nameof(EmailAddress), validate: EmailValidator)
            .Field(nameof(ZipCode), validate: ZipValidator)
            .Build();
    }
For the entities, instead of passing result.Entities directly to our form, we can do some pre-processing first, for example:
    private IList<EntityRecommendation> PreprocessEntities(IList<EntityRecommendation> entities)
    {
        // remove spaces from email address
        var emailEntity = entities.Where(e => e.Type == "EmailAddress").FirstOrDefault();
        if (emailEntity != null)
        {
            emailEntity.Entity = Regex.Replace(emailEntity.Entity, @"\s+", string.Empty);
        }
        return entities;
    }
Using Markdown
One last enhancement: rich channel clients like the web chat and Skype support text in Markdown format, which gives us a way to add some text formatting. So let’s use bold to highlight the user’s responses in our confirmation message:
var message = $"Thanks! We signed up **{form.EmailAddress}** in zip code **{form.ZipCode}**.";
With those updates, let’s take a look at what a conversation looks like:
Once you’re ready to publish your bot, you’ll want to deploy your Web API to a public URI (for example, using Azure App Service) and register on the bot website.
The full source code for this example is available on GitHub.
Got Bot!
There are many more ways to further enhance and personalize your bot conversations, such as custom prompts, confirmations, conditional questions, and service integration (for example, a zip code lookup for city and state to further validate and confirm the location).
This intent of this article was to give a brief introduction to the Bot Framework and LUIS, and to show how you can use LUIS dialogs and FormFlows to compose your bot experience. But building a successful bot requires much more thought and careful design. Remember:
- You don’t want to end up actually making it more difficult
- You want the interaction to “feel” pleasant and natural. This aesthetic is one of the advantages of a conversational interface.
As a Microsoft Gold Partner, our expertise at AIS can help you leverage the Bot Framework, Microsoft Cognitive Services and the Cortana Intelligence Suite to build cutting edge intelligent solutions and interactive user experiences. Contact us to learn more!