Any website that allows users to create their own textual content requires a good text editor. Fortunately for today’s developer, there are many options available that provide users with a great text editing experience. Depending on the development platform, this is often as simple as plugging in an existing editor written for that platform. In early 2014 I was looking for just such an option for AngularJS. This tutorial will give you an overview of the steps I went through to add a text editor to my AngularJS application.
AngularJS is quickly becoming s a popular web application framework. Its scalable, modular structure and intuitive syntax make it a popular choice for building medium to large web applications. While AngularJS is certainly opinionated, its opinions turn out to be quite helpful – especially to those less nuanced in the intricacies of well-organized JavaScript. I found AngularJS, and its accompanying opinions, a pleasure to work with.
You don’t need to head very far down the AngularJS road before you bump into AngularJS Directives. These little pieces of ingenuity, along with AngularJS modules, controllers, services and filters, form the main building blocks of an AngularJS application. Directives extend HTML. They are encapsulated units of functionality that can be applied in multiple locations within an application or even shared between applications.
One of my very first AngularJS undertakings was to create a directive that wraps a Markdown editor. Markdown is an easy to use syntax useful for creating uniformly styled content. It is used by the StackExchange network, GitHub and many other popular sites. You can read more about Markdown from its original creator, John Gruber, here. I would use this directive as the text editor within my web application.
The PageDown Markdown Editor
The first thing I was required to do was to find a markdown editor. The editor had to be 1) awesome and 2) free. It seems like there is an endless supply of markdown editors and flavors out there. One such editor is PageDown. PageDown has an interesting history that you can read up on here. While it is certainly possible to write your own markdown editor from the ground up in AngularJS, for most purposes it makes far more sense to build upon the work of others. As such, I decided to use PageDown as my markdown editor.
Creating the Directive
Set up
I am going to provide step-by-step instructions on how to create this directive from scratch. I will be using Visual Studio 2013 so if you would like to follow along, fire up Visual Studio and create a new, empty ASP.NET web application. Then add an index.html document to the root of the project and an app.js file inside a “scripts” folder.
There are a number of AngularJS NuGet packages out there. One package is simply called “angularjs”. This package installs AngularJS along with all of its side modules. While you certainly could use this package, I prefer the modular packages created by K. Scott Allen, Jeremy Likness and John Papa. These packages allow you to install the different AngularJS modules separately. The package we require is called AngularJS.Core. You can install this package using the Package Manager Console:
install-package angularjs.core
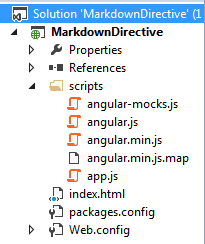
Right now your Solution Explorer should look something like this:
Inside your index.html, add the script references to the AngularJS script as well as to your app.js script file:
<script src="scripts/angular.min.js"></script>
<script src="scripts/app.js"></script>
After completing this setup you are now ready to begin creating your AngularJS application.
The Module
AngularJS applications consist of one or more modules so before you can create the AngularJS directive, you need a module. Open up the app.js file and create a new AngularJS module called “MarkdownModule”:
angular.module('MarkdownModule', []);
With the module created, you can tell AngularJS to process a portion of the HTML in the index.html file by associating the module with that portion of the HTML. This is done with the “ng-app” attribute (which is actually a built-in directive that ships with AngularJS). In this case you want AngularJS to process the contents of the entire <body> element, so add the attribute ng-app=”MarkdownModule” to the body tag:
<body ng-app="MarkdownModule">
The Directive
With the module created you can create a basic skeleton directive to use as a simple sanity check to make sure the AngularJS application and directive are working correctly. Directives are created by executing the “directive” method on the module. So in your app.js file execute the directive method and call your directive “pagedown”:
angular.module('MarkdownModule', [])
    .directive('pagedown', function () {
        return {
            restrict: 'E',
            template: 'Hello World'
        };
    });
Returning a “restrict” value of “E” tells AngularJS that the directive will be applied using an HTML element (as opposed to an HTML attribute or class) and the template value tells AngularJS what it should insert in the HTML at the element location.
To use this directive, simply add a <pagedown> element to the body of the HTML:
<body ng-app="MarkdownModule">
    <pagedown></pagedown>
    ...
Viewing the index.html file in the browser should render “Hello World” on the page. If it does then you know your AngularJS application, module and directive are all working correctly.
PageDown
Fortunately for us there is a NuGet package for PageDown called pagedown.bootstrap. It requires jQuery. So first install the JQuery package:
install-package jQuery
Then install the pagedown.bootstrap package:
install-package pagedown.bootstrap
As its name implies, this version of PageDown works with Bootstrap. As such, it includes bootstrap as part of the NuGet package. Installing the above packages will add a few more resources to your project. Include the following script files in your index.html file:
- jQuery-[version].min.js
- Markdown.Converter.js
- Markdown.Editor.js
- Markdown.Sanitizer.js
And the following css files:
- bootstrap.min.css
- pagedown.bootstrap.css
Now your index.html file should look something like this:
<!DOCTYPE html>
<html xmlns="https://www.w3.org/1999/xhtml">
<head>
    <title></title>
    <link href="Content/bootstrap.min.css" rel="stylesheet" />
    <link href="Content/pagedown/pagedown.bootstrap.css" rel="stylesheet" />
</head>
<body ng-app="MarkdownModule">
    <pagedown></pagedown>

    <script src="scripts/jquery-2.1.0.min.js"></script>
    <script src="scripts/pagedown/Markdown.Converter.js"></script>
    <script src="scripts/pagedown/Markdown.Editor.js"></script>
    <script src="scripts/pagedown/Markdown.Sanitizer.js"></script>
    <script src="scripts/angular.min.js"></script>
    <script src="scripts/app.js"></script>
</body>
</html>
PageDown requires a few HTML elements on the page in order work. You can read more about these elements here. Specifically it requires a text area with id of “wmd-input”. This is the text area the user will use to enter their markdown. It also requires two div elements. One for the button bar and one to preview the rendered markdown. These must have id attribute values of “wmd-button-bar” and “wmd-preview” respectively. Add these elements to the template inside your directive:
template:
    '<div id="wmd-button-bar"></div>' +
    '<textarea id="wmd-input"></textarea>' +
    '<div id="wmd-preview"></div>'
At this stage your app.js file should look like this:
angular.module('MarkdownModule', [])
    .directive('pagedown', function () {
        return {
            restrict: 'E',
            template:
                '<div id="wmd-button-bar"></div>' +
                '<textarea id="wmd-input"></textarea>' +
                '<div id="wmd-preview"></div>',
            link: function() {
                Object.prototype.tooltip = function () { }
                var converter = Markdown.getSanitizingConverter();
                var editor = new Markdown.Editor(converter);
                editor.run();
            }
        };
    });
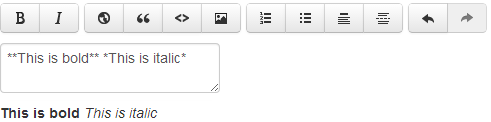
Viewing your index.html file in the browser should now render a fully working PageDown editor:
This should be enough to get you started. You could take this example further by allowing multiple markdown editors on a single page or changing the button style or images. I’ll leave that to you.
You can find the full source code for this example on GitHub.
Further Reading: