 For the last couple months, I’ve been working on a new mobile application for an AIS client. It is an iPad app, targeted for iOS 6. Although I am quite well-versed in many of the iOS standard libraries, there is always “further east” to go, and I’ve really stretched my wings with this project and explored some interesting UI features. One thing in particular that I dug really deeply into is Interface Builder and its new integration into Xcode 4.x. I’ll discuss more of that in a later post, as I explored some interesting features (and limitations).
What I’d like to discuss now is the use of static libraries in Xcode for a couple different reasons. First, I have several classes that I think will be helpful to the developer community (both here at AIS and beyond), and I will be building static libraries to share with any of my colleagues who want to use them in their iOS projects. Second, being able to import static libraries into an existing Xcode project can be a little involved, and I want to outline the process in a way that proves to be repeatable. And of course, the best way of learning is to teach, so I’m looking to solidify my understanding of the process by putting it out there for any of you to try it and punch holes in my logic.
Importing a Static Library Into Xcode 4
Before going any further, I want to provide some links to some resources that were used to make this work. James Montgomerie wrote an excellent article on the subject, and it’s the basis for this article. There are a couple of corrections and additions that need to be factored in, most of which actually come from the comments on his post.
There are also a couple of articles on git submodules here and here. Submodules are a new concept to me, and I definitely have more to learn on the subject. But these articles are a good foundation for the work I’ve done so far. At this point, GitHub will serve our purposes as a repository for these static libraries, but developing an understanding and set of procedures for other repositories will be a necessary long-term strategy.
I’m going to assume that you have read James Montgomerie’s article before diving into this. I am not going to repeat every step he discusses, but instead I’ll highlight what I feel are the important points, and supply any necessary clarifications/corrections. Here we go…
Creating a Static Library in Xcode
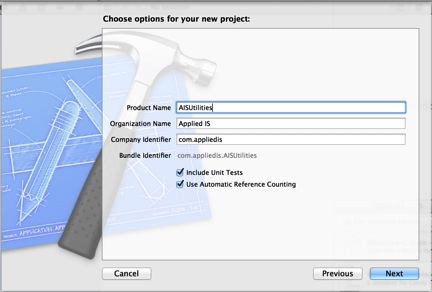
Following JM’s instructions, create a Cocoa Touch Static Library project in Xcode. I’ve called mine “AISUtilities.” Make sure you have “Create local git repository for this project” turned on.
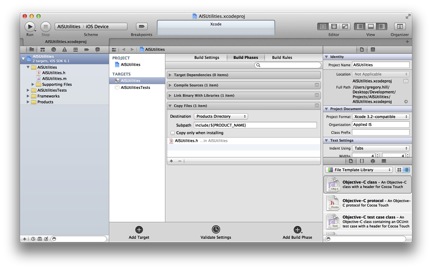
 Once you have created your library, follow the instructions for editing the project settings. There is one additional step at this stage, however: Select the “Build Phases” tab, and open up the “Copy Files” section. Click on the “Add Build Phase” button at the bottom, and select “Add Copy Headers.”
 Once this is done, go ahead and follow JM’s instructions for “Write the static library code” and “Create the global header for the static library.”
In the following section, “Set the visibility for the library headers,” there is a little tweaking you may have to do to execute the steps as outlined. In the image below, note the files “AISUtilities.h” and “AISHello.h” selected on the left, and the section for “Target Membership” on the right.
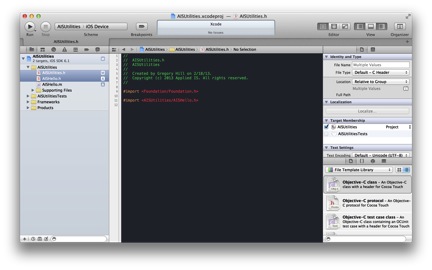 In your project, you may or may not have the dropdown available for publishing the membership. If you don’t see it, simply uncheck the project checkbox, and then check it again. This should present the dropdown. At that point, select “public” for all of the header files, and move forward. Whenever you add a new class to your public library, simply select the header, and make it public.
Committing It to Git/GitHub
One of the steps that Montgomerie glosses over a bit is committing the code and pushing it to a repository. He uses GitHub for his work, and we’ll do the same. I won’t go into great detail here (using git and GitHub with Xcode is a whole different article, which is forthcoming), but I’ll give the highlights and then we can proceed with using our newly created library in a “super project.”
Assuming you have a GitHub account, create a new repository. “AISUtilities” has been created at https://github.com/nukemhill, which will be the repository for the set of utilities that will be published for AIS. Make sure when you create a repository, you do not select “Initialize this repository with a README.” For whatever reason, this will munge Xcode’s initial attempt to connect with the repository. I won’t pretend to understand why, but I suspect that Xcode is expecting an unpopulated repository when it attempts the initial push. In order to get it all to work together, you probably have to pull the GitHub repository down, merge it with your existing local one, and then push it all back up. This process will involve command-line work, as Xcode does not provide that level of sophistication when working with git repositories.
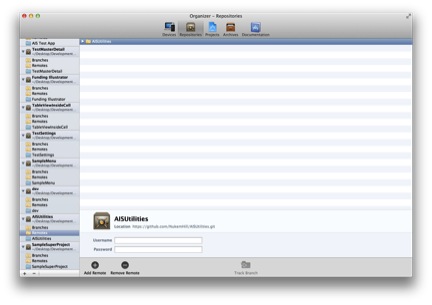
Once you have created a public repository in GitHub (I currently have mine as public, but that does not preclude us from creating private repositories in a corporate account on GitHub, or in some other repository, hosted or otherwise), copy the URL in the “git remote add” line of the “Push” command line example (for example: https://github.com/NukemHill/AISUtilities.git). Now, return to Xcode, select File->Source Control->Commit…, make sure all of your files are selected, enter a comment, and commit the files to your local git repository. Once this is done, you need to assign a remote repository to the project. Click on the Organizer button in the upper-right part of the Xcode tab bar. In Organizer, select the Repositories tab, and then select the Remotes folder under your current project:
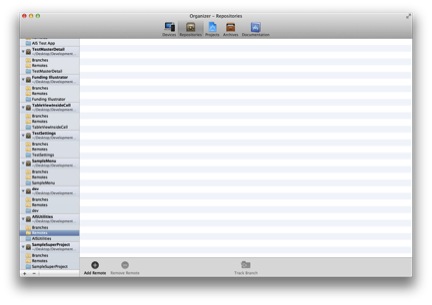 Now click on the “Add Remote” button at the bottom and enter the appropriate information:
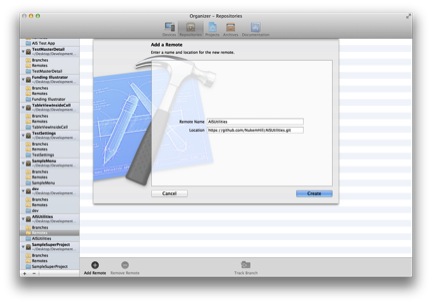 Make sure that “Remote Name” corresponds with the actual name of the repository on GitHub.
If all goes well, you should end up with something that looks very much like this:
(A quick aside: I’ve never had to fill out the username and password fields at the bottom.)
At this point, switch back over to the project editor, and select File->Source Control->Push… You may be presented with a “Verify Certificate” dialog.
 If so, press Continue and then select the remote repository for your project. If all is well, the green light will be on, you can simply select Push, and your project will be pushed up to the remote repository.
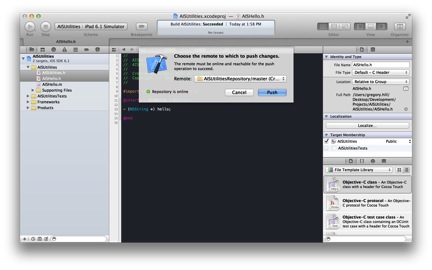 Success! We are now ready to use this static library in other projects.
Importing a Static Library Into a “Super Project”
Now it’s time to create another “normal” iOS project. It doesn’t matter what kind, but for our purposes, we can follow JM’s lead. I created a simple project called “AISHelloWorld” (yeah, I know, original…). Once you have created the project, follow JM’s instructions on cloning the static library, importing it into your new project, and configuring the settings (the “Other Linker Flags” settings do appear to be obsolete now).
(Aside: I actually did a little digging, just to satisfy my own curiosity about cloning local git repositories [i.e., can it be done], and found no satisfactory answers. It’s not really relevant to our long-term goals, so I didn’t spend a whole lot of time on the matter. But if you are looking to experiment on a local level before committing to a remote repository, I couldn’t find a way to do it. Leave a comment if you do find a way! It’s a point of curiosity for me, and I’m always looking to improve on my git-fu.)
Now that everything is configured, you can create a simple app that displays the output from a call to your static library. I embedded an NSLog() call in the AppDelegate, which prints “Hello!” to the command line. But knock yourself out. You should have a successfully imported static library.
Now let’s explore how to update the library with new functionality.
Modifying the Library
Updating the library and using those modifications is pretty straightforward, as long as you stay on the master branch. There appear to be some gotchas with respect to accessing other branches, which I won’t go into now. The documentation on submodules spends some time on this, if you are interested. This will obviously, become an issue if, for example, you make some local changes to the utility source code and want to commit them to a branch for review and dissemination. I’m not sure what a bullet-proof solution to that would be, so I’ll do some research and post a follow-up on my findings.
In the meantime go ahead and make some changes to the subproject you created. I created a “goodbye” method. Commit and push those changes to github, and then come back to the super project. Before you can pull the changes down, however, you need to commit this project. Do that, and then select File->Source Control->Pull…. You will be prompted for the repository to pull from. Select the subproject. If all goes well, it will execute the process and return a green light.
At this point, make whatever changes to the superproject you want, in order to take advantage of your superslick new framework functionality and run the app. You should see the changes take hold.
Future Uses
Ultimately, the idea is to have a set of libraries available for use across multiple projects. With that in mind, I will be pushing a suite of utility classes that I’ve made repeated use of up for everyone to take advantage of in their own iOS projects.
I always welcome comments; especially corrections or suggestions for different approaches. And as we explore effective branch support for git submodules in particular, and other repositories (like TFS), we’ll be able to create and integrate different branches for new code.


