![]() When I apply for speaking engagements, I usually submit at least one session that will require me to learn a new language or technology. I did this with the upcoming SharePoint Saturday Austin with a session titled “PowerShell for Developers: IT Pros Need to Share.” This session is the catalyst for this three-part blog series, which will be published over the next few Fridays. This first post is intended to get everyone up to speed with the basics of PowerShell.
When I apply for speaking engagements, I usually submit at least one session that will require me to learn a new language or technology. I did this with the upcoming SharePoint Saturday Austin with a session titled “PowerShell for Developers: IT Pros Need to Share.” This session is the catalyst for this three-part blog series, which will be published over the next few Fridays. This first post is intended to get everyone up to speed with the basics of PowerShell.
What is PowerShell?
PowerShell is a command-line language built on the Microsoft .NET Framework. This is a ridiculously simplified explanation, though. PowerShell is a task automation tool that takes common command-line languages and magnifies their power exponentially through the use of Cmdlets. Cmdlets are verb-noun commands that perform computer and application management tasks. These tasks can be as simple as restarting the computer or changing the time zone.
PowerShell is a sophisticated development language that contains many of the constructs found in other modern languages. Variables, functions, looping, and decision statements are all present among other important features. We will discuss these features and how they function in this post.
Variables, Arrays, and Hash Tables
No programming language is useful without the ability to create and manipulate variables. Variables in PowerShell aren’t strongly typed, much like JavaScript. This allows you to repurpose a variable as needed.
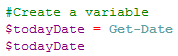
PowerShell variables begin with a dollar sign. A major benefit of this is that variables can be embedded in strings. Instead of string concatenation to get dynamic text from variables (which could cause formatting issues), you can add the variable inline as if it were another static word.
Variables have scope in PowerShell just like in other languages. If a variable is declared inside a code block, it returns null outside of the block. However, if the variable is declared prior to a code block, it can be used inside of it, but a copy of the variable is created in memory. This means if it’s manipulated inside of the block, then the outer variable will remain the original value.

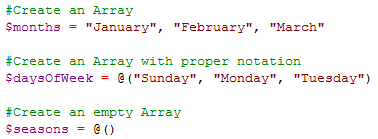
Arrays are also available in PowerShell. Arrays are very simple to create and manipulate. Arrays can be created in any of the three following ways:
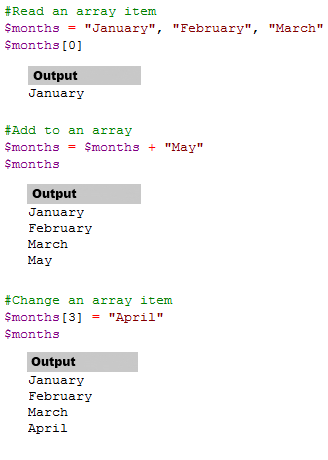
Accessing the array is very familiar. PowerShell arrays use a zero-based index accessor. Using the accessor allows for both read and write functionality.
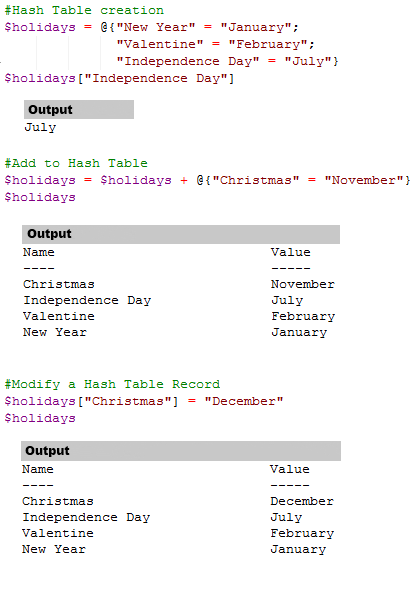
Hash Tables in PowerShell are arrays of name/value pairs (in C#, it’s similar to an array of System.Collections.Generic.KeyValuePair object that uses a string as the key). Instead of a numerical accessor like arrays, the string key is used as the accessor.
Pipelines and *-Object Cmdlets
So we’ve covered the idea of Cmdlets and variables. Pipelines introduce the ability to chain commands together. Chaining becomes quite useful when working with a list of objects. Take, for example, the Get-ChildItem cmdlet. This will return a list of files in the current directory. If you want to get only the files that are Word documents, you need to chain another command to the Get-ChildItem command. A pipeline is declared using the “|” symbol.
In the following example, you’ll see four commands piped together. What this does is get all child items in my AIS Blog folder. The Where-Object cmdlet filters those child items where the file is a Word document. Next, it sorts the items by length, or file size, using the Sort-Object command. Finally, the Format-Table command provides the output using the properties Name and Length. AutoSize uses just enough space to render the file names and then creates the Length column.
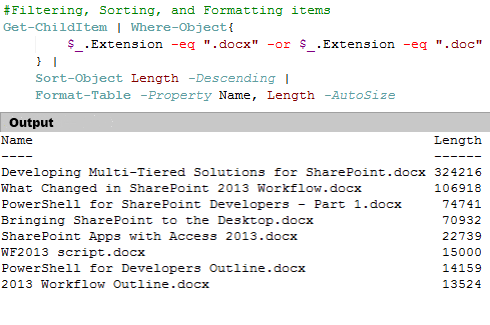
While the Format-Table cmdlet provides a great way to display results, the Where-Object and Sort-Object commands are just a couple of the very useful *-Object cmdlets. There are nine commands that share the Object noun. In addition to the two already mentioned, there are also ForEach-Object and Group-Object. Group-Object will group objects as expected. ForEach-Object, however, will likely become one of the two most-used Object cmdlets you’ll turn to (along with Where-Object). This will let you loop through a collection of objects and affect each object with additional commands inside the block.
For a useful example of ForEach-Object, let’s say you have a bunch of PowerShell script files that you want to email, but your Exchange server blocks PS1 files. You decide to just change them to TXT files, but renaming each item can be a long and tedious process. The script below will take care of it in a matter of milliseconds!
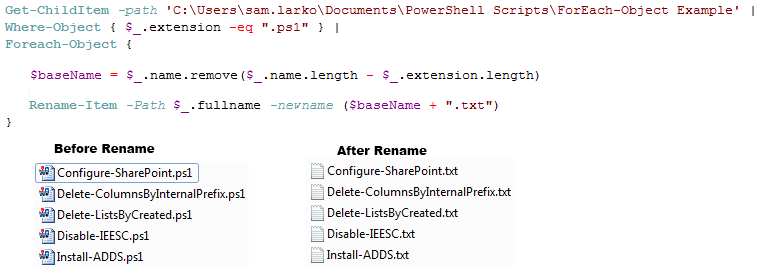
As you can see, it gets child items from a particular path where the file extension equals “.ps1.” Then it loops through each of these objects in the ForEach-Object and removes the file extension, getting the file name. Finally, the item is renamed using the original file name and attaches “.txt” to the end of it.
One more thing to note about these Object cmdlets: You’ll notice that “$_.” Is used inside these blocks. This represents the current item in the loop.
Loops and Decisions
Speaking of loops, other looping structures are available in addition to ForEach-Object. While, Do/While, Until, Do/Until, for, and foreach loops are all available and act much like their C# counterparts. A couple more loop examples will be covered in the Useful Scripts section near the end of this post.
Decision statements make an appearance in the form of If/Else and Switch statements. If statements can use ElseIf statements for decisions requiring more than two options. Switches have a couple of interesting features:
- Array value: A switch can be declared with several values and each value will be evaluated. So if “switch(3,2,4,15)” is the declaration, it evaluates all four comma-delimited numbers against the nested cases.
- String case sensitivity: If you need to evaluate a string value, by default a switch statement is case insensitive. To invoke sensitivity, use “ switch –casesensitive ($string).”
- Wildcard matching: By using the wildcard parameter, the statement can match against single wildcards (question marks) or any-length wildcards (asterisk). The following switch will evaluate true on all three cases:
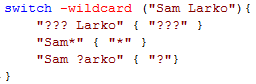
Fig 8 - Switch Wildcard using Single- and Multi-Character Symbols
Functions
PowerShell allows custom functions to be created, just like other languages. Functions give you the option to load blocks of code into a session without executing them. To me, it reminds me of JavaScript, where you can just have code run in a page on load or you can create functions and call it more strategically during page loading or other events. PowerShell functions can accept parameters. Passing parameters can be done explicitly using “-ParameterName” notation, or implicitly using zero-based positioning. “Find-Difference 100 50” would place 100 in the 0 position parameter and the 50 in the 1 position. The following section covers Useful Scripts and all are implemented using functions.
Putting it All Together: Useful Scripts
We’ve covered the basics of PowerShell, so now let’s bring it together in several functions that I’ve put together as part of a master script I’m working on to build out a SharePoint 2013 virtual machine (that’ll be Part Three of this series). I’ve provided a brief description of each here, but you can access the full scripts on my CodePlex project: Useful PowerShell Cmdlets.
Rename-Computer
This utilizes a WMI object to change the name of the computer. It accepts the new computer name and a Boolean to restart the computer or not. This will be part of the VM build script and will register another script to run after the restart.
Disable-IEESC
Don’t you hate it when you set up a new development environment, start up Internet Explorer for the first time, and realize that you forgot to turn off the enhanced security? This script accepts Boolean parameters for both the Admin and User settings, but defaults to true for both.
Set-TimeZone
Another minor change that you typically make on machines — changing the time zone — not only matters for VMs, but also for your host computer if you move or travel frequently. The parameter is the time zone name. There is a page on the CodePlex site where all the time zones are listed.
Register-Computer
This one I borrowed from James O’Neill as it’s a rather complex function that I haven’t had the time to break down. It’s not currently included in the script file, but you can find it in his post “How to Activate Windows from a script (even remotely).” This accepts the Product Key, with hyphens, and the Server/PC name.
Create-CodeFiles
On a different project, I needed to create several classes that were very similar in base code. While I could have created all 37 classes by hand and then copied the common code into each of them, that would have taken quite some time. Instead, I wrote this script, which uses a text file with the class/file names listed one per line. Provide a path for where the files should go as well as the text file as parameters. The common code is inside of the function at this time, so when you want to add your code in it, you’ll need to modify the function, specifically the $fileContents variable. As you can see from the sample, I used $fileName for the class name and constructor. It will be replaced with the appropriate text as mentioned in the Variables section above.
Conclusion
This post is just a quick introduction to PowerShell. There’s much more functionality that isn’t covered here, but this should give you the foundation needed to start using PowerShell in your development environments to simply some timely processes.
The next part in this series will introduce you to PowerShell for SharePoint. Manipulating lists, sites and other SharePoint objects will be covered. The final part of the series will highlight parts of a SharePoint 2013 VM script not already covered in the first two posts.
PowerShell is a great tool that developers should embrace. Not only will they find ways to improve productivity through automation, but they will also learn a few things about administration as well. While that may not be a long-term interest, understanding how that side of IT works will help improve cross-team relationships as developers can provide scripts to deploy or modify their applications, thus alleviating IT Pros of the added work of writing the scripts.